Manage item import
You can enter or copy items into an Excel list and format them so that they are imported into the Hypersoft item master.
The item master data to be imported must be entered in the Excel spreadsheet Item.xls provided by Hypersoft. This table contains the required data fields and a macro for import support.
The template for this item can be found at [C:]\Hypers-!\Gastro-!\Ascii\Item.xls .
After the Excel spreadsheet has been filled in, the file must be converted into a text file, this text file is then used for the item import. The import file is named Item.txt The format of the file is Text - (Tabstop-separated) (*.txt).
Extension for importing stocks and creating storage areas and inserting items into points of sale. A new Excel spreadsheet and documentation for the survey follows. About the new tables:
1) the first 5 "special features" recorded
2) Stocks recorded ( added )
3) Storage areas for the main warehouse / VKS created and saved
4) The areas assigned to the respective articles
5) Items added to points of sale ( only if something is entered in the stock column ( 0 is also valid ) )
Any number of outlets can be used.
The table can be extended at any time and read in again.
Existing data is not "destroyed" but supplemented
From here on, continue with the old documentation:
Technical details of the Excel spreadsheet...
The program considers two files in the folder:
[C:]\Hypers-!\Gastro-!\ASCII
The Item.xls is the Excel template and is used for input and administration. The Item.txt is the actual import file and is a text file where the columns are separated by tab stops.
You create the required item.txt file by saving the opened item.xls with the command Save as... in the new format Text (Tabstop-separated) (*.txt).
You store this item.txt file in the following folder:
[C:]\Hypers-!\Gastro-!\Ascii
Structure of the Item Import File
Import format: Text file, German Windows character set Codepage 1252, no UNICODE
All entries as text, without quotation marks or quotation marks. Numbers without thousands separation optionally decimal values with point or comma ( both are possible ). All fields/columns separated by TABULATOR, all rows are CRLF terminated. All fields except item name may remain empty.
Fixed format: 24 columns separated by tabulator
Variable format:
During import, so-called units are generated. Here there is the baseunit . This unit indicates how the item is managed in merchandise management.
There is also the ordervariant . This indicates the form in which the item is purchased. Both units must be identified by a 3-digit abbreviation ( field 14/15 ) or by their unique full name ( field 16/20 ).
Details about the columns as follows:
Cash register-related data...
01 Item number ( or empty for automatic allocation )
02 Item name
03 Bontext1 ( or empty for automatic entry )
04 Bontext2 ( or empty for automatic entry )
05 Key text ( or empty for automatic entry )
06 VK price ( sales price or empty )
07 sales tax rate ( 0-5 or empty,0=display,EMPTY=1)
08 Main group ( Name of the main group, e.g. "Food" or empty )
09 Material group ( Name of the material group, e.g. "Meat" or empty)
10 Subgroup ( Name of the main group, e.g. "Roasted" or empty)
11 Recipe (for recipes set to "1", otherwise leave blank)
12 Saleable ("1" if item is sold at the point of sale. )13 Barcode ( EAN8/EAN13/UPCA or empty)
Stock Management Data...
14 3-digit short name Base unit (e.g. "FL7" , mandatory for CONTROLLER )
15 3-digit short name Ordering unit (e.g. "KAR" , mandatory for CONTROLLER )
16 Designation of the basic unit ( e.g. 0,7L bottle )
17 Quantity of a base unit ( z. Example: 0.7 )
18 Name of the quantity ( e.g.: L for liters )
Data for ordering...
19 Supplier ( No. or Name Supplier or Name )
20 Designation of the order unit ( e.g. "Carton" )
21 Contents of the order unit ( z. Example: "6" - results in "carton with 6" )
22 Order no. at the supplier ( Item-No. of the supplier )
23 Net price of an order unit ( Optional, if price of a base unit is specified )
24 Net price of a base unit ( Optional, if price of an order unit is specified)
25 EK-MWST set ( 1/2 or empty)
Several price levels...
Several price levels can be entered. The individual levels must be separated with the pipe symbol ' | '. If a level does not exist, the price of the first level is used. The column for the VAT. can optionally be separated with |, these are the tax rates IH / AH.
Execute item import
Item import allows you to start with Hypersoft by importing an item master for the POS system from another system. Repeated imports are also possible, as existing items can be updated and missing ones added. For the controller, basic items can, for example, be imported from suppliers' order lists. You can also use the Excel table as a template to create items. In addition, you can update items using the barcodes.
In the Manage from Database and Tools section, select the Item Importprogram.

The option Set free item number is still in preparation.
The order for importing item data...
- Edit template in Excel. Keep in mind that Excel must be installed for this, which is usually not the case on POS terminals.
- Insert the data into Excel.
- Import import file (automatically after closing Excel).
- Verify the import file in the list.
- Press Import item.
- Press Exit. The item master starts and displays the data.
| Element / Switch | Function / Description |
|---|---|
| Editing a Template in Excel |
Starts the Excel table for editing. The column headings provide information about the field contents.
The Excel table contains a macro. Pressing CTRL+E saves the current file and additionally creates the import file in the format "Text ( Tabstop-separated )". If macros are deactivated in Excel, the data must be saved manually and then saved in the appropriate format with "Save as". This button is only available if a corresponding file exists. |
| Import import file | Reads the file and displays it in the table. This can be used for previewing. Certain errors can thus be detected before the actual import. |
| Import item |
Imports the imported import file into the item master. After importing, this button remains deactivated. If errors occurred in the data, the program must be restarted for a new import. |
| Status (list) |
In the left list of the dialog you get information. For example, about the existence of a valid file, or about the history of the import.
If errors are detected during import, they are listed in detail at the end of the list. |


Editing the Excel table
The items are imported as base items without other specifications. However, a 1 in the Recipe column imports the line as a recipe (always without base item).
The items can also be imported as sales items by entering a 1 in the sales item column for the corresponding items. You have at least two possibilities to edit the Excel table. For editing you need the program MS Excel from Microsoft (or an equivalent):
- You open the file x:\Hypers-!\Gastro-!\Ascii\artikel.xls with your Excel program.
- You start the Excel spreadsheet directly from the item import (you confirm the question Activate macros positively).
All new items are always added. There can be no backwards conversion to Excel and, for example, to process data there.
The import file must be located on the local drive in the Hypersoft directory:
Example: C:\Hypers-!\Gastro-!\ASCII\ and must have BARCODE.TXT
The file is a TABSTOP separated text file. The first line is interpreted as a heading and is not imported. Each line consists of 4 fields with the following structure:
BARCODE Receipt text1 Receipt text2 PRICE
4002822013639 Media Star Guard 12,5L 84,60 €
4002822005948 Media Star 11,75 l 54,20 €
4002822015480 Media Star 12.5 L 58.60 €
4002822008994 Media Star B3 1,175L 7,70 €
4002822008994 Media Star B3 4.7L 24.00 €
The currency, here "€" is ignored.
Errors in the import table are displayed and the import is denied. For example, duplicate barcodes are displayed in the right table.
Details about the buttons and elements of item update via barcode:
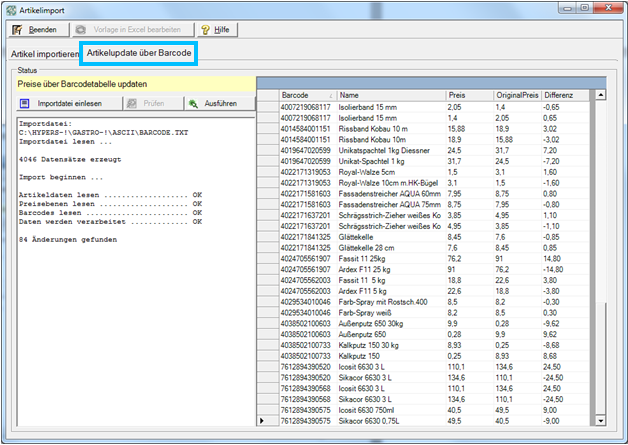
| Element / Switch | Function / Description |
|---|---|
| Import import file | Reads the file and displays it in the table. This can be used for previewing. Certain errors can thus be detected before the actual import. |
| checking | When you check, the changes are determined and displayed. |
| Table (Preview) | If there are price changes, only the changes are displayed in the right table and Execute is activated. |
| Execute | The "Execute" button is activated and saves the changes in the item master. The update always takes place on the 1st price level. |
Back to the overarching topic: Import: item master Data