Connect vending machines with Diva and Hypersoft
Note: Cost centre cards automatically have a virtual credit of 100,- so that they can be used at all machines.
Creating a Care Unit in the POS System
In order to be able to network any type of vending machine within a POS system with the aid of the DIVA LEX 4500 VM RFID system and the central data crawler, each individual vending machine - or the DIVA LEX 4500 VM installed in it - must be created in the station management as a station type "Vending Manchine". In particular, the IP address entered in the DIVA LEX 4500 VM and the serial number printed on the outside of this IP address must be entered. For the serial number, the leading "0" must also be adopted. Following the creation and setting of each station, each station must be set up as a subsystem.

Enter station number in DIVA
In addition to various other settings, the station number selected in the station management for a vending machine must be entered in the corresponding DIVA LEX4500 VM vending machine modules. For this purpose, programming can be carried out with the aid of a network interface via a PC or with the aid of a manual programming device.

Figure 1: Hand Programmer for the DIVA RFID System
Set up points of sale
In order to be able to transfer the sales data from individual vending machines into the journal management of the POS system, these must be created as sales points within the master information. If you do not use stock management, you can select a point of sale without inventory management here. Alternatively, you can also choose a point of sale with inventory management, which, however, must then be licensed.

Figure 2: A vending machine is created as a point of sale without inventory management.
Assigning price lines from vending machines to items
After a point of sale has been created for each vending machine created in the station management, the price lines of the vending machines must be linked with corresponding items from the Hypersoft item master. Via this link, the Hypersoft system can transfer the sales data of the individual vending machines to the reporting system.
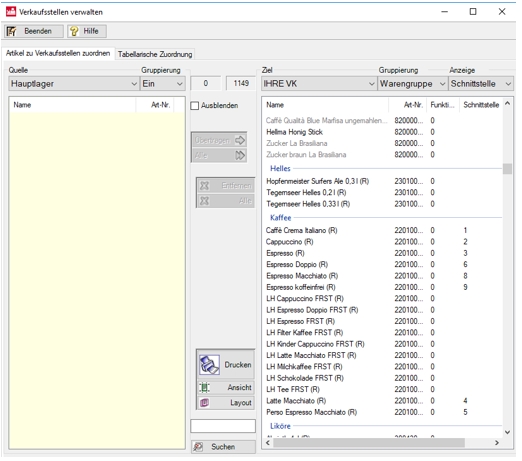

Figure 3: If an item is assigned to a point of sale, the price line is entered for this item via the input field "Interface", via which the corresponding product is sold in the vending machine. By using a comma, several price lines can be assigned to an item.

In many vending machines, product sales are controlled by so-called price lines. Prices, products and selection keys, which the guest serves, are each assigned to at least one price line. If the guest then selects e.g. the selection key 1, the sales transaction for the corresponding product is started. As a rule, after pressing a selection key, the guest is shown the price set in the vending machine. The customer can then choose a payment method (e.g. cash or RFID card) according to the options offered and pay the required amount. The machine then transfers the price line selected by the guest via the selection button to the connected payment system (machine module), which can release the execution of the sales transaction after checking the credit or credit situation. After release and successful completion of the sales transaction, the transaction data is transferred by the vending machine module to the Hypersoft system via the network interface using the data crawler. Based on the price line transferred by the vending machine module, the sold product is now assigned to an item number from the Hypersoft item master. It must therefore be ensured that the price lines set correspond to the same product or item both in the point of sale management, the setting of the vending machine module and in the vending machine itself.
Set Up Datacrawler (SPIDER)
The Datacrawler is a Hypersoft software module which is used for communication and data exchange between Hypersoft software solutions and DIVA LEX 4500 VM machine modules installed in vending machines. The Datacrawler can query and transaction transaction data of individual machines and/or the status of individual RFID media used at these machines in real time. The Hypersoft Datacrawler uses a third-party software element for this purpose. This software element called "SPIDER" is installed on the central component (server, control PC, main cash register) of the system group in accordance with the intended system landscape in addition to the Hypersoft installation. In order to ensure that the correct version of SPIDER is used for the respective installation, SPIDER is not part of the Hypersoft installation package, but is provided by Hypersoft for each corresponding project together with further important project data.
In order for the Hypersoft Datacrawler to access SPIDER correctly, it must be installed on the central part of the system group in the main installation folder of the Hypersoft installation. Before this, however, the ports must be configured that can exchange DIVA LEX 4500 VM machine modules with SPIDER data.
Installation drive:\Hypers-!\Spider

SPIDER is configured using an INI file (Spider.ini). The software takes its basic settings from this during the start procedure. The standard INI file must be exchanged manually after installing SPIDER so that the project-specific settings required for SPIDER can be adopted. Hypersoft provides the correct INI file for each project. This must be stored in the following folder. Any existing files must be overwritten.
Installation drive:\Programdata\Hug-Witchi\Spider [Current Version Number]

Note: This folder may be "hidden" and hidden by Windows on your system. He can therefore not be seen by you. To do this, activate the setting "Hidden elements" in the "View" submenu of your Explorer.
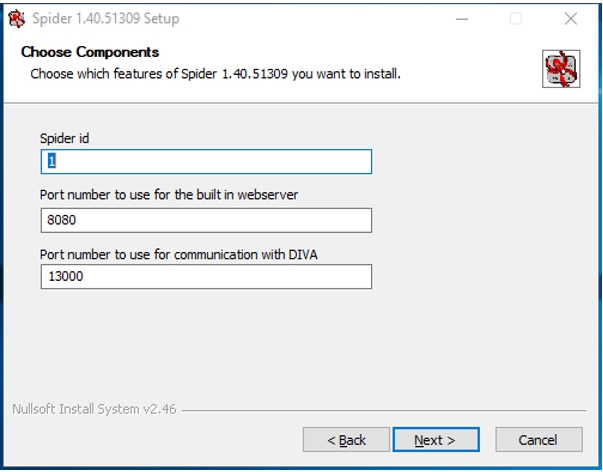
Activate Spider
In order to use SPIDER permanently, the software must be unlocked via a special license. Otherwise the initial activation of the software expires after 30 days. The license for Spider is bound to a specific computer and is permanently connected to the system via the so-called MAC address. Therefore, make sure that the MAC address does not change after the activation of the software by a license. In case of a planned device replacement or a new installation, please contact Hypersoft Support beforehand.
The license is created by Hypersoft for you in the form of a license file. For this you need a so called installation code. This is specific to each system, as described above, based on the individual MAC address of each computer. It can therefore only be queried on the computer or within the network for which SPIDER was installed. The installation code can be retrieved using a browser by calling the service (IP address: 127.0.0.1:8080).

After you have requested the installation code, please inform your Hypersoft support. You will then receive a valid license file. This must be stored in the following folder. Any existing files must be overwritten.
Installation drive:\Program data\Hug-Witschi\Spider

Note: This folder may be "hidden" and hidden by Windows on your system. He can therefore not be seen by you. To do this, activate the setting "Hidden elements" in the "View" submenu of your Explorer.
Setting Authorizations for SPIDER
In order for SPIDER to work correctly within the Hypersoft software solution, it is imperative that it be set up to start with a local system account after installation under Control Panel Administration.

Setting up the DIVA DeDesk reader
In order to use RFID media at both vending machines and cash registers, the cash registers must be equipped with a compatible USB reader. In combination with the DIVA LEX 4500 VM, Hypersoft uses the DIVA DeDesk USB reader at the cash registers. In order for this reader to be recognized by the Hypersoft software solution and for the project-specific RFID media to be read and written, a third-party software element is required. This software element has been integrated into the IF_82 interface and comes with the standard Hypersoft installation package. However, the IF_82 interface must be licensed and configured for each project due to the specific properties of all projects. With the licensing the complete package (software) is coupled with the computer on which it is located. In case of a planned device replacement or a new installation, please contact Hypersoft Support beforehand.
Installing the FTDI Driver
The DIVA DeDesk-USB reader requires a standard FTDI driver for operation. Please contact Hypersoft Support, who can provide this support if necessary.
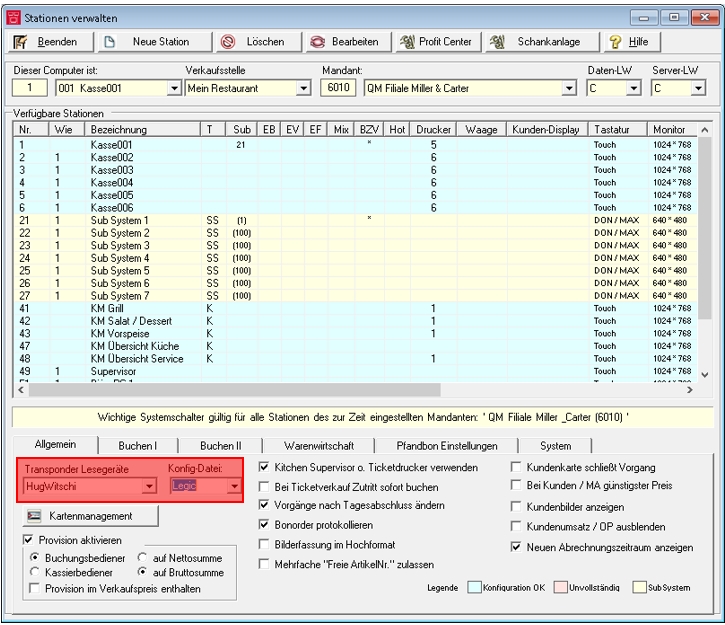
Configuring Readers in Station Management
The DeDesk USB reader must be set on the device it is connected to in Station Management. Select the type "HugWitchi" in the selection field for transponder readers. Then please select the standard according to which RFID media are read and written in the respective project.
Configuring and activating IF_82
Hypersoft Support provides you with a data and program collection for the installation of your individual project. This contains all files and programs required for your project. One of these programs is used to activate and configure the IF_82 interface.
The configuration enables the IF_82 interface to control the DIVA DeDesk USB reader programmed for your individual project and to interpret its transmitted data. The configuration is done by reading in a so-called configuration file. This will be provided by Hypersoft Support. The configuration file is a file created for your specific project and prepares the IF_82 interface for use within your project. Never use the configuration file of a project to configure an IF_82 interface for another project.
With the activation the license file necessary for the use of the IF_82 interface is created, which must be copied afterwards into a program folder intended for it. To create the license file for the IF_82 interface, an activation card is required. Activation cards are created by Hypersoft Support and can be used for a specified number of stations with DIVA DeDesk USB readers. Each station with such a reader must have the IF_82 interface, which in turn must be activated via the license file. The Activation Card therefore has the ability to generate exactly the number of license files planned for your individual project in advance.
The following transaction must be carried out.
1. place the configuration and activation program (TagDiverDemo) in a folder you have permanent access to
2. start the configuration and activation program (TagDiverDemo) in this folder
3.load the configuration file (conf_xxxx.tdc). Use the Options drop-down menu to do this.
Select the appropriate model of the reader under Reader parameters (Hug-Witchi DeDesk USB OEM).
5. select the COM port to which the DeDesk USB reader is connected
6. make sure that the baud rate is 19200
7. press now the button "OpenReader".
8. now place the activation card on the reader
9. press now the button "SelectCard".
10) The configuration and activation program (TagDiverDemo) now creates the license file. These can be found in the same folder from which you started the program.
11. copy the license file (TagDIVER.act) to the following directory
Installation drive:\Hypers-!\Cashier-!\


Setting up the DIVA LEX 4500 VM automatic machine module
The configuration of the vending machine modules to be installed in your vending machines (hot beverage vending machines, cold beverage vending machines, vending and snack machines, reverse vending machines, revaluers, etc.) requires close coordination between you and Hypersoft Support. There is a large number of vending machines available on the market, the functionality of which can differ fundamentally. Even supposed industry standards do not offer sufficient security to be able to assess the functionality of your individual machine from a distance. In order to ensure the simplest possible installation of a vending machine module in your vending machines, please provide us with the following information as early as possible at the start of the project:
1. manufacturer of every single machine
2nd series/model/type/variant of each machine
3rd year of construction of each machine
4. technical contact person for every single machine
- Your vending machine dealer
- Your operator/caterer/operator of the machines
- Your service company for vending machines
5. installation situation (free-standing, hanging, clad, etc.) of each individual machine
6. meaningful pictures of every single machine
7. manufacturers of the payment systems (coin transactioning, banknote transactioning, EC/credit card readers, RFID system) used in each individual vending machine
8. series/model/type/variant of payment systems used in each machine
9. products sold and their prices in each individual machine
10. price line configuration for every single vending machine
The configuration of the DIVA LEX 4500 VM vending machine modules is project work that must be commissioned and must be invoiced on a time and material basis. The more meaningful your information is in the run-up to the project, the lower the project expenditure will be.
Back to the overarching topic: DIVA Box and Spider Network extension