General operating elements
A program displays different elements in a dialog that you are to operate. Here we would like to give you details about the possibilities of these elements.
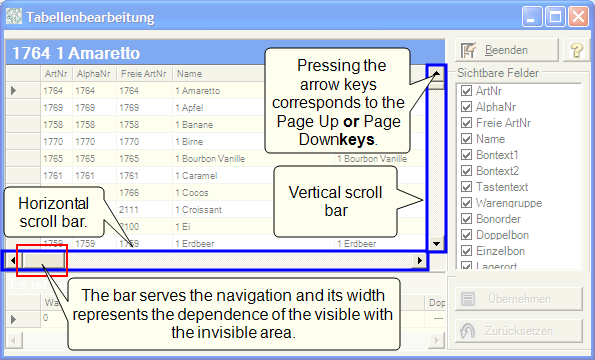
The scroll bar allows you to move screen contents.
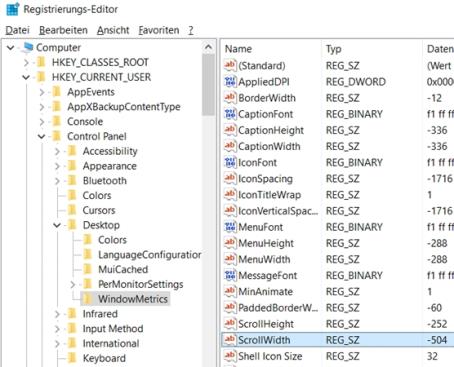
If you use scroll bars in touchscreen programs, you can increase their width to better control them. This then applies to all programs at this station.
Example for Windows 10 (for administrators/professional users only). Make sure that all programs to be executed are compatible with this setting):
- Start the Registry Editor.
- Go to the following subfolders:
HKEY_CURRENT_USER
control panel
desktop
WindowMetrics
- Open key "ScrollWidth" (REG_SZ)
- Enter the size in pixels or twips as the character string. For example: "-540" (a twip is one twentieth of a pixel and is entered with a negative sign).
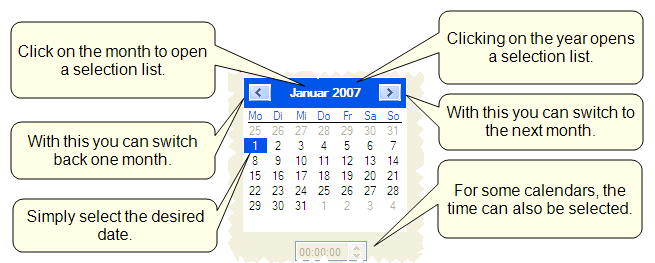
This calendar offers you the possibility to quickly reach any desired date with just a few actions.
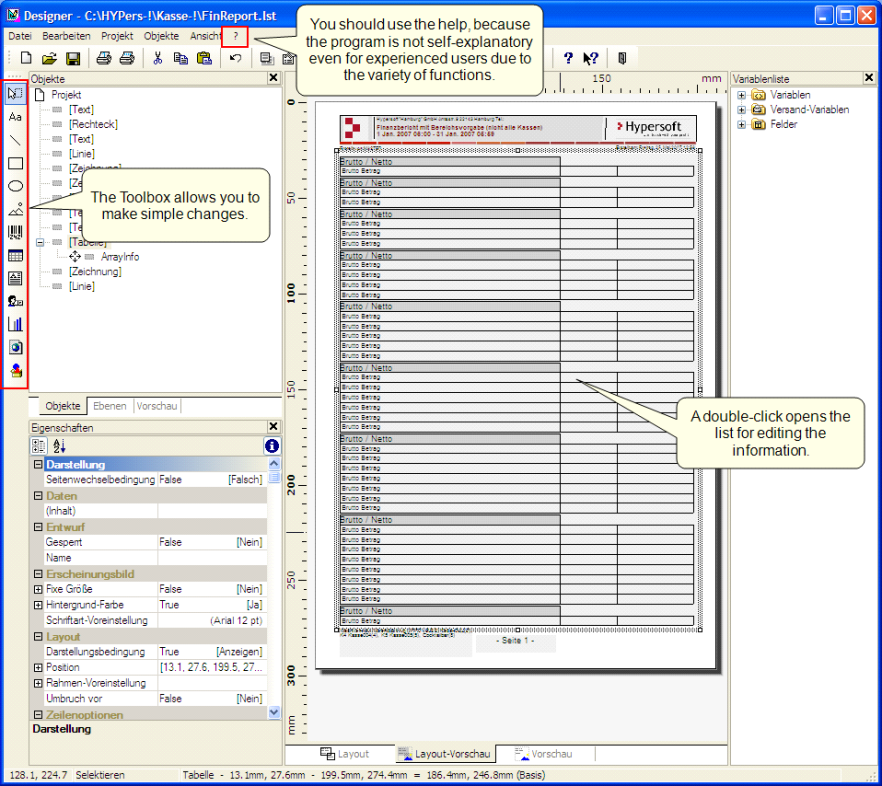
Hypersoft programs use the List & Label Layouter. The layout functions are very extensive. The created lists can be previewed via the view button.
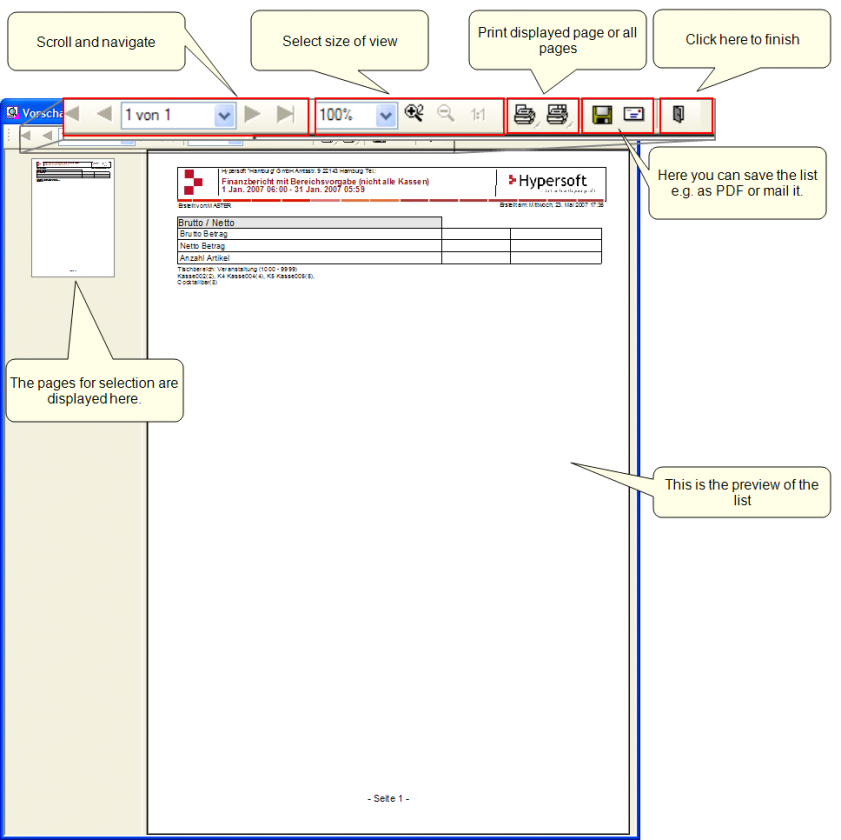
The individual print pages are displayed in the view. The non-printable edges of a page are displayed hatched.
The view contains a toolbar that controls various functions. As in the List & Label Designer window, the toolbar can be docked to any of the four sides of the window and can also be pulled out as an independent window.
You can control the selection of the current page using the arrow keys or the selection list. The zoom selection list, the magnifiers and the 1:1 tool represent different zoom levels with which you can also make fine details visible in the printout. You can also zoom in on details by dragging the mouse in the preview window with the left mouse button held down over the area you want to zoom in on.
The printbuttons allow you to print the currently displayed print page individually or completely as shown in the preview (copies are not taken into account in the preview). If you click with the right mouse button on the print button, the printer selection dialog is displayed first.
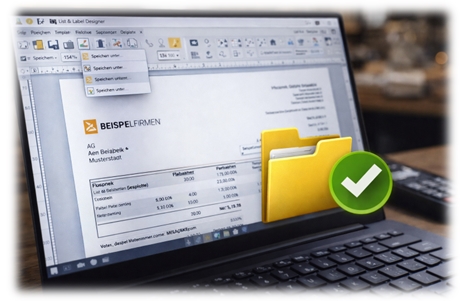
Via Save as you can save the current preview file with the extension .LL. The preview file can also be saved in various other formats, such as the data exchange format PDF. Depending on the selected format, further settings are available via the Options button.
Please note that when saving in a different format, not all information can always be transferred and check this result for yourself.
A click on Send to sends the current preview file (*.LL) e.g. via a MAPI mail client set up on the system to any mail recipient. The List & Label Viewer, which is included with the parent product, is used to view the preview file. Printing the preview file is also possible with the List & Label Viewer.
Exit the preview to exit the preview window and return to your application. The displayed print preview is not printed on the printer, but discarded.
When you access the Windows printers with the Hypersoft Suite, you get a dialog with additional options.
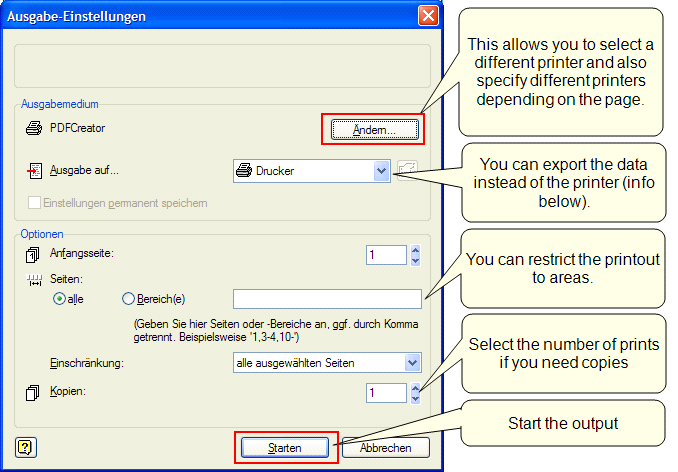
When changing the printer selection, you also have the option of selecting a different printer for the first page than for the subsequent pages.

The export from the printer selection dialog is a function of the printer control. This is a program support of the integrated 3rd Party Layouter from List& Label. This is not a Hypersoft Standard export, as provided elsewhere in the Hypersoft Suite, but a standard procedure within the List & Label programme. You can use these export formats, but do not assume that we can simply adapt them in case they do not meet your requirements. In addition, they must be prepared for the fact that the formats may change in the future. This may be due to Hypersoft, List & Label or Windows updates.
Export format PDF
The PDF export provides you with handy small files in no time at all and offers up to 128-bit encryption. You can allow or forbid printing, editing and copying individually and embed fonts, or you can choose to only embed the characters used to optimize the file size.
Export format Excel
Optionally as pure data export - the table data runs into a sheet and you process a regular Excel project - or with full layout transfer - the optics are reproduced as detailed as possible in the Excel file. Completely without OLE mechanisms, the Excel export makes you independent of an Excel installation. If you wish, create one worksheet per page, e.g. "Item list p. 1/2/3/...".
Export format HTML...
Here Cascading Style Sheet (CSS) tags are used for table frames and thus also optically beautiful results are obtained, especially if you use individual frame formatting. MHTML In contrast to HTML, the result is a single file that contains all the required images in addition to the data.
Export format Text
Either purely data-oriented and thus for the creation of almost any CSV files (data conversion!) or layout-oriented, e.g. for needle/continuous feed printers.
Other export formats...
-
XLSX
- XML
- JPEG
- BMP
- EMF
- TTY
If there are problems with printing, this is often due to defective printer drivers, because the manufacturers do not have enough time to test their drivers. You can usually obtain updates to the enclosed drivers from the homepage of the manufacturer of your Windows printer. You can also simply use a driver that came with your Windows operating system. If your printer is not listed in the driver selection, simply select a predecessor. In most cases, you only do without functions that you do not need.
The Designer allows you to edit the template file that is used to output lists and documents. For detailed information, use the Designer documentation.
Best practice: Using your own layouts safely with the List & Label Designer
The List & Label Designer gives you the freedom to customise forms, receipts and lists exactly to your business requirements. Customised logos, texts, sorting or additional information can be implemented in a targeted manner - a real added value for everyday life, accounting and external presentation.
At the same time, it is important to understand how individual layouts and system updates interact.
Secure your own layouts - before updates take effect
In the course of updates, it may be necessary to adapt or renew existing standard layouts - for example due to new legal requirements, additional variables or technical developments. In such cases, customised layouts may be overwritten.
As Hypersoft does not currently provide an automatic procedure for merging individual changes with new standard layouts, we strongly recommend the following procedure:
Save your own layouts separately.
This means that you can quickly import them again after an update and - if necessary - adapt them specifically to new framework conditions. This saves time, avoids surprises and ensures that your individual design is retained.
Practical tip: Avoid printing problems at the edges
Printers sometimes differ considerably in their non-printable edge areas. Despite careful consideration of these differences in the Hypersoft standard layouts, it can happen that content is cut off or not completely output in very narrow or unusually designed forms.
Proven solution:
Open the affected layout in the List & Label Designer, select all elements with Ctrl + A and move them slightly inwards using the arrow keys. A small correction is often enough to achieve a clean print image on all devices.
Conclusion
The List & Label Designer is a powerful tool for customised layouts - provided you use it consciously.
With a simple backup strategy and a little attention to peripheral areas, you can combine maximum design freedom with the necessary update security.
If you like, we can also turn it into a compact info box ("Short & important") or a warning box - stylistically, this fits very well here.
At some points in the program we offer a simple document layout for the front office printers (standard POS thermal printers). You have direct access to the control characters and can change them by overwriting them. As a reference we offer you the basic variables.
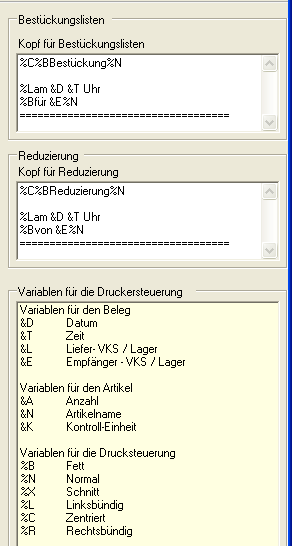
You change the layouts of these documents by changing the texts and variables in the white fields.
Some programs support the setup of labels with barcodes. A dialogue is available for this, with which you can select elements and place these elements with the mouse where they should be printed. The position of the barcode is fixed in most programs.
Setting for label printing...
On the left side select the elements. In the preview (centre) you can place and move the elements.
If you select the Attachments option, queries and free attachments are printed on the label. Since only one line is provided for this purpose, all attachments (maximum 8) are grouped together. However, it is always truncated after the 64th character, so you may have to use abbreviations for the attachments. You can, for example, use item text 2 for abbreviations. You can also select the attachments to be printed (right).
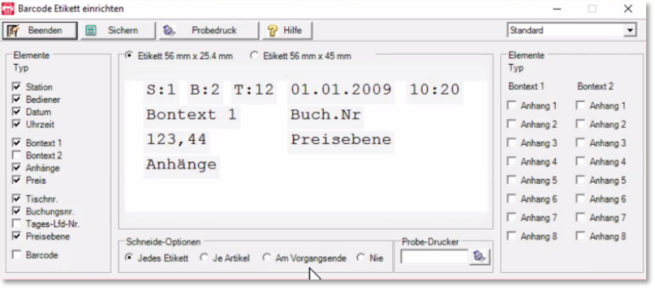
As a cutting option, you can have Cut each label individually or Cut per item. With the setting Per item you determine that identical items are printed on individual labels without cutting. Select At the end of the operationto keep all labels of an order together. Never cut never.
For the test print select the desired printer and press the printer symbol.
Barcode check and automatic format correction...
The system checks the 8-, 12- and 13-digit codes for validity when printing. If this is not the case, the format CODE128 is printed.
Back to the overarching topic: MCP Workplaces