Configure pick-up monitor
Parts in this document are for trained support only. The software is partly set via configuration files, the JSON files can be edited by a standard editor. A misconfiguration leads to a system that functions incorrectly or not at all.
Setup in Terminal Commander Autostart
For Terminal Commander Autostart, enter the installation path. This is in the standard:
C:\Program Files (x86)\Mortega Hypersoft\Digital Signage HS Web BL Connector\ DSPickUp.HypersoftWebBLConnector.exe
Configuration of the name list on the Hypersoft POS...
Generally, the daily transaction numbers are used to display the transactions. However, names can also be displayed (superhero function). The following must be set for this:
-
No start value must be specified for the desired functionality.
-
The check mark for "Use name list" must be set.
-
The list of names must contain names
-
Bon Order individual (tab Book I ) must be activated (and taken into account on the keyboard for the closing keys)
The Hypersoft system must then be restarted (main computer and cash registers).
Only transactions of the current theoretical end-of-day are output.
For the remaining configuration, https://docs.abholmonitor.de serves as the basis
Configuration of the HS WebBL Connector
Where is the configuration?
At startup, the application creates the Config folder in the installation path. The folder receives the default configurations set by the application.
apiConfig.json:
These are settings for connecting to the entire collection monitor ecosystem.
-
BaseAddress: Base address or special endpoint of the collection monitor API. Must be specified as a string in the form "http://xxx.xxx.xxx.xxx" (or HTTPS).
-
ApiKey: An authorisation key that may be required to access the API.
-
LocationId: The ID of the location created in the online portal.
Example:
{
"ApiConfig":
{
"BaseAddress": "https://portal.abholmonitor.de", // set by the installer
"ApiKey": "{GEHEIMER_SCHLUESSEL}", // set by the installer
"LocationId": "{STANDORT_ID}" // set by the installer
}
}
hsWebBlConfig.json
These are settings for the connection to the Hypersoft WEB BL interface.
-
Ip is the IP address of the machine on which the HS Web BL service is running. Values in the form "xxx.xxx.xxx.xxx" or "localhost".
-
Company and SerialNumber is the vendor authentication for the interface.
-
CallIntervalSeconds is an integer and forms the time span after which the interface is periodically called. The default value is 10. It should not and cannot fall below 5.
-
PickUpStations is a comma-separated string with station numbers according to which the transactions are filtered. For example, "1,3" for stations 1 and 3. If the value is zero or the field is completely missing, no filtering takes place.
-
PickUpTables is a comma-separated string with table numbers according to which the transactions are filtered. For example, "300" for special collection table 300. If the value is zero or the field is completely missing, no filtering takes place.
-
IgnoreArticleId is the ID of a filter article defined in the POS. If this filter item is present in a transaction, the entire transaction is not sent to the API and is ignored. If the value is zero or the field is completely missing, no filtering takes place.
-
SendSumZero: The customer can set up the configuration so that transactions are sent even if they add up to zero.
-
DesiredOrderState: A new operation has the "Open" state by default. The customer can set up the configuration so that processes are created with a different status, e.g. "In preparation" (InProgress). This means that the guest receives feedback more quickly on site. Example:
{
"HsWebBlConfig":
{
"Ip": "localhost", // set by the installer
"Company": "{VENDOR_NAME}", // set by the installer
"SerialNumber": "{VENDOR_SERIAL}", // set by the installer
"CallIntervalSeconds": 10, // Query every 10 seconds
"PickUpStation": "1,2", // Stations 1 and 2
"PickUpTables": null, // No filter -> all tables
"IgnoreArticleId": "999",
"SendSumZero": true, // Display, although turnover 0
"DesiredOrderState" : "InProgress" // Order goes directly to preparation
}
}
itemDictionary.json
This is a simple translation table, or dictionary, for article names. Each article name is a key and the overwriting value is the value.
Example:
{
"Items":
{
"BH" : "Backhähnchen", // Article name "BH" is changed to "Backhähnchen"
"K" : "extra garlic",
"Far too long description" : "etc."
}
}
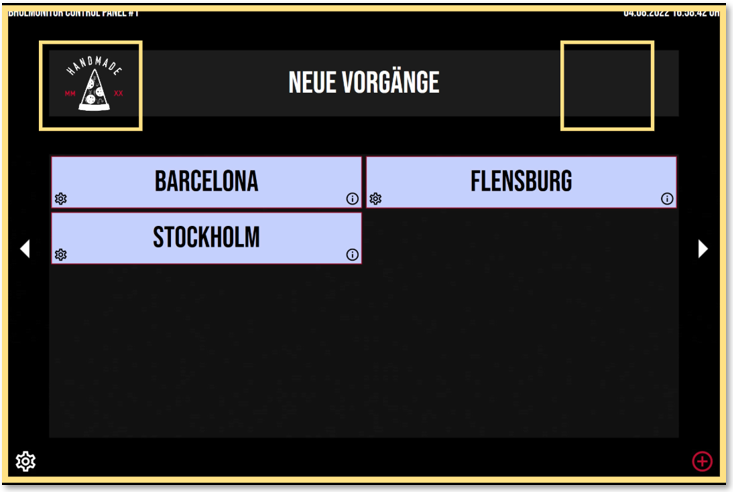
Configuration of the collection monitor handheld / ControlPanel
At startup, the application creates the Config folder in the installation path. The folder receives the default configurations set by the application.
Which resources can be used?
All resources can be stored in the Resources folder in the installation path.
-
Resources/Background: Background image of the tablet
-
Resources/Logos/Left: Logo left
-
Resources/Logos/Right: Logo right
-
Resources/Fonts: Font used in TTF format
All other settings can be changed via dialogues in the application. The application must then be restarted.
Where is the configuration?
At startup, the application creates the Config folder in the installation path. The folder receives the default configurations set by the application.
apiConfig.json:
These are settings for connecting to the entire collection monitor ecosystem.
• BaseAddress: Base address or special endpoint of the collection monitor API. Must be specified as a string in the form "http://xxx.xxx.xxx.xxx" (or HTTPS).
• ApiKey: An authorisation key that may be required to access the API.
• LocationId: The ID of the location created in the online portal.
Example:
{
"ApiConfig":
{
"BaseAddress": "https://portal.abholmonitor.de", // set by the installer
"ApiKey": "{GEHEIMER_SCHLUESSEL}", // set by the installer
"LocationId": "{STANDORT_ID}" // set by the installer
}
}
automationConfig.json
These are the settings for the automated behaviour of the application.
• OrderingTimeOffsetSeconds: (WIP) This serves as a buffer value for the lead time of pre-orders. If the time of the scheduled collection is later than the current time + buffer in seconds, the order is displayed with time information.
• AutomaticSendNewOrderToPreparation: If set to true, new operations are automatically sent to preparation after seconds have elapsed in AutomaticSendNewOrderToPreparationSeconds.
• AutomaticSendNewOrderToPreparationSeconds: Threshold value in seconds to automatically send new operations to preparation.
• NotPickedUpWarningAfterSeconds: (WIP) Threshold value in seconds for flashing processes that have not yet been picked up.
• AutomaticSendToPickedUp: If set to true, then processes ready for collection are automatically completed after seconds have elapsed in AutomaticSendToPickedUpSeconds.
• AutomaticSendToPickedUpSeconds: Threshold value in seconds to automatically complete processes ready for collection.
Example:
{
"OrderingTimeOffsetSeconds": 840,
"AutomaticSendNewOrderToPreparation": true,
"AutomaticSendNewOrderToPreparationSeconds": 30,
"NotPickedUpWarningAfterSeconds": 120,
"AutomaticSendToPickedUp": true,
"AutomaticSendToPickedUpSeconds": 130
}
generalDesign.json
These are general visual adjustments.
• TabletName: Name of the tablet, is displayed at the top left
• FontName: The font used in the application in TTF format. The name of the TTF file should match the name of the font.
• BaseFontColor: Base font colour
• SuccessColor: Font colour of successful messages (not relevant)
• FailColor: Font colour of error messages (not relevant) Example:
{
"TabletName": "Control Panel #1",
"FontName": "./#Bebas Neue",
"BaseFontColour": "#ffffff",
"SuccessColor": "#56cc50",
"FailColor": "#e5254e"
}
controlPanelDesign.json
These are visual adjustments
• HighlightColor: Colour of the add order icon
• FontColor: Font colour
• FillColor: Fill colour of the area
• BorderWidth: Border width
• BorderColor: Frame colour
• CornerRadius: Corner radius example:
{
"HighlightColor": "#bf0c30",
"FontColor": "#50ffffffff",
"FillColor": "#503e3e3e",
"BorderWidth": 0,
"BorderColor": "#00000000",
"CornerRadius": 0
}
orderBoxDesign.json
These are visual adjustments to the process box.
Example:
{
"FontColor": "#1d1d1d",
"FillColor": "#00000000",
"BorderWidth": 2,
"BorderColor": "#cbae89",
"CornerRadius": 0
}
stateColors.json
These are the fill colours of the process boxes. The fill colour serves as a visual feature to represent the process status (Open, In preparation, Ready for collection, Not collected, Closed)
Example:
{
"OpenColor": "#c6d1fc",
"InProgressColor": "#f3e28c",
"ReadyToPickUpColor": "#bdf8cf",
"NotPickedUpYetColor": "#e6a487",
"ClosedColor": "#f5f5f5"
}
titleBoxDesign.json
This is the visual customisation of the heading box for the menus.
Example:
{
"FontColor": "#ffffffff",
"FillColor": "#1d1d1d",
"BorderWidth": 0,
"BorderColor": "#000000",
"CornerRadius": 0
}
Configuration of the pick-up monitor display
Where are the configuration files located?
At startup, the application creates the Config folder in the installation path. The folder receives the default configurations set by the application.
Which resources can be used?
All resources can be stored in the Resources folder in the installation path.

-
Resources/Background/InProgress: Background graphic for "In preparation" area, format PNG or JPG
-
Resources/Background/Ready: Background graphic for "Ready for collection" area, PNG or JPG format
-
Resources/Background/Slide: Background graphic for the slide area, format PNG or JPG

-
Resources/Advertisement: Large advertisement, resolution 1920x874, format MP4/MOV. Several advertisements can be stored, which are played in alphabetical order.
-
Resources/AdvertisementBackground: Background image of the advert, resolution 1920x155, format PNG or JPG


-
Resources/Slideshow: Video on the right in the slideshow (image 1), resolution 640x870 (with TimeBanner) or 640x1080 (without TimeBanner), format MP4. Several videos can be stored and played in alphabetical order.
-
Resources/ReadyOverlay: As soon as an order changes to the "Ready for collection" status, this image or video banner is displayed instead of the video slideshow. Resolution with TimeBanner 640x870, without TimeBanner 640x1080, format PNG,JPG,MP4.
-
Resources/TimeBannerOverlay: As soon as an order changes to the "Ready for collection" status, a video is displayed instead of the time to visually emphasise the name of the order ready for collection. Resolution 640x210, format MP4

-
GIFs/TitleInProgress: As soon as an order is added or changes to the "In preparation" status, an animated GIF can be played next to the "In preparation" text. Resolution 284x256.
-
GIFs/TitleReady: As soon as an order changes to the "Ready for collection" status, an animated GIF can be played with the text "Ready for collection". Resolution 284x256
-
GIFs/OrderReady: As soon as an order changes to the "Ready for collection" status, an animated GIF is played above the order name (image 2). Resolution 300x130. The duration should be at most as long as the sync rate (default: 5 seconds), without loop. Several different GIFs can be stored, which are then played randomly when ready for collection. Optionally, GIF animations could be played depending on the order name / number, e.g. Paris -> Eiffel Tower.
What is configurable?
apiConfig.json
These are settings for connecting to the entire collection monitor ecosystem.
• BaseAddress: Base address or special endpoint of the collection monitor API. Must be specified as a string in the form "http://xxx.xxx.xxx.xxx" (or HTTPS).
• ApiKey: An authorisation key that may be required to access the API.
• LocationId: The ID of the location created in the online portal.
Example:
{
"ApiConfig":
{
"BaseAddress": "https://portal.abholmonitor.de", // set by the installer
"ApiKey": "{GEHEIMER_SCHLUESSEL}", // set by the installer
"LocationId": "{STANDORT_ID}" // set by the installer
}
}
automationConfig.json
These are the settings for the automated behaviour of the application.
• SyncEverySeconds: Polling interval for the process data.
• ShowAdvertisements: If set to true, a large advertising banner/video (advertisement) should be displayed.
• AdvertisementsEverySeconds: If an advertising banner/video is displayed, this number indicates the number of seconds between two adverts.
Example:
{
"SyncEverySeconds": 10,
"ShowAdvertisements": false,
"AdvertisementsEverySeconds": 60
}
generalDesign.json
These are general visual adjustments.
• FontName: The font used in the application in TTF format. The name of the TTF file should match the name of the font.
• ShowInProgress: If set to true, the "In preparation" area is displayed.
• ShowReady: If set to true, the "Ready for collection" area is displayed.
• ShowSlideShow: If set to true, the "Slideshow" area is displayed.
• SlideShowImageTime: If there are images in the slideshow, this value specifies the display time in seconds.
• DualMonitor: If set to true, the application is displayed on two screens. This means that in the example configuration ShowInProgress : true and ShowReady:true, the "In preparation" part is displayed on one screen and the "Ready for collection" part on another screen.
• MarginLeft: Lateral spacing of the application window (since Windows 11, this must be adjusted manually)
• MarginTop: Top distance of the application window (since Windows 11 this must be adjusted manually) Example:
{
"FontName": "./#Bebas Neue",
"ShowInProgress": true,
"ShowReady": true,
"ShowSlideShow": true,
"SlideShowImageTime": 10,
"DualMonitor": false,
"MarginLeft": 0,
"MarginTop": 0
}
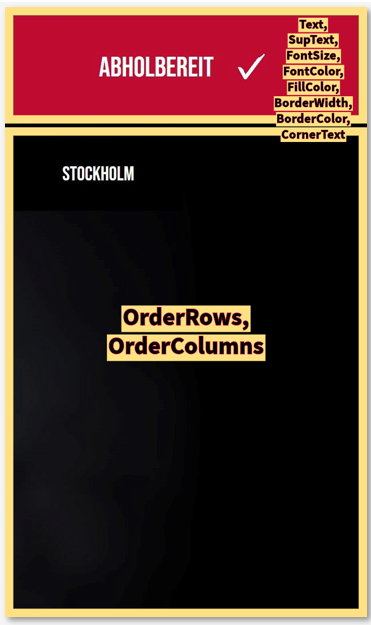
inProgressDesign.json
This is the design of the "In preparation" box.
• Text: Displayed text.
• FontSize: Maximum font size. The font is scaled down depending on the input
• FontColor: Font colour
• FillColor: Fill colour
• BorderWidth: Border width
• BorderColor: Frame colour
• CornerRadius: Corner radius
• OrderRows: Number of rows of the operations shown below
• OrderColumns: Number of columns of the processes shown below
Example:
{
"Text": "In preparation",
"FontSize": 80,
"OrderRows": 10,
"OrderColumns": 2,
"FontColor": "#ffffffff",
"FillColor": "#1d1d1d",
"BorderWidth": 0,
"BorderColor": "#ffffffff",
"CornerRadius": 0
}
readyBoxDesign.json
This is the design of the "ready for collection" box. Similar in structure to inProgressDesign.json.
Example:
{
"Text": "Ready for collection",
"FontSize": 80,
"OrderRows": 10,
"OrderColumns": 2,
"FontColor": "#ffffffff",
"FillColor": "#bf0c30",
"BorderWidth": 0,
"BorderColor": "#ffffffff",
"CornerRadius": 0
}

orderBoxDesign.json
This is the design of the process box, represented by a name or number. The structure is similar to the boxes described above.
Example:
{
"FontSize": 50,
"FontColor": "#ffffffff",
"FillColor": "#1d1d1d",
"BorderWidth": 2,
"BorderColor": "#ffffffff",
"CornerRadius": 0
}
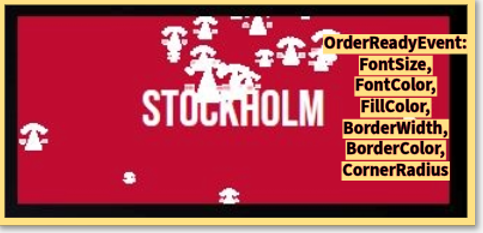
orderReadyEventDesign.json
As soon as an order changes to the "Ready for collection" state, this event is triggered. The new orders ready for collection remain in a special status until the next sync. Some visual changes can be made to emphasise the processes.
• ShowGif: Animated GIF is displayed in the process box, if available in the resources.
• other values see orderBoxDesign.json. Example:
{
"ShowGif": true,
"FontColor": "#ffffffff",
"FillColor": "#bd0c30",
"BorderWidth": 2,
"BorderColor": "#ffffffff",
"CornerRadius": 0
}
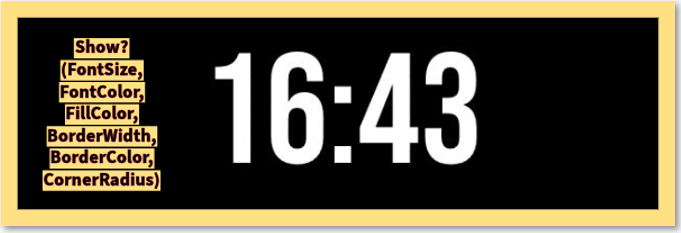
timeBannerDesign.json
Banner on the bottom right-hand side showing the time.
• Show: If the variable is false, the banner is not displayed.
• other values are trivial. Example:
{
"Show": true,
"FontSize": 80,
"FontColor": "#ffffffff",
"FillColor": "#bf0c30",
"BorderWidth": 0,
"BorderColor": "#00000000",
"CornerRadius": 0
}

timeBannerReadyEventDesign.json
As soon as an order changes to the "Ready for collection" state, this event is triggered. This displays the name or number of the completed order. A small message can also be displayed.
• ReadyMessage: The message to be displayed.
• ReadyMessageColor : Font colour of the message.
• ReadyMessageFontSize : Font size of the message.
• ReadyOrderFontSize : Font size of the operation description. Example:
{
"ReadyMessage": "Your order is ready!",
"ReadyMessageColor": "#1d1d1d",
"ReadyMessageFontSize": 40,
"ReadyOrderFontSize": 80
}
Back to the overarching topic: Pick-up monitor