Edit time calendar
The time calendar is called up in the portal via the Staff menu. After the call you are in the employee selection. Here, employees can be called up to enter working times and months can be completed. The program offers numerous possibilities for fast processing.

Basically, you can simply double-click on a line to open an employee's time calendar. You can also select several employees and make the same entries for several employees at the same time. With multiple selection, the existing working times of all selected employees cannot of course be displayed.
| Element / Switch | Function / Description |
|---|---|
| Open calendar | Opens the calendar of the employees for whom you have switched to Yes in the Select column. |
| Close month | Ends the current month. This serves your own organization. If possible, they should only work in one month at a time and complete this after completion of all entries. This function can only be used if the actual date is in a subsequent month. |
| Tested | You can mark collaboration as checked for your own organization. This way you can make sure that all your entries are complete and correct at the end of the month. |
| target date | The target date is the date in the time calendar that is automatically "jumped to" when opened. For example, if you record the times daily, select the target date to get to the right field faster. |
| Skip days |
If you enter several days when entering working times, but some days are not used, you can set Skip days. This speeds up the input process. |
Combine multiple selection, target date, and skip days as you like to capture times as quickly as possible.
Use Recurring Working Times for even faster results.
The time calendar

| Element / Switch | Function / Description |
|---|---|
| Select employee | This takes you back to the employee selection screen. |
| Save | Saves the entries. |
| gritting |
Once you have entered a working time, you can split it. When splitting, pauses are inserted or different activities (job) can be selected. That's how you split:
In addition to the Enter key, you can also use the Up Arrow and Down Arrow keys to navigate. |
| discard changes | Ends the time calendar and discards your current entries. |
| keyboard shortcuts |
Displays a list of supported keyboard shortcuts. The key combinations apply to focused work areas and, if necessary, focused entries. Open monthly calendar: Ctrl + Spacebar Split entry: Ctrl + e Remove splitting of the entry: Ctrl + < Empty tag: Ctrl + y Next employee: F6 Previous employee: F7 Splitting: Switch between pause/normal p |
Control area and split area
In the upper area, you can split in the action area on the left. The other elements provide information on totals and warn when wage and time limits are exceeded.

work area

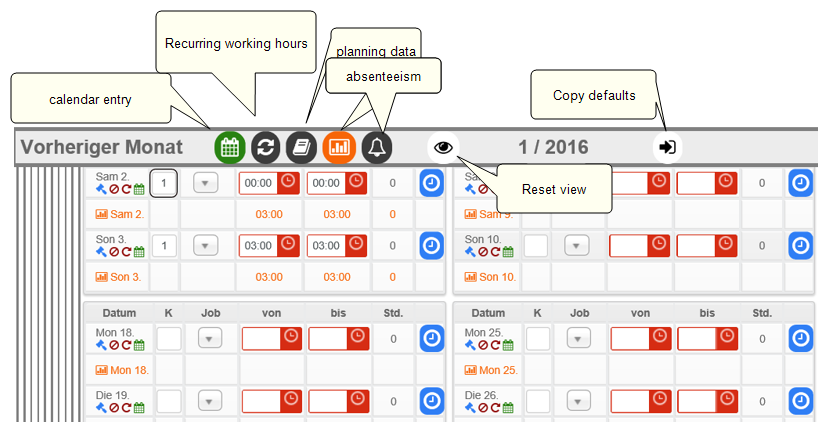
Calendarentry : This is the data that you enter here in the time calendar.
Recurring working times: These are the recurring working times that can be stored in the employee master record for each employee. This allows you to record employee working times even if the employee does not use time recording. You can transfer these times to the time calendar.
Planningdata : These are the working times planned in the duty roster program. You can use the data for comparison purposes or transfer it as working times.
Timerecording : This is the data from the Hypersoft time recording system. They are suitable for transfer to the time calendar.
Absences: Displays the employee's absences.
You can combine the option switches as required. Reset view hides all options except calendar entry.
Apply times
You can copy the times from other option areas for an employee's time calendar completely, or copy only individual days.
To accept all times of an option range press Acceptdefaults .
You receive a selection of the source data which you confirm accordingly.

To accept individual days, select the corresponding option and click the icon in the option line. The time value and the symbol are transferred to the calendar entry.

Further topics:
Back to the overarching topic: The time calendar