Simple article input
No matter which article type you enter, recipes, basic articles or products, you always start with the same article master.
Select the POS or Controller programme group from the Programmes tab and start the article master.
Simple entry of a new article
Firstly, we start by entering a recipe article.
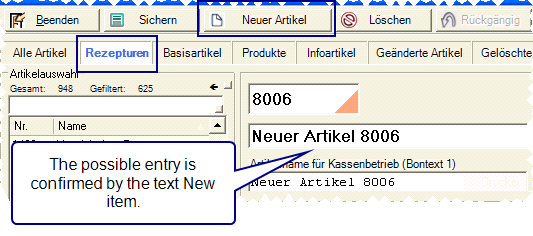
- Press the New article button. or click in the article number field. If you have not selected a prefix, you will be asked whether you want to create a recipe or a base article.
- A dialogue for entering the article number and the article name appears.
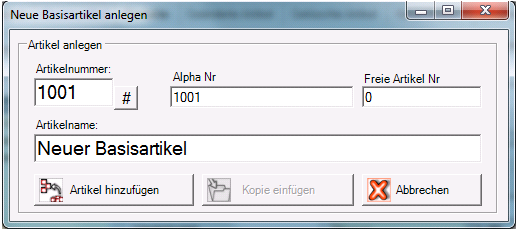
Select the next free article number of the number range to which you want to assign the article by entering it in the article number field. If the background of the field now appears red, this number has already been assigned. By selecting the # button next to the article number field, the next available article numbers are displayed depending on your input. Click on the number you want to assign in the list. This is now entered in the Article number and Alpha no. field. adopted - Overwrite the text New article # with your article text (or simply Cola 0.2l). You can observe how the article master transfers the text to the receipt text fields.
- Now select the product groups to which the article should belong.
- Enter the sales price and pay attention to the selected VAT rate.
- Now check under Key text whether the article description you have selected is displayed correctly and as clearly as possible in checkout mode. Select a different layout if necessary. Change or shorten the article description so that it only contains the information required by the operator. Words that are too long can be separated by a space (e.g. Blueberry cake > Heidelb. Cake).
- Select at least the properties - sales item on the right.
- If other options are required, select these as well.
- You can now press the Save button, which makes your item available to the POS system.
- If you use more than one point of sale, a prompt will appear asking you to assign the item to the available points of sale.
Done, you have perfectly created the first recipe item that can be booked at the checkout!
To be able to use all elements, see the notes under item master Dialog
Keyboard shortcut for article master professionals
The article master uses a tab order that allows you to tab (without the mouse) through the entries in the specified order. If you use the Shift key, you will return to the initial field.
| Key combination | Effect |
|---|---|
| Ctrl + P | Jump directly to the prices (not from the search field) |
| Ctrl + N | Direct jump to the article name (not from the search field) |
| Ctrl + S | Direct jump to the search |
| Ctrl + Tab | Switches the registers |
| Ctrl + space bar | Sets receipt text 1, receipt text 2, button text equal to the article description. This can also be used to synchronise deviating texts with it again. |
Further topics: Create items securely by copying
Back to the overarching topic: Basic knowledge 2: AreasMultifunctional item master