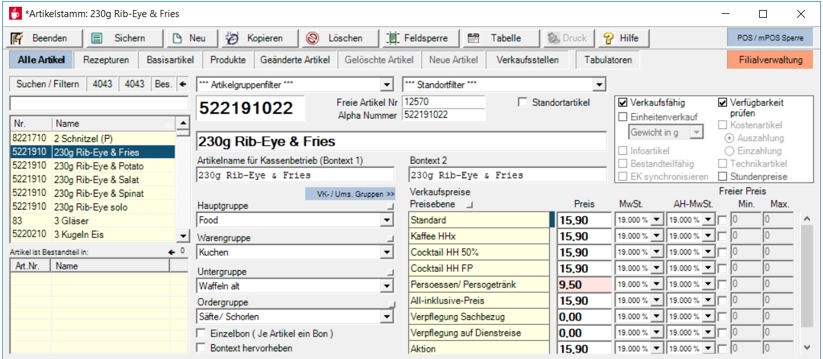
item master Dialog
The item master manages different items with different functions:
- Basic items (from an economic point of view "all items that can be touched")
- Recipe items (made up of base items and produced at the checkout at / after posting)
- Product items (made up of basic items, can be stored and reposted as basic items after production)
We start here with the generally valid input and setting options and then proceed to the specific operation of the respective item types.
With the button points of sale you get an overview in which points of sale this item is already available.
You can also enlarge the entire item master by opening the dialog. This gives you an improved view of the parts list and also allows you to see very long item names.
We start here with the generally valid input and setting options and then proceed to the specific operation of the respective item types. Select the program group POS or Controller from the APPS tab and start the item master.
Item description and item receipt texts

The field (Long) Item description is intended for orders (to suppliers) and for the item texts of the eSolutions. Here you enter the item designations in the standard.
In the eSolutions, all 64 characters of the long item description are used. Item receipt text 1 and / or, depending on the setting, item receipt text 2 are then used at the POS system for orders from the eSolutions.
The texts up to 32 characters are synchronised identically in the Bontexte 1 and Bontext 2 below. If you enter more than 32 characters in the item name, receipt text 2 serves for the characters from 33 to 64.
The Receipt text 1 is the standard text of the POS system. This is displayed to the operator in checkout mode and also to the customer on the customer monitor. The Receipt text 1 is normally also printed on forms and receipts. You can additionally activate the Item text 2 there or use it as an alternative.
Examples for the application of Bontext 1 and 2:
-
If you generally have to use very long item texts, switch on receipt text 1 and receipt text 2 on order receipts and invoices.
-
For additional internal communication, for preparation or storage, you can define special order receipts that only output receipt text 2 there for the specific items.
-
Use receipt text 2 for abbreviations, other languages or similar for special order receipts by using receipt text 2 for this purpose, or to output particularly long texts of up to 32 characters on the Guest Check printer.
-
A special invoice for special customer groups could then issue selected Bontext 2 alternatively or additionally. Example: Quantity & Bontext maximum.
-
In addition, you can also have graphics printed for certain items or for certain queries so that you do not have to use the texts. See the possibilities under Graphics for changes.
For quick editing and synchronisation of the fields, see also Keyboard shortcut for article master professionals.
Item text length Concept creation...
Please note that not all devices such as mobile tills and printers can output the full 32 characters. The maximum character length is then limited by these devices and your settings.
We advise you to create a concept where you determine the settings on forms and order receipts, then look at the possibilities of the devices and finally determine how long texts you want to use. Notes on this:
-
A noticeable limitation is the option to display the individual prices together with the item in one line on invoices. The number of digits required for this reduces that of the item text. Therefore, with this setting, you can optionally move the number of items to a line below.
-
The Guest Check printer has special options for printing long item texts. A table of the text length per printer can be found in the section POS Printer.
-
Note the Tabular print width of the POS Printer.
Use item master dialogue
| Element / Switch | Function / Description |
|---|---|
| item types | The multifunctional item master works with different itemtypes. |
| points of sale | Items can be assigned to points of sale. Look at this: Direct item assignment |
| item selection |
By entering a search text in the item selection, the result of the matches is displayed in the list. You can also filter and findextensive items. |
| Item group filter | There is detailed documentation on this: Apply item group filter |
| location filter | This function for the central item master is described here: Applying a Location Filter |
| item number |
This field is an internal item number for your internal use. Here you will find All about item number. |
| alphanumeric number |
You can use the alphanumber to assign sort numbers. |
| Free item number |
The freely selectable item number enables you to book the item by item number (PLU). However, it can also be used for sorting and grouping. In this case you can allowtheir multiple use. |
| Item description and item receipt texts |
The field Item description is intended for orders (to suppliers) and for internal use. Here you enter the item designations in the standard. Further important information further up this page at Item description and item receipt texts. |
| Features & Benefits |
With the features of the items you control some of the special Hypersoft functions. You will find an overview in the chapter Features and options of the items. |
| categories |
Assign merchandise categories to the items, which can later be used for evaluations. If these merchandise categories are on the keyboard of the cash register, the assigned items appear there which also have the property Sales item or Info item. By using sales merchandise groups, you have additional options for flexibly assigning items to merchandise categories for posting. Further topics: |
| turnover distribution |
Sales distribution enables you to distribute the sales price of an item among its components for evaluation purposes. |
| order group | Select the order groupto be addressed when booking this item. |
| single receipt |
This option initiates the creation of a single receipt per item and is described in the chapter Single Receipt (Talon). |
| Highlight receipt text | Activate the option Highlight receipt text to make items on order receipts conspicuous. For thermal printers, the printout is inverted. For matrix printers and inkjet printers, the text is printed in the "second color" (receipt text is printed in red). You can also use this function for items that are used in queries or attachments, so that, for example, only a particular insert change is highlighted. |
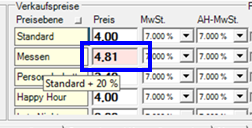
| selling prices |
Enter the sales price of the item here. If you are working with more than nine price levels, a scroll bar will appear here. If this entire area is shown disabled, it is because you are using the alternative Price groups and price maintenance for price maintenance. Exceptions to the automatic price calculation If you work in price levels with the automatic price calculation, you can enter a price in the level Standard and the prices for further levels are calculated automatically using the active price formula of the price levels. However, if you manually overwrite a calculated price, the further automatic calculation of this price will be deactivated for this item, so that from then on the changes in the standard price level will no longer be applied for this price. The price that is asynchronous with regard to the formula in the price level from then on is represented by a field with a reddish background.
If you want to resynchronise asynchronous prices, delete the asynchronous price you entered (from the field) and exit this field and save the item master. The price will be calculated automatically again and the field will no longer have a reddish background. Synchronise prices in system groups... For this requirement, please refer to the corresponding chapter Synchronise prices in system groups.
|
| value added tax |
Select the VAT rate that is included in the sales price. For items to be sold as disbursements, select the Disbursement entry instead of the VAT rate. Further topics: tax rates |
| Minimum and Maximum Free Price |
If you work with the Free Price function, you can also enter a minimum and maximum value here. See Change item text and price for this. |
Further topics:
Noteworthy information on the item master
item master Area cash register
Area stock and capacity specifications
Back to the overarching topic: Multifunctional item master