Set up TSE
Read the chapter beforehand KassenSichV TSE safety device
You must have an internet connection to set up and activate the TSE Stick.

The set-up is done via the master information.
Since the tax rates in the Hypersoft system are freely adjustable, a type must be assigned to each tax rate via the selection. This happens automatically as far as possible when the programme is called up for the first time.
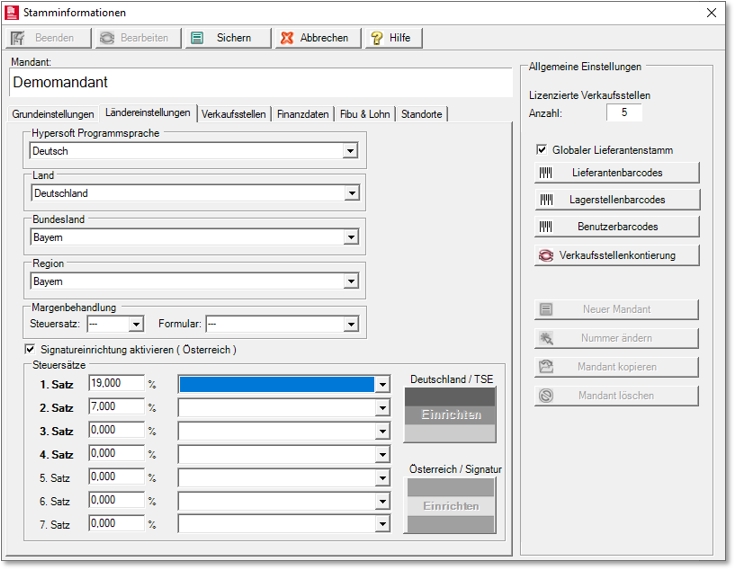
Automatic assignment has been made:
In Germany there are four tax rates relevant to the POS system: 19% / 7% / 10.7% and 5.5%. If these records are entered, the correct type is automatically preset.
In a German system, no tax rates may be used that have not been assigned to a type, as these would only be posted to the TSE as "expenses" (however, in the mixed operation with, for example, a cross-border Austrian system, this is normal).
Used tax rates from the item master are marked bold via the font : 1. Set etc. When configuring, make sure that the tax rates used in the item master are also correct. If at least the 19% and 7% tax rates are correctly assigned, the button Set up is enabled. Selecting Setup brings up the actual programme TSE System Setup.
Set up TSE system
In the upper area, the respective TSE stick is set up. If at least one TSE stick is completely configured, the lower area is enabled.

The area Enter new TSE is activated:

This is used to enter the corresponding values:

Subsequently, it is selected at which station the read TSE is used and with which drive letter it can be addressed. Here the station Main cash register and Drive D. (Under the drive letters there is another setting IP, which may be supported if there is an online solution for this).
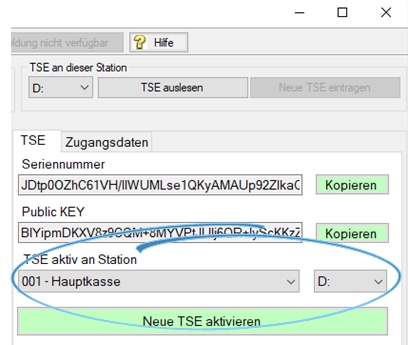
With Activate new TSE the TSE is programmed once with the settings made.
The programming cannot be reversed. The TSE can then only be operated at the respective cash register. Programming the TSE can take up to 30 seconds.
For the configuration of a TSE, there are other fields under the Access Data tab:

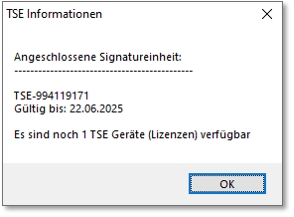
All values are internally stored with default values. You must enter the TSE expiry date and, if applicable, the date of decommissioning; this is also used for notifications. The expiry date is displayed in the list at the top left and, if there are less than 60 days remaining, the number of days remaining is also displayed. As an input aid, an entered date can be transferred to all cash registers that do not yet have an entry using the All stations button. Existing data cannot be overwritten in this way. Nevertheless, there is still a note. Upon confirmation, the date of purchase & commissioning is adopted. The button only becomes active if both data are entered correctly.
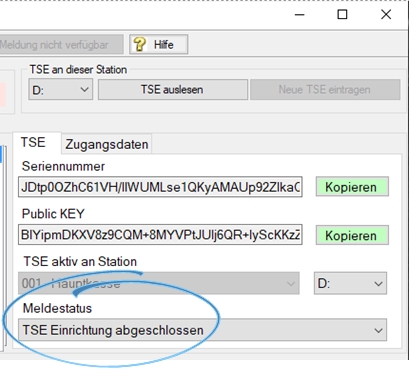
After activating, confirm that this TSE is now correctly set up by switching the selection under Message status. The TSE field in the top left-hand corner turns blue to indicate that at least one TSE is correctly set up in the system:

The status can also be used later to replace a TSE with a new TSE.
Set up all stations
Now each individual station must be set up. Here it must be decided via which TSE the respective station carries out the signing. Press the button Enter to enter the TSE selected in the upper field and thus assign it to the ward.

If there is only one TSE in the upper list, the button Enter automatically assigns it to all wards without further prompting. If this is not what you want, it is not a problem, because you can still adjust all the assignments (read on...).
Furthermore, it is determined whether the respective ward signs with its own ward number or in the name of another ward. Here, the selection own station is correct in the standard. Background: Until the very end, we researched the reporting system and the consideration of what an own fund is. Accordingly, each handheld device must also be reported and also sign as an independent device.

With the last selection list, you confirm that the station has been activated. To do this, you must select Recording system activated.

Assign non-booking wards
A special case are various Hypersoft stations that do not carry out any bookings: subsystems, kitchen display, supervisor, status, etc. Here, too, you decide what the respective station carries out. Example of a cooking station:

Copy copies the respective text to the clipboard in order to transfer these values error-free into your procedure documentation or otherwise, if required.
Verification and completeness check
When all stations (actually each one) are set up, all status fields turn blue and signal a complete and finished configuration.

Without a complete set-up, the cash registers refuse to function. Is it then not possible to work with the cash register system.
The filters above the station list show the stations assigned to the TSE selected above or without TSE assignment for easy checking. It is also possible to filter for the property no recording system and the statuses activated and not activated. These filters only work when using multiple TSEs, as a single TSE is assigned to it.
The activated TSE is displayed in the device management.
Replace TSE and go around TSE
Report TSE defective / replace. To replace a defective TSE, the status is switched to "TSE defective / deactivated". If this TSE is in use, the corresponding cashier stations using the defective TSE are displayed. The remaining, intact TSEs are then displayed in the right-hand window and the button Assign TSE is used to adjust the configuration accordingly.

If there is only one TSE in operation, the new TSE must first be read in and activated before decommissioning.
Whenever changes are made to stations that are already running, these stations must be restarted. We recommend restarting the entire system after a change.
TSE error messages
Error messages:
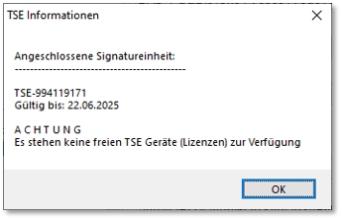
There are the following error messages in the cash register operation so far:
Returns as described and in case of error:
ERR-TSE01 Configuration error
ERR-TSE02 Read back data from database
ERR-TSE03 Read back data from database
ERR-TSE04 Programme error with "here are more details )
ERR-TSE05 Error inserting data into the TSE database
ERR-TSE07 Timeout while waiting for TSE unit
ERR-TSE08 Timeout waiting for processing by TSE unit
ERR-TSE09 Error from TSE stick / cloud connection [error text].
ERR-TSE11 Configuration error
ERR-TSE14 waitForTSEResult Error
ERR-TSE15 Error inserting data into the TSE database
The problem should then be found/solved on the basis of the respective message.
Some messages are handled internally and are not displayed.
There will be corresponding messages (emergency operation etc.), but these are not error messages in this sense.
In the cash register interface, the TSE icon flashes in the event of an error.
Cash registers that do not have a TSE facility in Germany receive a warning when the cash register is started. "The signature system is not fully set up for this checkout station. Please check the configuration."
Back to the overarching topic: KassenSichV TSE safety device