Navigation in the MCP
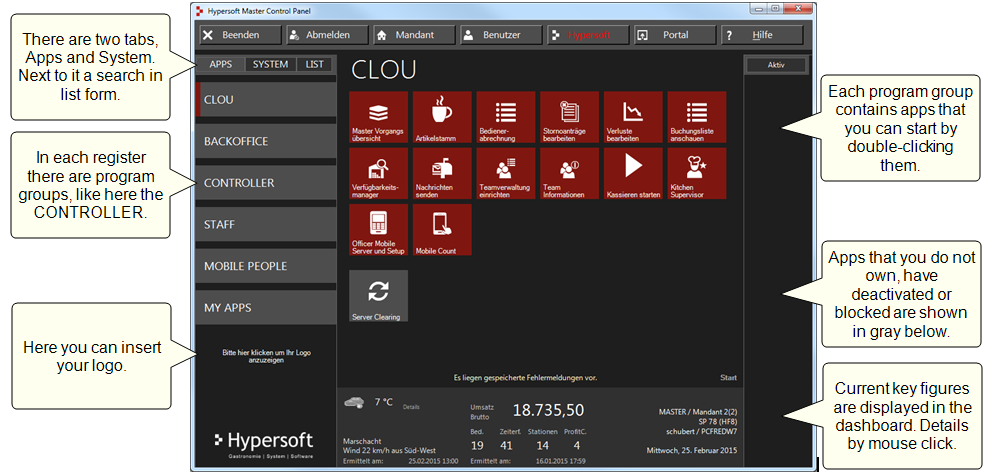
The MCP is divided into several sections, which we would like to introduce to you together with the terms we use.

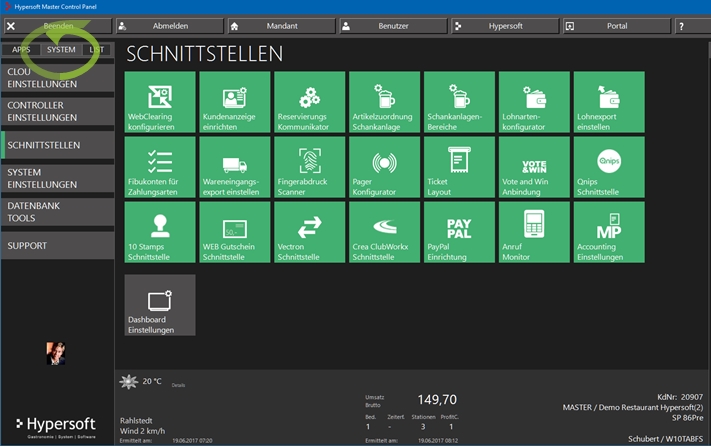
At the top left you can choose between Apps, System and List. The System area mainly deals with settings or master data that are not processed regularly. You will receive further tabs for selection. Example Register Interfaces:

You start the programs by double-clicking on the corresponding icon. During the start, the symbol receives a green frame to confirm the action.
To make it easier to double-click on a touch screen device, Hypersoft uses its own double-click logic, which converts two consecutive clicks on the entire icon area into a double-click, regardless of the system settings.
Search with List
If you want to use programs that you rarely need, the easiest way is to enter a term via List to find the desired program. Proceed as follows:
- Choose the List tab.
- Enter a search term
- Select the desired program from the list.
- Confirm the selection by ticking the "Found" box.
- You will be guided to the desired program.
The News Ticker displays current information from Hypersoft. In the same area, information about the program icons is also displayed when you wait with the mouse over an icon.

The messages are displayed as tickers and when Start is offered you can view a web page about it.
To move a symbol, simply hold down the left mouse button on a symbol, drag it to the desired position and release it there. You can also change the sort order to Alphabetical Sort by right-clicking an icon and selecting the Sort Alphabetically command (the selection only applies to the program group you are in). The Delete sort command discards your own sort order and displays the icons in the default order again. The individual sorting of symbols can possibly be reset by updates. If this occurs, you will need to perform your sorting repeatedly. All other settings are retained during updates.
If you are not using programs, you can move them down to the inactive area by using the Disable command. Programs you do not own are also shown in this section. You can see the difference by moving the mouse pointer over the symbol. Symbols of existing licenses can be reactivated with a right mouse click.
If you control the program using user authorizations, you can determine the access per user group. Symbols are also deactivated here.
You can copy symbols and paste them into other program groups, for example. To copy a symbol, select it with a right mouse click and choose Copy. Go to the desired program group and right-click again in the area where the copy is to be stored. Confirm with insert. You can remove icons by selecting the Delete command.
When you copy and paste symbols, you have the choice between Paste for "Your username" und Einfügen für alle Benutzer". This allows a user to build his own symbols (for example, in My Apps). Symbols that are only available for one user are marked with a small white dot at the bottom left.
Using MY APPS
We have provided a program group for Own Programs, in which you can set up your own start links. You can drag any program from your desktop into MY APPS - as well as any other program group. However, you can also right-click in a free area of the active upper window and select the New Program command to link the programs. The path refers to the program or file to be executed. You can enter start commands in the Parameter field (for example /n if MS Word is to start without an empty document). In the symbol properties, you can define the label and enter information in the explanation field that is displayed when you hover the mouse over the symbol. You can also select a symbol.
You can insert your own program icons from the Windows desktop directly into the MCP with the mouse. If you use the right mouse button, the original is retained.
Further topics:
Back to the overarching topic: MCP Workplaces