Define bonus actions
To define a bonus action, choose Createbonus action in the menu (MyHypersoft.com). Alternatively, the command Createnew bonus action can be found in the Dashboard under Bonus actions, as well as in the Bonus actions module under the tables.

Designation...
Designations that you assign to bonus campaigns must be unique (the same designations may not be used more than once, which is checked by the system).
Date and term...
In the Date & Runtime section, you can enter a date for the start and end of the bonus promotion. Independently of this, the end of the benefit can be determined. This allows you to set a grace period for redeeming points you have already collected after the end of the collection.
If you do not select a date for the end of the bonus promotion or the end of the benefit, they will be considered unlimited. You can also change the date during a running action.
Locations...
To select the participating locations press the button Selectlocations .
If the locations use the same item master, the unique settings apply to all the same locations. Even more precise: One setting is sufficient for all locations with the same item master.
Since locations can have their own item master data, you must take this into account when creating bonus and benefit items. If you use different item master data, then an item that is written the same way would also be invalid. You then have to assign the "espresso" from each location that uses its own item data to the bonus action - the good thing is, you can do it for this case too.
Bonus Type & Benefit...
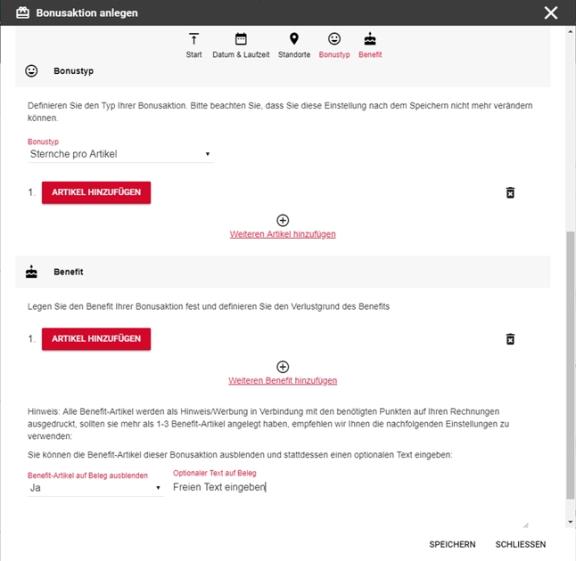
To assign bonus types and benefits, you must select at least one location with an item master. Only then are these areas released for processing.

With the bonus type, you first have the choice of whether your customer should receive points for every item purchased or every visit to you. A visit is a process in which the customer card has been scanned. Of course also an item reservation must take place on a scanned customer card, only points are collected.
If you decide for points per item, then you can reach the item selection over the magnifying glass and define under points per sale the number of points for each booked item.
In the item selection you will see a table with the corresponding items for each item master of the selected locations. Under Locations you can see whether you can assign items once for all locations or have to assign them per location.
In the item selection you can use the search. These filter both the item numbers found and the item descriptions for you in all item masters.
With Benefit you have the possibility to award benefits in the form of items. The item selection is identical to the item selection for a bonus type. In addition to the item selection, you must select a reason for loss for each item selected (for example, advertising costs bonus) so that the system posts the free goods delivery accordingly. You must also specify the number of points required to achieve the benefit.
The text for the customer serves the communication and gives the bonus action a name for your participating customers.
If more than 3 benefit items have been created, it is recommended to use the Hide benefit items on receipt switch so that the forms of the POS system do not become too long. The counter will not print the benefit items at the bottom of the form in the bonus area. To inform your customers about the possibilities, you can enter a free text, which will be printed instead of the item. For example: From 10 points on, buy a medium hot drink of your choice.
Benefit item with picture in YourAPP
If you use our product YourAPP, you can upload a picture per benefit item , which will be displayed within the bonus system in the APP. Please use the following format for this:
Format: jpg, png
Aspect ratio (w:h) 16:9
Resolution (w x h) 1242x699
Maximum file size 270

Back to the overarching topic: bonus scheme