Reservation settings
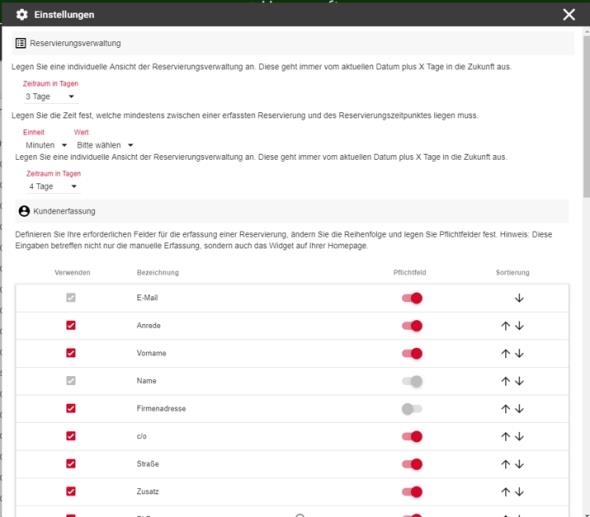
Specify the minimum time between the entry of a reservation and the reservation time (lead time). This value is valid for entry and transactioning in the backend. There is a separate settingfor the widget.
Select the desired unit and value. Example: Unit: "hours" Value: "3
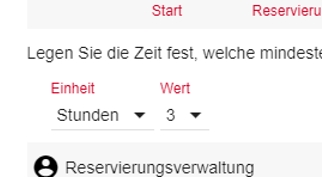
In this context, see Best practice: The right lead time for reservations.

You can freely define which customer data you want to enter for a reservation, the sequence in which it is displayed, and whether this is a required entry.
Name and eMail are mandatory fields and cannot be deactivated. The company address cannot be used as a mandatory field because customers without company affiliation could not fill this field.
Please note that these settings not only affect the manual entry of a reservation, but also the display within the widget.
The reservation requires the license Customer Master 2.0 to work with the customer database.
Set reservation book
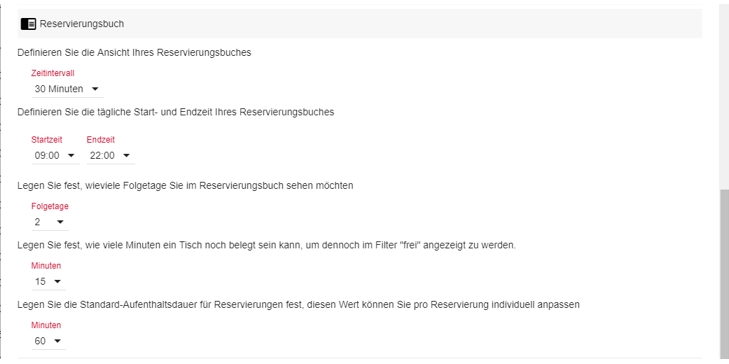
Set the Reservation Book module according to your individual needs.
The time interval influences the number of columns per hour (example: "Time interval" 30 minutes = 2 columns per hour).
Define the daily start and end times of your reservation book. Note: Your opening hours are not affected by this setting and are set and displayed separately.
The reservation book can be "scrolled" into the future by specifying how many days you want to see in the future.
Define how long a table can still be occupied in order to be displayed in the "Free tables" filter. This function is intended to prevent tables, which may only be occupied for 5 minutes, from not being displayed when you select a new reservation.
Specify how many minutes a table should be occupied in the case of a reservation. You can adjust this value individually for each reservation (later during entry).

Set the waiting time from which an entry on the waiting list is to be displayed in "red".
Define a time at which an entry on the waiting list is to be automatically removed.
Configuring Times and Favorites

Define the time for the automatic change of day within the reservation. This is largely independent of the TTA value of the Hypersoft POS system.
Set whether to display the selection of times per hour, per half hour, or per quarter hour. Example: If you only make reservations for full and half hours, you can save the query of quarter hours and set the clock to half an hour.
For manual entry of reservations, you can create up to four time favorites to be able to select these times more quickly.
Reservation times and contingents
The correct setting of opening times, limits and simultaneous number determines the efficiency of your reservation system - especially when reservations are made automatically with the widget. Look at this: Best Practice with Concurrent and Limit in Hypersoft Reservation
If most of your reservation requests are made at times when your employees have the least time, then you should outsource these requests from normal operations, because there is sales potential in reservation requests. The widget on your homepage is a good solution. If your guests still like to call, you can employ a call centre to answer the calls. With Hypersoft Reservation 2.0, call center employees can easily enter reservations.
General specifications and interrelationships
It makes a big difference whether you work with simple quotas (e.g. number of seats), exact objects (e.g. tables) or a mixture of them. If it should be quite easy (at the beginning), limit yourself to contingents.
The general reservation times apply to all objects and the space contingent. When objects are reserved, there is also the value Lead Time (see above), which must be observed at least between the time of the reservation request and the reservation time.

The reservation times start daily after the set change of day (see above). Time entries always apply from the time entered until the time of the next entry or until the next TTA (until the next column).
If there are no time entries and the day is open, there are no general restrictions during the period the program considers all requests possible.
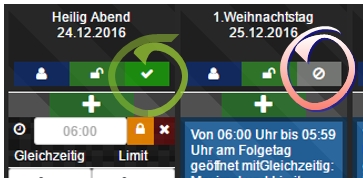
| Element / Switch | Function / Description |
|---|---|

|
Entries and columns can be opened or closed with the lock symbol. A closed entry always receives 0 Simultaneous and 0 Limit. |

|
With the plus symbol entries and columns can be added. |

|
Clicking on the person symbol opens the multiple editing of all entries in a column. |

|
You can use the delete symbol to delete entries, columns, and sets. |
Sections...
The opening hours are divided into 3 sections: Weekly, Holidays and User-defined special days.
The sections are used according to the following values ( from higher value to lower value ): User defined -> Holidays -> Weekly. Add your regional holidays and special requirements in the user-defined section. These are then applied preferentially to the general holidays and of course the weekly settings. The information in the Holidays section also replaces the weekly opening hours settings.
Weekly settings...
In the weekly section the general times for the corresponding days are determined. In addition to the general control elements, it is also possible to link weekdays in the weekly section: The How button can be used to select the day whose times should also apply to the current day (column).
Holiday Settings...
In the Holidays section the times for the holidays are defined. In addition to the general control elements, please note that these entries must be activated for them to be used by the system. The activation of a public holiday is done via the activation button. The button also shows the status.
Special days and custom settings...
In the Special Days section, you can specify settings for a specific date or time period. In addition to the general operating elements, start and end dates can be defined for each entry. It is also possible to store private and public notes here. The private notes can be displayed to your employees in the booking administration (the public notes will be made visible to customers in future versions of the reservation).
If you set one or more public holidays as closed, you must generally have set the public holiday configuration as active. Otherwise, holiday settings and closed holidays will not be applied.
Best Practice with Concurrent and Limit in Hypersoft Reservation
We would like to point out at this point that reserved or checked-in tables also include a number of people who are calculated and taken into account by the program as seats. The number of persons in the program corresponds to the number of seats in the POS system.
The number in the Simultaneous = field indicates the maximum number of bookable seats (in the restaurant) that can be reserved.
The number in the Limit field can be used (if desired) to limit the number of reservation places per time unit (60min / 30min / 15min).
If the Limit field is not maintained, you can reserve up to 200 seats for a restaurant with 200 seats and a value of 200 in the Simultaneous field, for example, 18:00 for the same time. This may lead to overloading of parts of your company.
In terms of quality management, we recommend that you counteract this situation preventively by, for example, setting a limit for the maximum number of reserved seats per 60min / 30min / 15min. Example: if you have a total of 200 seats, it could be that only 30 should be checked in within 15 minutes so as not to overload the service or kitchen. So you could configure this:
At 18:00 you enter a limit of 30 seats that can be reserved. This would continue every quarter of an hour (i.e. at 18:15 there would again be a limit of 30 etc.), the value Simultaneous remains defined as 200 in each case and is also taken into account over time.
So that you can create many entries quickly there is an optional interval function:

Select Generate interval to open the interval generator. This makes it easy to create entries in time intervals for columns within the selected section.
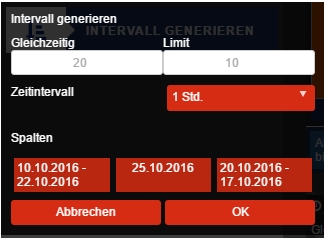
Enter the required values and select the columns for which the intervals are to be entered (selected columns are highlighted in green). With OK the intervals are created and entered.
Back to the overarching topic: Configure Hypersoft reservation