Tabular processing of the item master
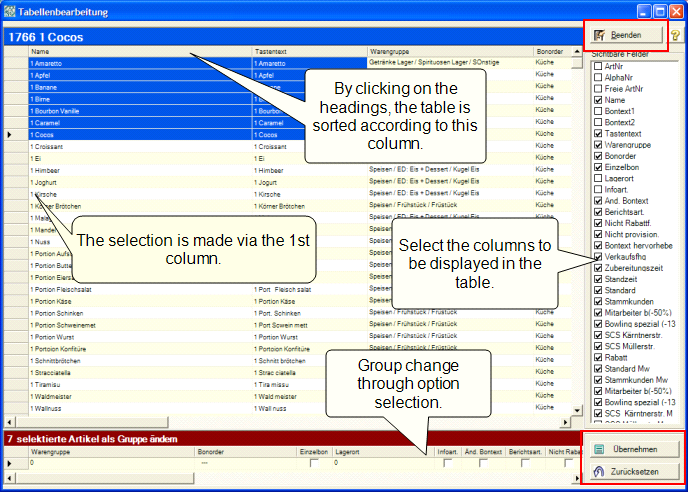
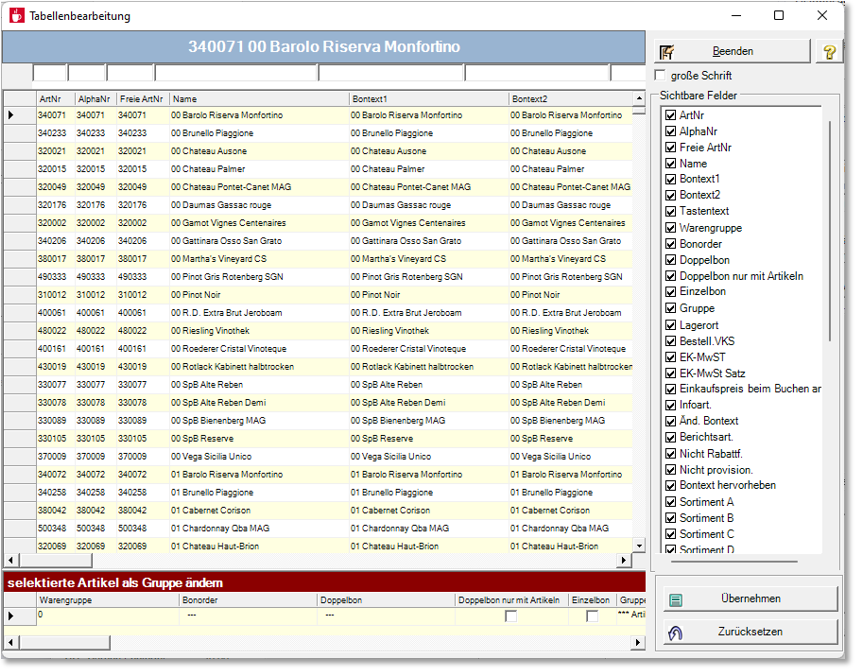
In table editing, you get an overview of as many items as possible. Table editing allows you to sort items according to information in their master data and thereby quickly and easily change multiple item information in one step.
The scope of the items displayed depends on the filter settings that may have been made in the upstream item master. This allows you to fill the table very specifically with the item selection, such as a particular product group, that you then want to tabulate.
Table editing now also allows the free item number to be edited. As item numbers must be unique, this is only supported if the switch Allow multiple "free item numbers has been activated.
Start table editing from the item master by pressing the Table button in the upper button bar:

| Element / Switch | Function / Description |
|---|---|
| large font | Switches to large font. |
| 1st column |
The 1st column is used to select items, multi-selection is supported. When selecting several items, it may be necessary to briefly release the control key or the shift key after selecting. |
| List | The list shows all items that were previously selected in the item selection of the item master. You can make changes to individually selected items directly in the list. |
| Visible fields | Select the columns to be displayed in the table here. |
| Group change |
If you select more than one item, the lower area Group Change is activated. You will receive a message about the number of items selected. You make changes to the information and settings in the group change line. Press the Apply button to apply the desired changes. |
| Reset | Here you can deselect elements of the group change area that have been selected by mistake. |
| Exit | This ends the editing of the table. |
Example to change the order receipt for all dishes...
In this example, all items in the food product group (example) are set to be assigned to the kitchen order group (example).
- Click on the heading Product group so that the list is sorted by product group.
- Click in the 1st column for the item whose product group is Food so that the row is highlighted.
- Use the scroll bar on the right to scroll down to the last item with the name Food in the column Product group.
- Now hold down the Shift Key and click on the first column for this item at the same time. in the selected area are now selected.
- Now select the term Kitchen from the lower Group Change area in the Bonorder column (make sure that only this field is highlighted in red, otherwise press Reset and select it again).
- Press Apply to make the changes.
Check their changes first when returning to the item master. If you find that you have made a mistake in changing the group, exit the item master without saving the changes.
With a right mouse click and the selection Filter you can enter filter texts per column, which are applied together immediately at the table view (the result is AND):

Unfortunately, it is not possible to search or filter for fields where the content comes from a list selection. The fields are greyed out accordingly:

However, most of the fields concerned can already be filtered in the item master, so that the table is started filtered accordingly. See Filter and find items items in the item master.
A filter can be reset with another right mouse click:

Further topics: Manage stocks in tabular form
Back to the overarching topic: Basic knowledge 3: Special knowledge