Hypersoft procedure for zeroing

In certain situations, it may be necessary and correct to delete the transaction data and parts of the master data of the POS system. For more information on the regular deletion of master data as intended, click here . After a test run ("Burn In" at Hypersoft) and the briefing of the employees on "the new system" and before the actual commissioning of the POS system in your house, a delimitation can be made with the zero setting. The program Zeroing enables you to remove certain data areas. At the same time, these actions are logged so that you can prove these interventions if necessary.
Logged zero position
The zero setting of the system, which may be technically necessary but is logged at Hypersoft, thus represents a safety aspect.
In the case of systems from competitors that do not provide this or similar functions, you must assume that data from the test phase will be mixed with your operational data or that deletion of data with insider knowledge is possible and can then take place without logging.
If a support code needs to be retrieved from Hypersoft, this additionally ensures logging to the Hypersoft Helpdesk.
In Germany the zero position is signedin the TSE .
The log file contains the information about the zero position. In a Hypersoft network there is only one file within a client which is valid for all cash registers. Details can be found in the HS-SSP document. Other internal log files of the POS system are also removed with the zero setting. This procedure obliges you to take other measures to comply with your retention obligations, if any. In Germany you are at least by the law for the testability of digital documents GDPdU (of the 01.01.2002) and the cash security regulation 2020 obliged for this.
The Zeroing program can only work correctly if you have made sure that no other Hypersoft programs are running (except Terminal Commander, Web Clearing and the MCP). Running programs can otherwise cause a file access conflict.
Although the zero setting is carried out at the location, it also takes into account dates already created in the portal (for executions from 17.11.2021). Please make sure that you also provide a connection option to the portal when zeroing.
A set-up master token of the Hypersoft POS Portal Integration is also required for zeroing in the portal.
Depending on the desired zero position, the following portal applications are considered:
Cash register system - Delete bookings...
-
enterprise reports
-
Live Report
-
B2B Data Interface/ Revenue (API)
-
MOBILE PEOPLE Accounting
-
eSolutions - Order lists
-
Cash book (content+cash books)
-
property report
Stock Management - Stocks...
-
B2B Data Interface/ Stock (API)
Time Recording - Stamp Data...
-
Time calendar in the portal
Customers and loyalty cards - sales and credit...
-
Bonus system (points/ accounts) - zeroing of points from the respective location
Delete Campaigns with Zero Position...
If the portal is reset to zero, all campaigns, checks, activities and their view in the portal that have not yet been settled are reset.
If you have used the Services, deletion does not release you from the obligation to pay.
Excluded areas
NO zero setting takes place with the following programmes/ modules:
-
Cashless Options (there is a notice at the POS)
-
eSolutions / Reviews
-
My contracts
-
My bills
-
Report Collection (Reports that are no longer required can be removed manually via the main view)
-
TSE Archive
-
Web Vouchers
A master token that has been set up is required for the zero setting in the portal.
If, for technical reasons, a zero setting cannot be carried out in the portal, our support will be informed automatically so that we can deal with it as quickly as possible.
Execute zero setting
On the System tab in the Database & Tools program group, choose the Zeroing program:
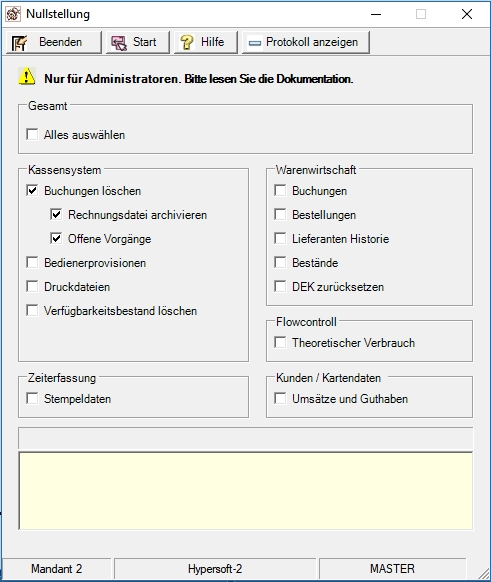
The Open Transactions switch is linked to the Delete Transactions switch and the transactions are automatically deleted together with the completed transactions.
| Element / Switch | Function / Description |
|---|---|
| option switch |
The option buttons allow you to select the amount of data to be deleted. The Select All option deletes all available options. |
| Details in the display area | If you want more information about the options, move the mouse pointer over an option to get details about the deletion in the lower area. |
| Start button | Press Start to confirm the selection and go to the confirmation prompt and logging. |
| Display log button |
Displays the previous contents of the log file by opening it. |
After you have made your selection for the zero position and pressed Start, you will be asked for the reason and a confirmation prompt will appear.

| Element / Switch | Function / Description |
|---|---|
| Select reason |
A reason must be selected from the list. The following reasons are available:
|
| Add description | A description for the action must be entered with at least 10 letters. An on-screen keyboard is also available for this purpose. |
| confirmation | You must enter the word YES. The Execute button is released for operation. |
| Execute |
If you press Execute, a final safety prompt appears which, after positive confirmation, executes the deletion of the data. Therefore we refer again to the necessity of a data backup before carrying out this action. |
Back to the overarching topic: Hypersoft Suite