Define ItemTAGs
The item tags can be called up via eSolutions / Configuration, or eSolutions / Self-Order-Terminal as a tile or in the submenu via the three dots in the title bar.

If you use both the webshop and the self-order terminal, your settings will be used equally for both systems.
List of TAGs
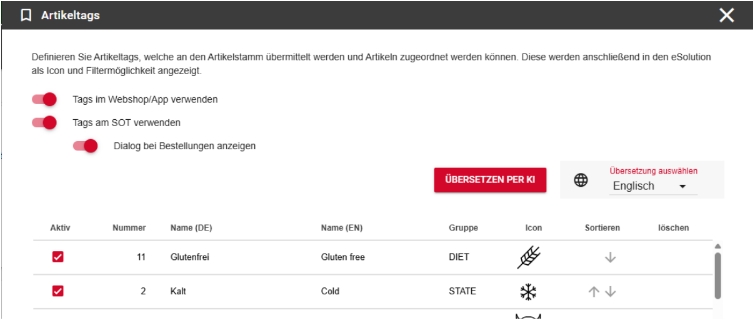
After calling up the item TAGs, you will get an overview of all created TAGs. Hypersoft already supplies 37 common TAGs as "system tags" including the icons.

If you want to use your own days (in addition), we recommend that you add our SystemTAGs and possibly replace our icons with your own, instead of not using our TAGs and creating them all from scratch.
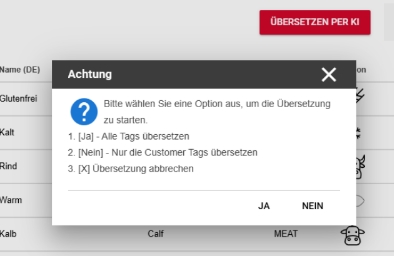
The Translate using AI button can be used to translate all tags at once (individual editing is possible in the "Article detail" dialogue).
After selecting the foreign language and selecting translate by AI, you can choose whether only customer tags or all article tags should be translated.

System tags...
Hypersoft already supplies 37 common TAGs incl. icon as a system tag. You can use these TAGs at any time and adjust the colour as HTML colour code if desired.

The names and groups of system tags cannot be changed.
If you would like to use your own icon instead of the assigned icon, you can switch this on by selecting Use own icon and uploading an icon.
The groups are based on international abbreviations and are chosen as short as possible in order to be used by the programmes in a space-saving way (for example, on the small screen of the mPOS devices). The capital letters support the separation from the actual tags.
Create individual TAGs
You can create individual TAGs via the Add item tag button.

To do this, enter the desired name in German and English and optionally select a grouping for it. If you would like to use this TAG as an icon, you can upload your own icon in SVG format with a maximum file size of 50KB. Please make sure that your uploaded icon already corresponds to the desired colour, as colour adjustments are only possible for system icons.

Please note the following restrictions when uploading your own SVGs at this point:
-
Pass only the SVG element "<svg ...>...</svg>" as an svg file.
-
Do not use ids in the elements "id='...'"
-
Do not use 'class' or 'style' attributes.
-
'viewBox' - and do not use fixed positions or sizes as the display is relative to the resolution.
-
The 'fill' attribute should not be set, as this overrides the automatic colour setting of our application.
Delete TAGs...
If you no longer wish to use tags that have already been created, you can remove them using the delete symbol.

System tags cannot be deleted, only deactivated.
Activate or deactivate TAGs
All TAGs are activated in the standard and are thus transferred to your local item master. If you only want to use some TAGs, you can deactivate all TAGs you do not need at any time so that they are not (no longer) transferred to your item master.
A small number of TAGs makes it easier for you to assign the TAGs in your item master.

Once you have created and defined all tags according to your intended use, you can activate their use separately in the webshop/app, as well as on the SOT, and transfer them for further processing and display.

Show dialogue when ordering...
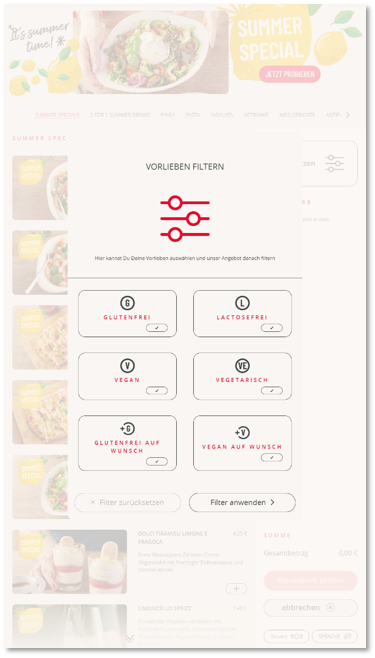
At the SOT, you have the additional option of automatically calling up the tag selection dialogue after the order type has been selected, in order to present the option of filtering by tags to your users particularly clearly.


If the option Show dialogue when ordering is deactivated, the user can still filter your offer by tags, but must call up the dialogue for filtering separately via a button instead of having it displayed directly at the beginning of his order process.
Further topics: TAGs and features at the SOT
Updates of the master data...
As soon as you have assigned the TAGs in the Item Master, the TAGs and filter options are offered to your users. The SOTs may have to update the master data first (during operation), which you can trigger manually.
Sorting the tags...
The sorting of your TAGs has an influence on the display in the Item Master and the shop / SOT. Use the arrows to change the position of the TAGs:

Assigning ItemTAGs to items
The assignment is done in the itemmaster in the area Additives, allergens and tags.
Back to the overarching topic: ItemTAGs in the customer master