mPOS Keyboard
In this area you can manually configure the keyboard of the mPOS.


| Element / Switch | Function / Description |
|---|---|
| mPOS Scheme (Skin) |
To use schemes and define the number of buttons, see the ThemamPOSmPOS scheme / skin for situations and device types. |
| Assign the same keys for all skins |
Activate the option and mark the keys (visible yellow frame) which should always be displayed on all pages. The function is only active on the first page and can only be used there.
|
| keyboard programming |
With the item search you can position the items and categories on the keyboard. For a better overview the items can be filtered according to categories. A full text search for the items is possible in the text field below. Since the following item is automatically marked when an item is positioned, you can quickly position further items. With the register Groups / Functions you can select the groups which are put on the keyboard just like items (when selecting a group on the CLOU MOBILE, the items contained are then offered for booking). If you select an item or a group, the field next to it is displayed in green for clarification (here to be recognized as a grey bar). The mouse pointer then represents a hand and you can position the item or group on a free field. If you leave the keyboard to be assigned with the mouse, the mouse pointer is displayed again. For your protection no key can be positioned anymore. A button is removed again with a right mouse click. With the setting Overwrite Keys or Indent Insert Keys you can decide whether the insertion or deletion of an item "moves / indents" the existing keys or whether the existing keys remain positioned. Putting functions on the keyboard... All functions of the mPOS (which are offered in cashier mode via lists) can also be set as a key. An individual text can be assigned for each key (except for items and product group keys).
You can define an individual colour by pressing the small button (see picture above). The F displayed on the key (only visible on the PC) indicates that the key has its own colour assignment. If you are working with layout templates that you update or change elsewhere (head office or location) after assigning them in mPOS, please call up the mPOS settings here once and press Save so that the changes can also be applied. The yellow F letters on the keys indicate that a color has been assigned to the respective key with the Fix key option. Requirement item... Description below: Requirements |
| Stand aside... |
With this function you have the possibility to create a page which can be reached via a freely definable button. For example, you can use the Coffee button to reach a page on which you can compile coffee and cake independently of the product group. You can also select the buttons in the preview directly to navigate to the corresponding page. |
| Overwrite or insert keys 7 indent | If you activate insert/ indent and add items, any existing items are moved one place further (and gaps are automatically closed when deleting). Otherwise, gaps remain and items can be easily replaced. |
| Allow multiple items | This option allows you to place items on the keyboard more than once. |
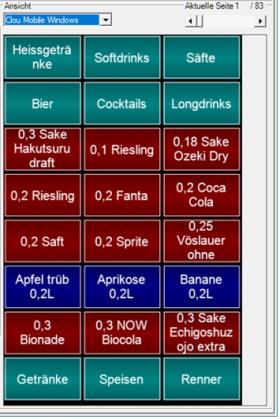
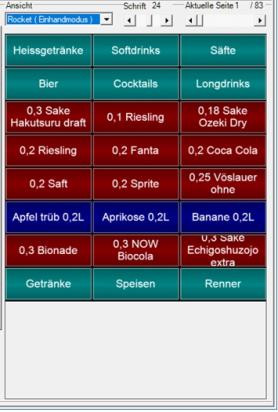
| view | Please note that you select the category you want to set up via the View selection: Clou Mobile for Windows, and One-hand mode (for the one-hand portrait format). This allows you to respond extensively to the respective requirements. In addition, there is a setting for the font size used in the two Rocket modes, default is 18. If a ROCKET/ one-hand portrait format is configured, the view is adjusted accordingly. To make CLOU MOBILE for Windows and ROCKET view approximately the same in mixed mode, you should use a font size of approx. 24 (even if this means that texts can no longer be displayed in 3 lines in one-handed portrait format). Views as an example... Conventional view: Clou Mobile Windows. One-hand mode (one-hand portrait) with font size 24, texts can only be displayed in a maximum of two lines. Normal view One-handed portrait format with font size 18.
|

At the bottom left, key images can be loaded by clicking.

| Element / Switch | Function / Description |
|---|---|
| writing | Key text is displayed |
| frames |
Free space as with any key, when off, the images join seamlessly without transition. |
| Fill in | The image fills the entire button (is stretched), regardless of the size. |
Context menu above the keys...

Standard Copy, paste and delete a key.
Insert or delete lines. With Global, all subsequent key pages also shift. Without global, the changes only take place on the currently displayed page.
Fast booking with PLU keyboard
The numbers 0-9, * and CLR / PLU can be permanently assigned to the keyboard. So you can build your own "PLU keyboard". The input is also possible with number: "Example: 5*4711" books 5 times the item with the number 4711. When booking, the booked item is displayed briefly, the program remains with the fixed keys and does not jump to the transaction content.
Back to the overarching topic: Setting Hypersoft mPOS


