Edit customer data at the POS
In addition to being able to edit customer data in the MCP, you can also use this conveniently and quickly at the POS. The dialog for editing customers also enables you to create new customers or change existing customer data directly at the point of sale. This solution is especially strong when you request exactly the information you need from your customers in the optimal order and hide unnecessary fields. Since price levels and losses can also be assigned here to customers who may not be accessible to everyone, you can assign these (and other) authorizations to the operator.
Press the New or Edit buttons from the Find Customers checkout function:
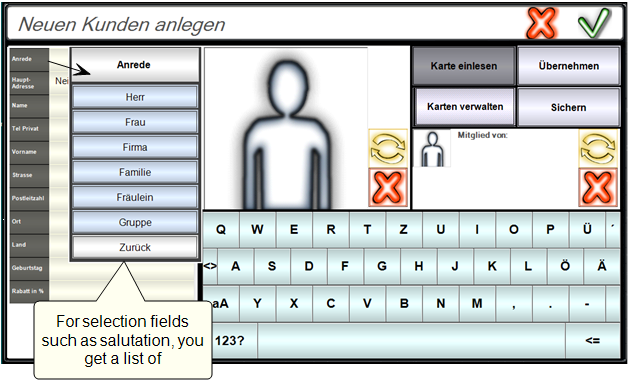
The individual fields are positioned one below the other like items in a process. The number of fields, their sequence and function can be freely set. Active input fields have a dark border, locked fields due to settings or permissions are slightly lighter.


| Element / Switch | Function / Description |
|---|---|
| X | Does not save and cancels the entry of client data. |
| Apply | Choose Copy to save the customer and use it immediately in cashier mode. You switch to cashier mode and not to search. |
| Green hook | The green OK hook saves the data and returns to the search. |
| Read map |
Press Read card and then have the desired card scanned by an appropriate reader. The different cards and readers are different in handling. Further topics: MOBILE PEOPLE Cashless Options |
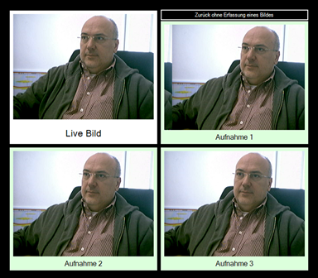
| customer image |
In the middle part is the customer picture. The yellow button leads to the image capture, the red button removes the image. A dialog with a selection of photos appears for recording. Top left is the live image. 3 shots are taken within one second. If you click on the live image, 3 new shots will be taken.
If you click on one of the 3 recordings, it will be taken over. |
| Member of: | In the right part is the affiliation to a main address, which can be added / changed or removed here. Add / Change calls up the customer search and a customer or a company can be selected. The data will then appear accordingly in the right-hand field Member of:. |
| keyboard |
The keyboard can remain in capital letters. If you write in capital letters, the programme automatically converts this to upper or lower case letters if possible. |
Automatic upper and lower case...
The automatic upper and lower case can be switched off by selecting the input field. The field then gets a yellowish background. Selecting it again switches the automatic control on again.
Birthdays...
Birthdays are entered directly as text TT-MM-YYYYY , separations can be omitted and are inserted by the program. So "12041965" makes 12.04.1965 so the input can be done faster.
It also works 120465 - without century
Main address...
The main address is the address of the company/group.
Price levels and losses...
These settings may only be made by authorized operators. Note the possibilities that arise when you create such data directly in cashier mode and check the postings to customers accordingly.
Postcode...
When entering a postal code, the corresponding location is automatically determined from a Hypersoft database. If the location field is empty, it will be filled. If you only change the postal code later, the city will not be updated automatically. If this is desired, the Place field must first be cleared.
The first input of the day can lead to a small delay, because the postal code database is loaded once.
Working with corporate clients
If a corporate customer has been selected, the button New member...appears.

If you press this button, the company is already selected during the entry and the button Insert address appears.

If Insert address is used, name & address from the company will be inserted into the current record.
Fields that already have contents are NOT overwritten. In this example, everything including the name would now be taken over. If the surname / first name were already entered, only the address would be taken over.
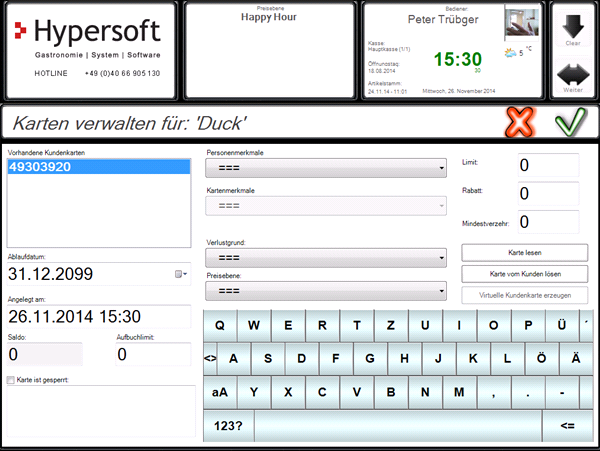
Operator authorisations with cards...
The following operator authorisations apply to the fields Loss reason, Price levels and Discount:
Operator authorisations and the locking of individual fields from the POS layout.
If you are not allowed to change any level / loss or discounts for a customer, you are also not allowed to do so for a card.
The Balance field cannot be edited as this is the prepaid balance. Changes to the prepaid balance can only be made by recharging and paying.
accreditations
If you work with accreditations (only customer master 1.0), these can be switched by Yes/No at the end of all fields.
Further topics:
Back to the overarching topic: Customer base at the POS