Device management devices
Sorting the units
The displayed devices can be sorted by the following items:
- End of lifetime (descending)
- Purchase date (ascending)
- End of warranty (ascending)
- Description (ascending)

Overview of the
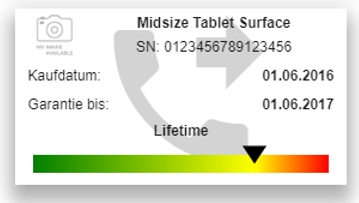
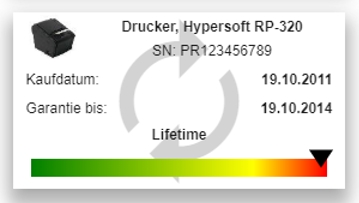
One device is displayed per tile. A tile contains a preview image of the hardware, its designation, the serial number, the date of purchase and the end of warranty. The progress of the lifetime is also displayed graphically. If the marker is located directly on the yellow area, the lifetime has reached 100%. The red area indicates that the lifetime has already been exceeded and should be traded.
In addition to displaying the lifetime in the form of a bar, the background color of the tile also changes. A yellow background indicates that the end will be reached soon and a red background indicates that the end has already been reached and exceeded.
At the end of the dialog, you can click on Create new device to add a new self-defined device (not a device supplied by Hypersoft).
Other features...
The tile of another device (not from Hypersoft GmbH) is underlaid with a telephone receiver with an arrow as a watermark. This also means that the corresponding service partner for this device is external (not Hypersoft ).
If the watermark in the tile is the circle symbol, the device is currently in an RMA exchange or repair process that you can process in the device Devices RMA Management.
three-point menu
In the three-point menu it is also possible to create a new device. You can open the device template management or enter the site management.
By selecting a tile in the location details or in the RMA overview, a clear detail view is opened.

The Service Partner entry contains the service partner responsible for the device. Depending on the permissions Manage devices (Hypersoft) edits and Manage devices (Other) edits, the following items can be edited.
Request a quote
If the device has reached less than 6 months of its remaining Lifetime Remaining Lifetime, the Request Replacement Quote button can be used to contact Hypersoft or your reseller (also via the three-point menu). In the contact dialog that appears, the contact information known to you such as telephone, mobile, e-mail and FAX is displayed and can be revised if necessary.

ATTENTION: Editing this user data updates the user data stored in the portal.
In addition, an alternative callback number and a comment can be stored.
Manage device templates and device types
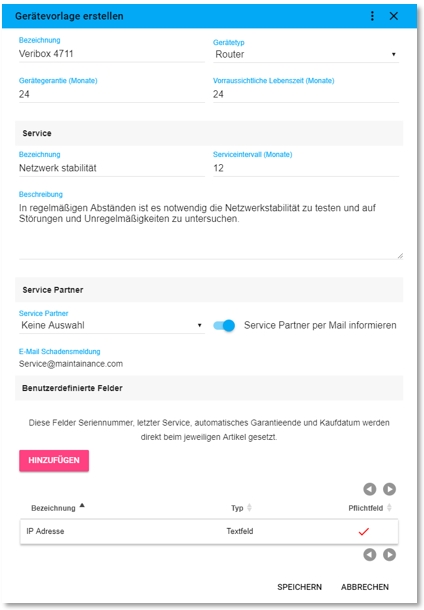
In order to create devices, a template must be created that represents the device type of several identical items and assigns the service partner. For example, you can create a device template for fire extinguishers and then use it as a basis for each fire extinguisher. Location and further information are then stored for each device. A new device template can be created via the three-point menu and Create New Device Template. A new template has at least one name for the device. In addition, the previously created device type can be selected, as well as specifications for warranty in months and the expected lifetime. If the device requires regular service, this cycle can also be defined here in months.
This can be selected under Service Partner. You can also specify whether this person receives a detailed mail notification in the case of a new Initiate RMA procedure.
User-defined fields
The Custom Fields area contains all the templates created for this device template. These fields can be text fields or selection lists. By clicking the button Add, new fields can be added. Selecting the respective line opens this field. The template can be deleted via the dialog menu.
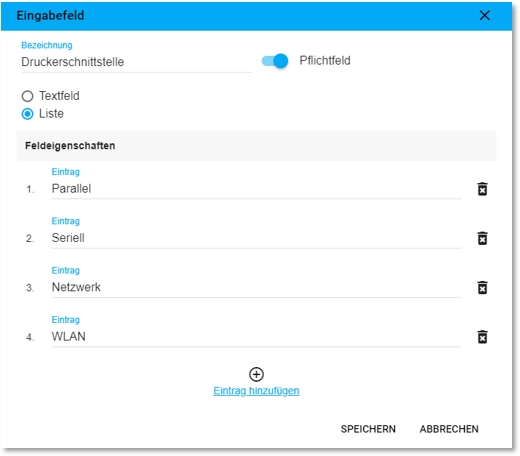
User-defined fields differ between text field and list. Both are given a name when they are created, and mandatory fields can also be specified. These settings form the template for later device creation. If the type Listis selected, it is possible to assign up to 10 (ten) values to it for selection. If, for example, the fire extinguisher type were used, it would be possible to use powderfire extinguishers , waterfire extinguishers , foam fire extinguishers etc. for selection per device.
device templates
The device templates can be accessed via the page frame Service Partner / Devices, via the three-point menu, or in the device overview of a location via the dialog menu Manage Device Templates.
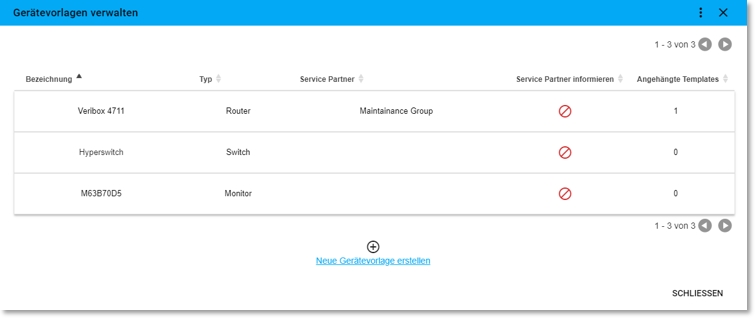
All templates are listed in the Manage Device Templates dialog. Here it is possible to see at a glance which service partner is responsible for the respective devices and whether this partner should be informed as soon as an RMA procedure is initiated. The dialog menu allows you to manage self-defined device types such as routers, switches, telephone systems, etc. quickly and easily. With Create New Device Template you can create a new device template.
device types
To create a device type, at least one designation for the device must be entered.
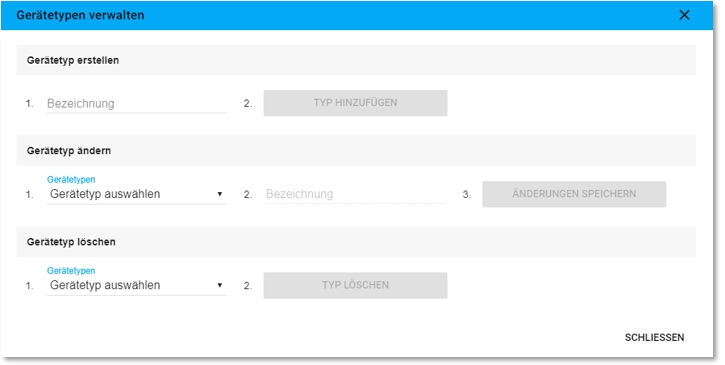
First the input or selection takes place and then the corresponding command. New types can be added on the Create Device Type tab. Under Change device type an existing type can be selected and renamed and under Delete device type an existing type can be selected and deleted.
Creating Other Devices
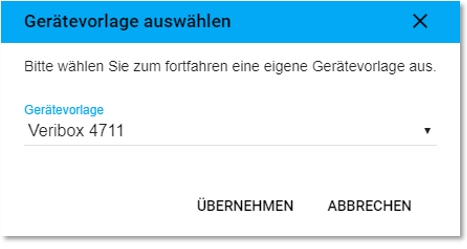
If you want to create other devices (not from Hypersoft), this can be done via the Location Details dialog via the dialog menu and the Create new device button. When creating a new device, a selection dialog appears first in which you have to select a previously created master item as a template and accept it.

In addition to selecting the date of purchase, the location of the device can also be selected here. The user-defined fields can also be filled here. The serial number and certain user-defined fields under User-defined fields are mandatory fields.
If a new device has been created, it can be opened in the same view as Hypersoft devices.
service partner
The Service Partner Management can be opened via the Dashboard / Device Management in the page frame Service Partner / Devices or via the three-point menu.
Special feature: Your service partners can get access to your device management.
If a service partner is assigned a user, this user can also register at www.MyHypersoft.de . However, he only sees your device management and can only edit his own devices.
All created service partners are listed in tabular form in the Service Partner Administration dialog. Here, for example, it is possible to see the contact email address at a glance.

A new service partner can be created using Create Service Partner or the three-point menu.

The company name is a mandatory field, address data optional. The address eMail for damage reports is used when the command Initiate RMA procedure is executed in the detail dialogue of a device of a service partner. A mail with all important device information is then sent to the service partner.
A service party can be deleted during processing using the dialog menu under Delete Service Party. If users are set up as partners for this service, they are automatically blocked and can no longer log on to MyHypersoft.com.
By activating the button All user logons locked all users of a service partner can be locked for access to the portal (the service partner receives the note locked in the overview list).
Service Partner Users
Service Partner Users can only be added to an existing service partner. If it is a new creation, add user is deactivated before the first saving. Only a saved user can be added. Alternatively, you can select existing users for editing in the table.
The First Name, Last Name and User Name fields are mandatory for users. If you assign a password, this must be confirmed twice.
Each user in this category is automatically assigned the Service Partner - Hardware permission. This profile specifies that a user of a service partner can only access device management and edit his or her own devices.
If an address has been stored under eMail, the user will automatically receive an email with his access data when saving the data for the first time. If the password is changed for existing user data, an information mail is also sent.

The login of a user can be prevented in the user dialog by deactivating the button Login is allowed. A user can be completely removed via the three-point menu with Delete".
Further topics:
Location overview of the device management
Back to the overarching topic: Device Management Dashboard