transfer acceptance
Normally, goods can be posted directly from a source to a destination. In certain cases it is useful to optionally use the transfer function of the CONTROLLER to ensure the transport route and the acceptance. This function can be optionally activated in various ways and the CONTROLLER then maintains the In Transfer status for the specific situations between delivery and acceptance.
Transfer confirmation for manual booking
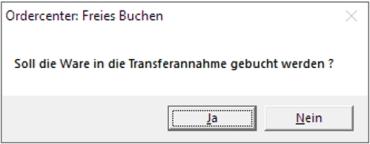
For manual bookings in the order centre you can activate the transfer acceptance via the switch Querying Transfer Acceptance During Transfer Posting directly in the order centre. The decision can be made again for each booking so that you can differentiate. As soon as this option is activated, the following query appears for each booking:

If this is confirmed with Yes, the goods are deducted at source, but transferred to the transfer acceptance for the destination. The goods must then be accepted and only then entered into the stock of the destination. Unaccepted transfers are booked back on /TTA and credited back to the source.
Automatic posting back to TTA is only possible if the MRP monitor is running or being used at the time.
Transfer confirmation for automatic bookings from the disposition monitor
For automatic bookings from the disposition monitor you can use the settings Post stock at recipient without acceptance confirmation in the disposition monitor to regulate globally or for individual sales outlets whether they should confirm internal deliveries.
Confirming internal deliveries is therefore an alternative to unconfirmed delivery. In the case of unconfirmed delivery, the goods are booked from one location to another at the time of booking. If you work with the transfer acceptance, the goods are posted from the source to the status In Transfer and from the status In Transfer to the target by the transfer acceptance.

For this purpose, the transfer acceptance is started at the destination from the cashier mode. All transfers intended for the destination will be offered for acceptance. You confirm the arrival of the goods at their destination, debit the warehouse there with the goods and relieve the open transfer.
Carry out transfer confirmation
For transfer acceptance, the operator needs the authorisation Transfer acceptance allowed....
The transfer acceptance posts items from the transfer status to the destination. You can have documents printed for acceptance by setting Documents and also accept partial quantities or make return deliveries.
The program is normally started directly from the POS system at the destination. To do this, use the cash register function Transfer Acceptance. When you start from cashier mode, the destination is automatically selected and fixed based on the assignment of the point of sale.
The transfer acceptance program can also be started at the MCP from the CONTROLLER program group.
Check the acceptanceconfirmation setting.
If you work with transfers and do not want to forget the acceptance of the items for the daily closing (or operator closing) unnoticed, activate the check for transferpostings.

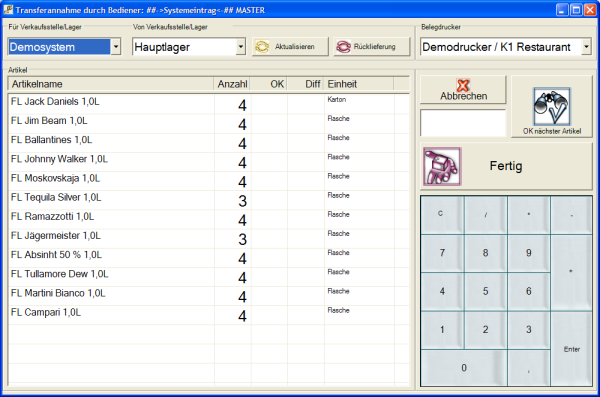
You select a line and confirm the acceptance with OK, the transfer is then posted with Finished.
| Element / Switch | Function / Description |
|---|---|
| For point of sale / warehouse | The destination of the transfer is set here. If you start the program from cashier mode, the setting for the point of sale is already defined. |
| From point of sale/warehouse | Here you can set the source from which you expect transfers. This setting is largely automated, because as soon as transfers are available, they are displayed with the respective source. |
| Update | If you have already started the transfer acceptance transaction and new transfers have been created, you must press the Update button to display these new transfers. |
| Return delivery or inbound delivery |
The mode of the program is Delivery. You can use this switch to switch between return delivery and inbound delivery. A return delivery is a transfer from this (or the selected) point of sale to the former source. Return deliveries can be set up in the stock specifications with the Reduce type for special items. Further topics: Define stock specifications |
| receipt printer |
Select the document printer on which you want to print a confirmation. If you do not want a printout, choose Without printout.The printing is done via the front office printer. |
| abort | Discards your entries and exits the program. |
| OK next item |
When you select a row, the number in Transfer is offered for confirmation. Press OK to activate the complete number. If you want to confirm a partial delivery, overwrite the number offered and then press OK.
Changes to the number are noted in the Diff (difference) column. The missing (here 3) items remained in the transfer acceptance and can be booked in at the next opportunity. The number of completely confirmed items will be removed from the list. |
| Finished | With Finished, the postings are executed and the goods are transferred to the destination. |
Deviating internal delivery quantities via transfer
When accepting transfers, you can temporarily accept smaller quantities so that the rest can be brought and posted later. However, they cannot assume a higher number than the quantity in transfer.
This is a deliberate restriction so that staff only deliver the maximum amount of goods that have been ordered. You can react to all situations by setting the stock specifications, the items and the transport unit. If unexpected requirements arise for MRP, switch the MRP monitor to MRP controller and adjust the quantities if necessary before you post them.
Further topics:
Back to the overarching topic: Touch-optimized programs
