Design customer monitor
With the Customer Display Screen Setup, you can use a second screen as a customer display and elaborate this customer monitor in a multimedia way. For this purpose you can use cash register terminals with a second monitor (alternatively special USB monitors). The customer monitor is compatible with the Hypersoft POS and the Hypersoft ePOS Tablet. In the head office, you can select the corresponding client in the MCP to design the customer monitor for the respective location.
Hypersoft supports special monitors and POS terminals and checks all functions for compatibility. Other hardware may not be supported.
Hide booking list and NoCOO code...
After a preset timer, the list of bookings should be hidden from the optional NoCOO code so that other customers cannot see this data. To do this, use the timer at Posting List (Monitor).
Setting Up the Customer Monitor Screen
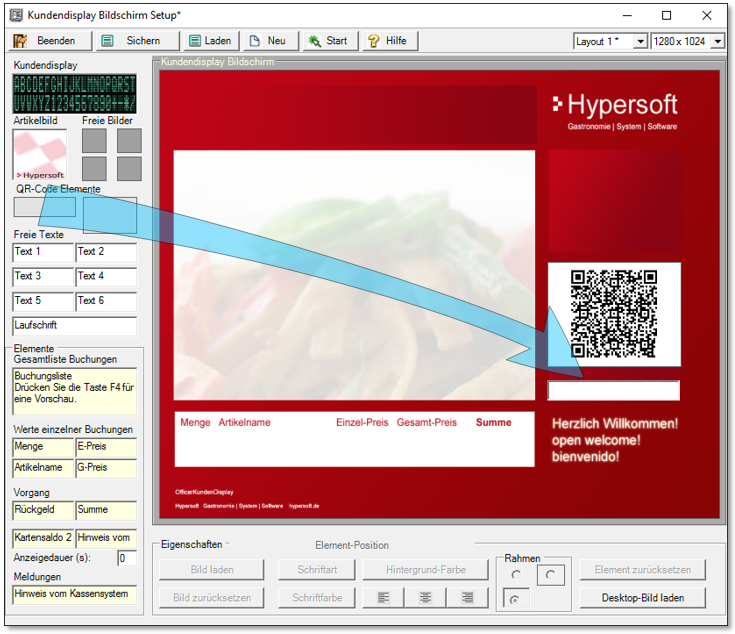
If you select the Screen type in the Set up customer display dialog, you can use the Edit button to set up the customer monitor.

Set up NoCOO code on the client monitor...
Below the item image are two elements for displaying QR codes and text info. The size of the QR code is determined in runtime and adjusted so that a white frame remains when it is displayed. This provides better readability.

-
The info element is used to display a note about the QR code.
-
The NoCOO QR code is displayed in the fields and the required NoCoo PIN in the text field.
-
The waiting time must be entered locally on the corresponding cash register, see Set up customer display.
-
NoCoo short receipt must also be set!
Example:

Basically, the elements from the right editing bar are dragged into the screen of the customer monitor and adjusted. For testing the monitor can be started here. Once it has been set up with a cash register station, the cash register station automatically starts the accreditation monitor. By pressing the right mouse button you get an additional menu with further functions.

Templates are provided for the customer monitor, which you can select in the selection of layouts at the end of the list:

Decide on a layout template and then select the layout number you want to use. Click Saveto apply the template. Then you can customize them individually. To the template overview...
| Element / Switch | Function / Description |
|---|---|
| New | Attention, with the button New you start the design of your layout anew and discard possible changes. |
| launch | The Start button activates the animation if corresponding elements such as tickers are used. This mode is only for testing your layout. Later, the layout is started from the corresponding POS station. |
| Layout 1-99 | Different storage locations are available for the design of different layouts. Note which layout is selected for editing. |
| customer display |
The customer display is a graphical element that appears exactly like the customer display. You set up the customer display as usual and you can also use the scripts. Place the customer display on the customer display screen and drag it to the desired size. Further topics: |
| item picture |
This element displays the item image from the item master when the item is posted. If you use an item with queries, the customer can be shown an image that supports his selection. You can also place an info item with the POS function item number as a macro on a merchandise category key in order to display an image when the key is pressed. |
| QR Code Elements | The size of the QR code area is automatically determined and a white frame is added, as this allows better machine readability of the code. The info element can display a note text for the QR code. |
| films | With a right click you can add and play movies in AVI format. |
| booking list |
The booking list represents the complete booking transaction in a list. If the frame is set to without, the heading is also hidden. Supports also Splitting, New Balance, Reversal. |
| Free texts |
You can enter free text after you have placed the element on the screen. If you select the element, you can format it with the elements at the bottom left. You can also access the formatting with a right mouse click. In the free text fields, variables can also be included in the text. &D = Date / Date &T = Time / Time &U Operator / User These variables can easily be used in the text. Example: "It's &T on &D and they're served by &U." Results: "It is 13.20 on 25.05.2018 and they will be served by Master Jacob." |
| ticker | Creates a ticker element that you can fill and format with your own text. Press Start |
| item information | The item information highlighted in yellow corresponds to the variables on the customer display. If you use these elements, they are replaced by the relevant information when you post the items or make the payment. For example, E-Price stands for unit price and G-Price for total price, if you select the element you can format it with the elements at the bottom left. You can also access the formatting with a right mouse click. |
| Reset element | Removes the selected item from the screen. |
| Desktop Image Loading | Here you can load a background image. All other elements cover this. |
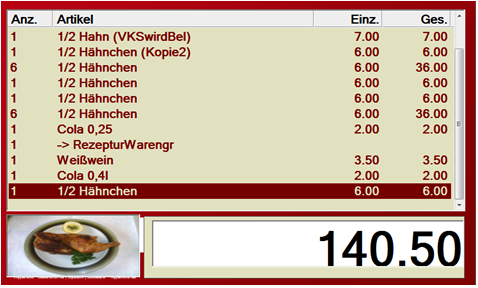
Example of a simple representation of the posting transaction using, among other things, the Posting listelement:

Monitor as customer display with the elements booking list, item picture and total.
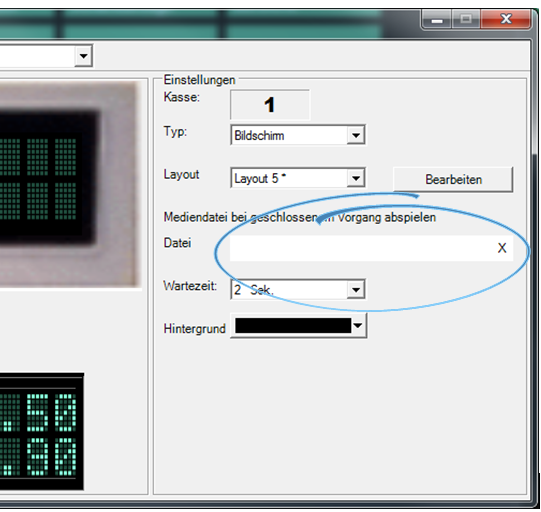
Clicking on the file field opens a file explorer.

Formats for images and films...
Films / images in different formats can be selected. While compressed formats are often preferred for transport, less compressed formats should be used for the POS hardware (especially for videos) so that the hardware is not still busy with conversion. Since videos for this use tend to be short and small in format, transport should also not be a problem. If your format is incompatible, you can use appropriate converters, some of which are available free of charge.
To play the formats, the correct "codecs" must be installed on the PC (if files in "special" formats are selected). Simple test: If the film runs in the Windows media player of your POS system, it will also run on the connected customer monitor. The X resets the file selection.
In checkout mode, the film is started or the image is displayed after a process is closed, both after the set waiting time. Opening another process ends the display. The background color can be used in the picture display if the picture does not exactly match the monitor format. The missing area will be filled in the selected color. For movies, the background cannot be influenced.
Further topics:
Back to the overarching topic: Customer display and customer monitor