item master Area cash register
The Checkout area contains the settings for the item for sale on all systems. Different item types are available. In the cash register settings, you mainly organize the presentation of the item in the form of a key layout and set the order receipts. In addition, it offers a number of useful special functions.

| Element / Switch | Function / Description |
|---|---|
| item picture |
You can assign multiple images to an item. Picture 1 can be displayed in checkout mode and on the customer monitor using the item memo function. The images can also be used as key images on the keyboard if you follow the scaling and instructions described there. Pictures 1 to 9 can also be used in the recipe data sheet. All images will be converted to JPEG. With PNG images, the PNG is also retained, since this can be required for interfaces. If you press the YourAPP button, a dialog opens where you can assign images more clearly.
X deletes the respective image. The button with the three dots opens the file browser to select an image. The format and quality specifications are checked during assignment. With the button Load image and calculate automatically you can select an image that will be converted for all formats. For this purpose, the images are reduced in quality until the maximum file size is undershot. Thus the parameters are kept with all 5 pictures. Any edges (due to different aspect ratio) are filled in white. Further topics: |
| /CO² Carbon Footprint |
Here you can enter the value that applies to this key figure. You can find the relevant information for food on the Internet and enter it here.
The value is currently displayed in the item memo of the POS and item info at the mPOS. The eSolutions integration can also output this. |
| Discount eligible | Here you can disable the application of discounts to the retail price. |
| Minimum discount price | If required, store a minimum amount that must not be undercut by discounts. The minimum amount applies to all price levels. |
| ticket type |
For the ticket system, a factor (multiplier) and layout can be assigned to the item. The factor 4 makes it possible, for example, to produce 4 tickets with one item. Further topics: Ticket type and layout |
|
Only with item |
Use this option if you want the POS system to print on another order ticket. For this purpose, the topic of Best Practice double receipt only on demand A different approach for complex requirements is described in the section Queries with a different order group. |
| dispensing items |
In this area you can select a dispensing item from the list of dispensing systems function numbers. This selection is used to synchronise the bookings with the dispensing system. This selection is only available if you have entered at least one dispensing item in the list of dispensing system function numbers. To call up the list, use the small direct start button directly above the selection. An item is therefore defined as a dispensing article if it has been assigned and saved in this area. Scale items... A scale item must also be categorised as a dispensing item. A number such as 127 is then the PLU number of the scale (which is also used on the scale receipt). Further topics: |
| Depending on item |
You can make the possible posting of the current item dependent on whether another item has already been posted in the transaction. Otherwise the booking will be rejected at the cash desk. Here you can select the item whose posting must exist. Please also activate the item option Dependencyitem . With this you can, for example, only allow the reordering of an "All you can eat" item if the chargeable item has been booked beforehand. The Postdependency item immediately switch enables you to post the dependency item without having previously activated New balance. If the original dependency item was removed from the process by cancellation or transfer (e.g. by operator manipulation) and the item requiring it remained alone (e.g. free refill), the corresponding postings are listed in the operator settlement. Further topics: |
| item group | The possibility to group items serves the later filtering according to this group. |
| Bonus Points MixMatch |
These bonus points have essentially been developed for customer base 1. The bonus points mentioned here refer to the legacy bonus system and not to the current one. Here you can define the number of legacy bonus points for the MixMatch programme that are assigned to a transaction (customer) when this item is booked. Bonus points are only stored in combination with the MixMatch program. The new bonus program is configured in the Hypersoft portal. |
| key text |
The key text is the text that is displayed on an item key at the cash register. With a placeholder you can also display the current prices. Further topics: |
| key layout | Select a layout template for your button here. |
| key image |
You can also place an image on the button instead of text and layout. Further topics: Using Images on Buttons |
| Edit group layouts | Since you can also define the layout using the merchandise category, you can access the merchandise category layout using the Edit group layouts switch. |
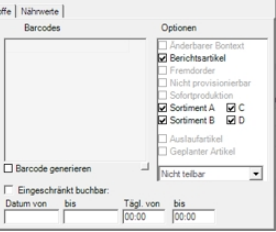
| barcodes |
All numeric barcode formats are supported. You can simply enter the barcodes in the lines and thus also store several barcodes for the same item. The same barcode can also be used for several items. By assigning the items to sales points, different items can then be booked with the same barcode (e.g. once with deposit and once without). If you have connected the scanner, you can send the digits directly to the line by clicking in the destinations and reading the barcode with the scanner. If you want to use several items per barcode, create them individually as base items (without barcodes) and combine them in a recipe with queries. You then assign the barcode to this recipe so that the desired item can be selected after scanning. More than one barcode: If the barcode is assigned to an item that does not exist in the point of sale or the assigned item is not saleable, the system searches for the next item with the same barcode. If this is found, it is checked according to the same criteria until an item is posted that is assigned to the point of sale and can be sold. Otherwise, no item is posted. Special case of acquisition without checksum...
When capturing barcodes, the new button Capture without checksum can be applied. This allows no checksum to be calculated or appended to 8,12 and 13 digit codes in order to freely capture barcodes. |
| Generate barcode |
You can generate your own valid bar codes with the Generate bar code switch. The barcode starts with 444 and is completed with its item number followed by a check digit. From your item number 1765 results then: 4440000017657 The space from 444 to its item number is filled with zeros. |
| Age verification | Enter a number to be applied as the age check in years for an age check, e.g. 18 for the age 18 check. Further information can be found in the topicAge verification |
| Menu | Items can be assigned to a standard menu course. Please see Menu course default. |
| Restricted bookability |
Here you can limit the booking of items to a date or time range. See the chapterTimed items for more information. |
| Item options |
The description of the individual options can be found on the page of the properties and options of the items.
|
| tare |
In the Tare field, enter the weight that is to be deducted automatically when the sales scale is connected. The Tara field is only displayed automatically (for bonus points) as soon as unit sales are activated. Further topics: |
Back to the overarching topic: item master Dialog


