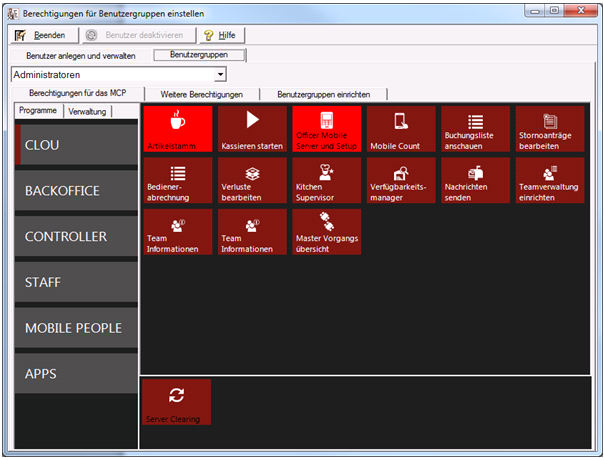
User groups in the MCP
User groups group together the authorizations for users. In the User Groups tab you can name the groups, select the icons that are available to start the programs and set additional permissions.
The user groups are only maintained in the site client in the site, but can be transferred from the head office to the branches using data backup.
Press the User management button in the MCP button bar. Select the User Groups tab.
The User Groups tab contains three additional tabs, which are described chronologically here.

The Permissions tab for the MCP

| Element / Switch | Function / Description |
|---|---|
| Select user group |
Select a user group to assign permissions to it. First, the users have all permissions. Selecting individual icons removes the program from the privilege set. Reselecting adds the programs back to the user group. You should work with as few user groups as possible, but enough to map the appropriate authorizations for all task areas. |
| navigation |
The Program and Administration tabs contain the program groups that are selected for setting. Work your way systematically through the program groups and set the symbols. Further topics: Navigation in the MCP |
| Disable and enable icons |
By clicking on a symbol it will be highlighted in grey. A gray icon represents a program that is not available to members of the user group. Clicking again cancels the deactivation and the gray background is removed. Your settings are saved automatically. |

| Element / Switch | Function / Description |
|---|---|
| Selection of authorizations |
The functions of the individual authorizations are determined by their names so that they do not have to be explained in detail - with a few exceptions. The possibilities will be expanded in the future. |
| Block access to user administration | This allows you to determine whether members have access to the user administration and can thus change their settings. |
| Hide locked programs | With this option, programs for which the user has no authorization are not displayed instead of just grayed out. This increases the overview, but can lead to misunderstandings among senior staff when special functions are sought or referred to during support. |
| Lock the following functions in the item master | In this area, you can block individual functions of the item master. |
| Number range for item processing | You can use this to restrict the number range that a user can edit. This setting is also suitable for store systems, as it allows access to the item master to be split. |
| Lock customer master for the following functions | In this area, you can block individual functions of the customer master. |
| Employee pool | In this area, individual functions of the employee master data can be blocked. |
| reporting |
You can lock the view of theoretical hourly wages in the employee time recording report and directly in the duty roster. Theoretical wage calculationFurther topics: |
| Processing clients and points of sale |
The clients available on the system are displayed in the list of clients. This varies depending on whether you are in a head office or a branch. Select the clients for which the user is to have access. This also applies to access to the Web Report. Access to points of sale refers only to certain reports in the Report Manager. Users with blocked points of sale cannot edit them in the MRP monitor. |
| Locking Other Functions |
Locks functions of the corresponding modules. The naming of the switches determines their function. Further details in the description of the respective programmes. The Edit check button allows users to edit completed check completions. |
| Allow other functions | Allows functions or access to the corresponding modules. The naming of the switches determines their function. Further details in the description of the modules. |
| Lock Order Center |
Allows you to lock cancellations and the seven tabs in the Order Center. PP Purchase Order blocks purchase price processing for purchase orders, /PP Goods Receipt blocks purchase price processing for goods receipt. In this context, use the setting Update purchase prices in order variant. |
Setting Up User Groups Tab

| Element / Switch | Function / Description |
|---|---|
| Name and list |
Select one of the existing user groups from the list and change its name by overwriting it. Click Save to save your changes. Unique names increase the overview when assigning authorizations and employees. |
Global Settings Area
You can select the format of the user names in the Global Settings:

Below you can activate the Increased security for operator secret numbers, which we hereby expressly recommend. See also: Key and card identification.
User rights area User rights area
To do this, please go to the information on the chapter Using the authorisation hierarchy.
Set special statistics for user groups

Back to the overarching topic: Create and manage users