Use duty roster
The duty roster helps you to plan all work centers according to your requirements and takes into account the suitability and planned absences of the employees. The duty roster creates print-ready duty rosters for you and transmits them to your employees. In the duty roster, you schedule the working times of your employees. Before the duty roster can be used, it must be set up: Set Duty Schedule
The duty roster consists of a duty roster monthly overview and the duty roster itself. Select the Duty roster programme from the Staff Organizer programme group:

Double-clicking on a calendar day opens the duty roster for that day.
| Element / Switch | Function / Description |
|---|---|
|
With Print you can print or email all employees' duty rosters. Further topics: Printing duty rosters |
|
| planning specifications |
This takes you to the Plan Specifications dialog box. Further topics: planning specifications |
| sorting | Here you can define the default for sorting the employee names. |
| Show deleted employees | This button adds the data of deleted employees to the view. |
| Select variants |
In the plan specifications, you can define variants for the standard plan specifications and select the required variant before the start of planning (per day). If a day has not yet been processed at all, you can select the variant beforehand. Only after the first assignment of a person does the duty roster remember the specifications and then no longer change them. Further topics: Working with Variants |
| Select year | The current year is selected at the start. In the upper area, you can switch one year forward or backward using the buttons with the year numbers. |
| months | The current month is selected. Other months are available for selection. |
| day range |
The day area contains several pieces of information:
The reservation information comes from the reservation communicator. Status symbols...
|
Details of the buttons and elements of the duty roster

If the duty schedule does not appear as here, but "empty", the schedule defaults are missing.
The time window for the start and end of the duty roster can be defined in the time recording settings.
Multiple Planning for Employees
If an employee is scheduled for several activities on the same day, the entry is displayed in light pink. If you hover the mouse over this entry, a message will be displayed "Employee is still planned elsewhere". In addition, information about the other activities in which he was scheduled appears.

Whether there is a concrete time overlap is not examined.
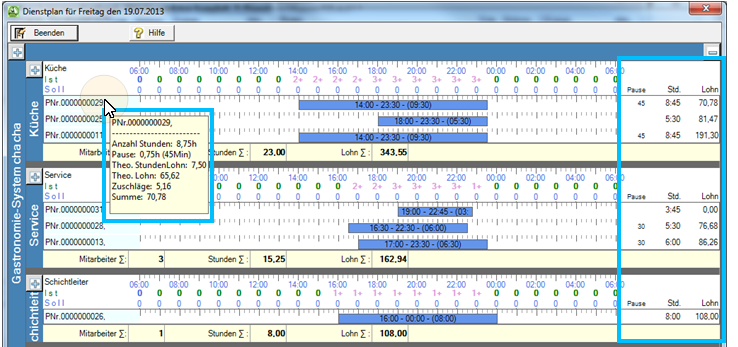
The wage type configurator is used to determine the wage costs in the duty roster. The automatic pauses are taken into account and the result is displayed on the right-hand side during planning. Tax-free bonuses and other established wage types are also taken into account. In addition, a sum is displayed for each activity.

If you do not want the wages to be displayed to the user, you can do this using the switch Reporting: Lock the following functions: Deactivate theoretical hourly wages in the user authorizations.
Further topics:
You can copy days on which employees have been assigned. Right-click a tag that you want to use as a template, and then choose Copy. Once you have arrived at the target day, right-click again and select the date of the source day to insert its data. The information of the employees is copied, not empty days and also not empty defaults.
Back to the overarching topic: The duty roster

 A green checkmark means that planning has been carried out and that the plan data matches the plan specifications.
 An exclamation mark indicates that a planned employee is assigned an absence in the planned time. Remove this employee or the absence.
 The red X stands for a day on which planning specifications have been entered but not yet sufficient planning data has been entered. As soon as plan data is entered, the missing number of employees is displayed.


