Laying out and designing keys
To assign keys to the keyboard, select either an item from the item list or a cash register function from the function list by double-clicking on it. Depending on what you have selected, the other keys are faded out in grey, so that you can place an item only on one item key (labeled PLU) and a cash register function only on one function key (displayed in white). For example, select the key Work as operator from the list of Cash register functions with a double click and place it on a free key. The moment you release the button, the Layout dialog appears to customize the button. Simply confirm the layout dialogue with OK and you will see the symbol representing the cash register function on the keyboard.

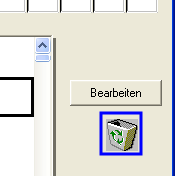
If you want to delete a key, select it by double-clicking it and click the Trashicon once. The item is now deleted.
You can also directly select another function to discard the currently attached one. For example, if you have selected the wrong function from the function list.
Change key position...
If you want to have a key in a different position, double-click on it and place it in the desired position with a simple click. Make sure that you do not place keys that are larger than a single key so that they extend beyond the available space.
Copy keys...
To copy a key, you can hold down the shift key (upper and lower case), double-click on a key to be copied and then release it at the target position.
You can also place buttons once so that this applies to all layouts.
Use preview
In addition to the permanent preview of keys over which your mouse pointer is positioned, you can also activate an entire preview of the keyboard programming. To do this, activate the checkmarks at Preview:

The keyboard programming shows a preview of the complete keyboard layout:

Place several keys on the same key
You can place up to eight functions on each key or items.
Items can easily be placed on top of each other up to eight times. If you press one of these item keys, you get a selection in cashier mode. But for this there are better methods such as queries on items that are less limited and more efficient.
The multiple hanging up is meaningful with cash register functions. For example, you can superimpose rarely used functions and access them with just one key. The selection is always displayed at the top left and all other keys are hidden:

A much more frequently used method is the creation of macros from cash register functions.
Search for items and place on keys

From the List Contents area, select the text area to be used in the list:
- Receipt text 1 & 2 :Receipt text 2 is a copy of receipt text 1 in the standard system and is only displayed here in case of differences to receipt text 1.
- Keytext : The content of the key text defined during item programming.
- Item name: Item description from the item master
To search within the list you can enter one or more terms. These terms can be separated with , : ; & |, where the separators search as "or".
In addition, you have the possibility to select the area to be searched:
- Text: Content of the list based on the above selection.
- Main group: For example, search for the term "Food" to list all items with the main group Food.
- Product group: as above.
- Subgroup: as above.
If you simply click in a list, you can find the desired entry by text input. Click in the item list and tap Col to get to Cola 0,2, or tap in the function list to get to the function key tip afterwards.
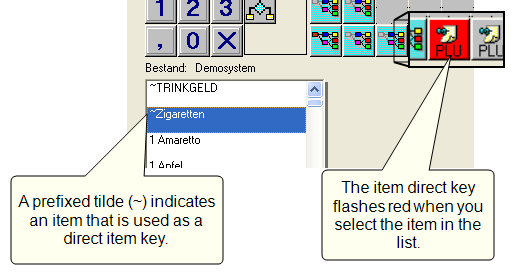
In the item list, all items that are already on the keyboard are preceded by a tilde so that they are sorted upwards.
If you have a lot of items in the list and the loading times are annoying, switch off Refresh item list.
Place inactive items in the central...
In the central item master you can mark certain items as inactive, so that they cannot be sold at the POS. This means that these items also do not appear in the item list in the keyboard programming.
However, if you are preparing items to sell in the future and want to place these items directly on the keyboard, you can activate the switch Show unavailable items for this purpose.
Layout keys
The layout dialog allows the design of keys. It is also started automatically whenever you press a key. With the layout dialog keys can be designed. You can change the caption and select images to display.
If you want to hang up keys whose layout you do not want to edit at the same time, simply hold down the shift key while hanging up so that the layout dialogue is not started each time.
- If you hold the mouse pointer over a key, a preview appears in the dialog. Click on the preview of the button.
- Right-click an item key.
- Right-click on a function key and select the Layout button in the layout dialog.

| Element / Switch | Function / Description |
|---|---|
| OK | Saves your entries and closes the dialog. |
| Use color layouts | You can choose Custom Layout to make the settings for the button here or select one of the existing layouts from the layout templates. If you select a layout template, you cannot make any changes in this dialog. Only changes to the text are possible here. |
| Use image |
If you activate this option, a dialog for selecting an image file opens. This dialog depends on the operating system used. If you deactivate this option, the image will no longer be used. |
| Transfer format |
You can copy the format of a key to other keys. Select the font size, color, and key type depending on what you want to transfer. Then press OK and click each button that you want to get the particular layout. To disable the Transfer Layout function, restart the Layout dialog of any key and close it with OK - without using any of the Transfer Layout options. |
| font |
Select the desired font. If you carry out the layout on a different PC than on the cash register station itself, then you must ensure that you only use fonts that are also available on the cash register station. Otherwise, the display in cashier mode will not be able to match your specifications. |
| size |
Select the Designing the keyboard layout here to determine the size and format. |
| text | The key text is the text that is displayed on an item key at the cash register. To cause line breaks, enter a space. The key text apple juice would be separated so apple(space)juice. A key can contain up to three lines of text. |
| function |
The Function area is only displayed when the Execute 2 cash register function is used anywhere on the keyboard programming. Further topics: Execute 1 and 2 |
| Background and text color | Select the color for the background with the left mouse button and the color for the text with the right mouse button. You can also use the Text colour button instead of the right mouse button. |
| colour palette |
The color palette is preset and can be changed with the double arrow symbol. It is easier to set the color and font size using layout templates, rather than having to re-select the appropriate color. |
Back to the overarching topic: Designing the keyboard layout