Hypersoft ePOS Designer
With the POS Designer, you can customise your checkout mode to make it even clearer and faster.
See also the chapter: Templates to download for the sidepanel and Design POS checkout mode.

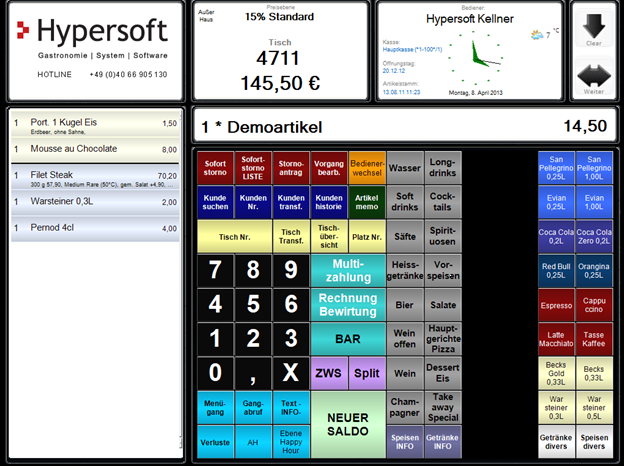
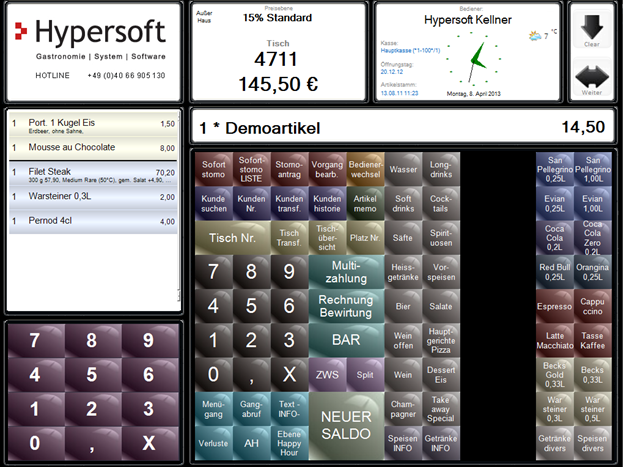
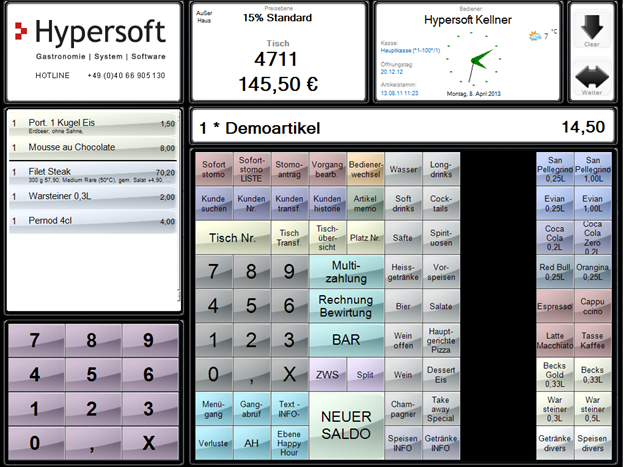
This example shows the default setting 6 with the image background also in the process. The numeric keypad has been moved to the process area so that the former numeric keypad (still in the picture) can be assigned function keys next.
The design of a cash register can optionally be applied to all other Hypersoft POS systems in your business. Further possibilities arise through the use of the sidepanel.
Call POS Designer from the cashier mode...
Hold for 2 seconds on the clock at the Clou to open the layout dialog.
If you press for a shorter time, however, the clock menu is displayed only.
Call up POS Designer from the MCP...
Start the Stations programme from the programme group System Settings. Select the desired station and press the Editbutton. The tab Basic settingsappears, where the button POS Designer is located.
Use Hypersoft POS Designer
For the settings for the MOBILE PEOPLE customer data see Set customer base.
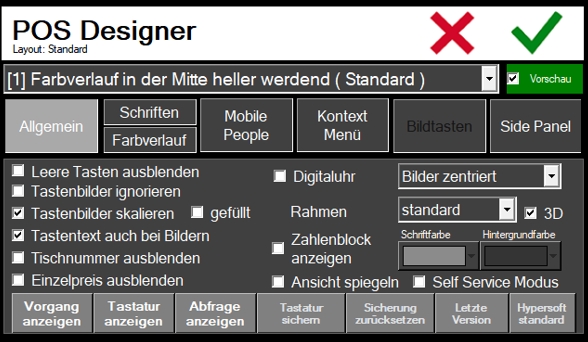
| Element / Switch | Function / Description |
|---|---|
| Hide empty keys | If the switch is active, keys containing no text are not displayed with the usual grey frame, but as with a cash register function blind cap as a continuous background. |
| Ignore key images | If you use key pictures (possibly from older layouts), you can hide them here. |
| Scaling key images |
In the standard mode (switch active), the images are fitted into the key. If the switch is off, the images are displayed in the size 1:1. These can then be larger or smaller than the respective key. Smaller may be desired if you use the possibility to use smaller transparent images as icons. The Filled option enlarges the image completely to button size to allow contiguous images even if they do not have the exact button size. Further topics: Use images on buttons |
| Key text also for images | The key text is also displayed if an image has already been stored for the key. |
| Hide table number | Hides the table number at the top (recommended for Quick Service). |
| Hide unit price | Hides the unit price in the line above the keyboard (recommended for Quick Service ). In this way you avoid confusion with the total amount. The individual prices can still be viewed in the activity. |
| image alignment |
If images are not scaled, but displayed 1:1, the alignment of the images within the keys can be adjusted here. This makes it possible to display a transparent icon and the font simultaneously and appropriately. Select the orientation of the images within the buttons. |
| Display digital clock | Switches the view between an analog and a digital clock. |
| frames | Normally, each button has a frame and a 3D effect inside the frame. This can be used to format keys on frameless or larger frames. |
| Display numeric keypad |
You can display a numeric keypad below the operation list. Twelve additional keys are now available on the keyboard for free programming. However, there are only 8 items visible in the process instead of 13. Use the adjacent elements to set the color of the numeric keypad. |
| Mirror view |
The switch allows you to place the operation list (optionally also the /number pad) on the right side. The categories will also be opened from right to left.
|
| Self Service Mode |
Self Service Mode locks the advanced functions in Cashier Mode so that the self-service device is protected from unwanted inputs such as access to the service area. Locks the advanced functions in the Clou interface: click on the clock - change clock, item search, hold on the clock - start Clou Designer, process content by clicking on table number, Special functions on items in the table (cancellation etc.), click on weather display. Further topics: status overview |
| Display operation | Opens a sample process for visual inspection. |
| Show keyboard | Shows a sample keyboard, or an individual keyboard, if it has been previously secured with Secure Keyboard. |
| Display query | Shows a sample query. |
| Save keyboard |
Saves the design of the currently displayed keyboard. In Set ward details the secured keyboard can then also be assigned to other POS terminals. |
| Reset fuse | Deletes the saved design and allows you to use the Hypersoft sample keyboard again. |
| Last version | Restores the layout according to the settings at program start. |
| Hypersoft Standard | Resets all settings to the default (normal optics as with the delivery). |

Details on the buttons and elements in the Fonts tab :

| Element / Switch | Function / Description |
|---|---|
| Calculate font automatically | All settings from the keyboard programming are ignored and only 3 font sizes are used (depending on key size). In addition, as a special feature, keys with one character are greatly enlarged, and keys with up to 3 characters are slightly enlarged. The font is fixed according to the selected setting. This results in a very homogeneous typeface across the entire keyboard. |
| Allow border crossing | In consideration of the existing keyboards of previous versions, it is possible by default to slightly exceed the key size by using too long fonts. This normally unwanted behavior can be turned off here. The fonts are then centered exactly including a small amount of free space in the key. |
| Zoom in on key labels | Here the labeling of all keys can be enlarged / reduced across the board. The X restores the standard. |
| Zoom other fonts | Here the inscription in the process and in the selection menu (and further) can be enlarged / reduced in size. The X restores the standard. |
Details on the buttons and elements in the tab Gradient
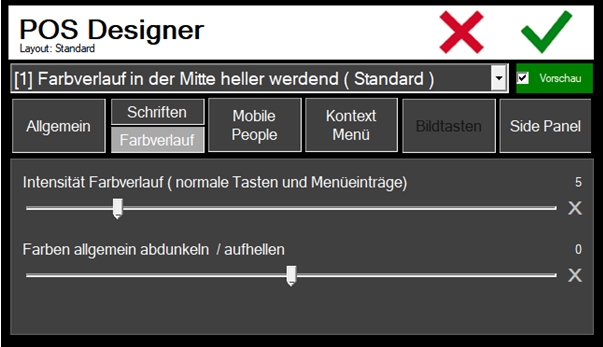
| Element / Switch | Function / Description |
|---|---|
| Intensity Gradient | Here you can control the intensity of the normal gradient ( mode 1-4 ). The X restores the standard. |
| Generally darken / brighten colours | Here you can change the entire color scheme. The X restores the standard. |
Details on the buttons and elements in the tab Picture buttons

| Element / Switch | Function / Description |
|---|---|
| Design Selection |
If you chose 5th place in the design selection. or 6. entry ( Picture keys ...) the Picture keys tab is activated. All color settings of a key are ignored and the background is created from a bitmap. Default is the shown bitmap which is fixed in the program. If you click on the image, a file selection opens and any image can be used as background. Make sure that the images are not too large, as a copy will be made for each button. Large images may slow down the cashier mode. Reset deletes the individual image from the designer and applies the standard bitmap again. |
| Height of the color bar |
In the case of the image keys, a small color bar in the (original) background color of the key is displayed by default at the bottom of the key. With the height of the colour bar the thickness of the bar can be adjusted individually and with 0 it can also be turned off completely. |
| font color | Here you can choose between white / black, foreground and background. Depending on the bitmap used, the font color can be readable or set individually (dark bitmap, light font and vice versa, or select a suitable color). |
| Intensity of the color bar | Here you can set the strength of the gradient within the small bar. The X restores the standard. |
| Shading keys in background color | In this mode, the selected key background is colored by the programmed background color of each key, so that each key has its own color without editing the original bitmap. The slider below controls the intensity of this effect. The X restores the standard. |
In the context menu of the operation list, you should display exactly those commands that are frequently used. Remember that the corresponding user rights must also be available in order for certain functions to be offered in the context menu.


Discount (%) and discount (amount) are inactive in the standard system and must be activated manually.
Configure side panel
The setup of the side panel is described in the section Configure side panel.
Copy POS layouts
Open the Master Control Panel. Start the Stations programme from the System Settings programme group. Select the desired ward and press the Edit button. The Basic Settings tab appears, where you will find the POS Designer button:

After the POS Designer has opened, select the layout to be copied. Select POS Designer Layout: Standard at the top left under the font:

Now select Copy Layout:
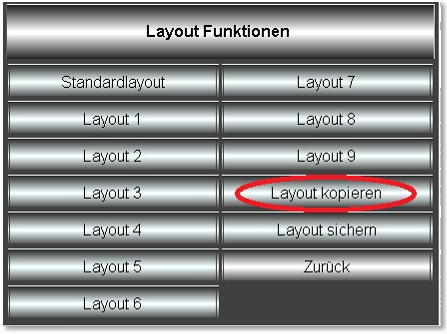
Click on Layout: Standard again, now you can select Layout Insert:

The layout is copied.
example designs
Hypersoft default settings...
Frameless buttons with colour gradient from top...

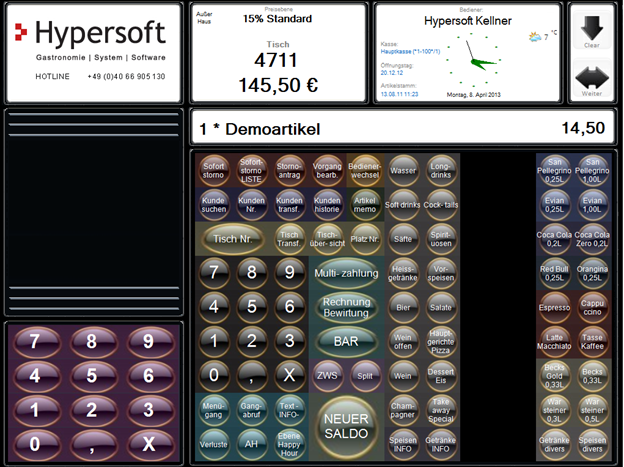
/Number pad displayed...

Image buttons [5], default settings, color bar intensity slightly increased:

Shading through background colour...

Font sizes automatically calculated by the programme, intensity of shading further increased...

Colour bar turned off...

Bitmap other than background:
Another bitmap with activated 3 D frame...

Bright bitmap as background...

Another bright bitmap...

Mode [6] - Picture background also in operation...
Dark bitmap, colours generally a little brighter...

Another bitmap changes the appearance completely...
Another variant...

Back to the overarching topic: Set up Hypersoft POS checkout mode