Hypersoft POS Cashier Mode
 Start of cashier process 1 from the MCP
Start of cashier process 2 with the Terminal Commander
The elements in checkout mode

The POS cashier mode in waiting position. No operator is logged in and the task list (left) is closed:

Event list for event, online order and eBookings
If no process is open, up to three areas are displayed at this point, depending on the use.

In the upper area, the event list informs about planned automatic switchovers of the price level ![]() or the layout
or the layout ![]() . This planning is done in the Event Manager.
. This planning is done in the Event Manager.
In the centre is the status display for the Online Order Channel Manager. Among them the eBookings for the integrated reservation programmes.
Pressing the > key or the corresponding gesture takes you to the second page of the keyboard layout and pressing the key again or a gesture to the left takes you back to the first page.
It is the same with the definable area. If you have selected a merchandise category to book one of the items displayed and there is not enough space, then items are displayed on the second page (this time the second page of the defined display area of the items).
The operation list can be toggled by the gesture To right or gesture To left. The following information is then displayed alternately in the upper right corner:
- menu
- price level
- operator
- seat

The activity list shows the last item postings of the activity - from top to bottom. If you reopen a transaction to post further items, these are separated from existing postings by color.

The operation list is also invisibly divided into three areas:

If there are more items in the list than can be displayed, you can move the list up and down by making a gesture up or down in the middle movement area.
In the left multiplication area you can book the item again by simply touching it. If you touch an item that has already been ordered, a security prompt appears.
If you touch the detail area on the right, the details of the item booking appear:

The functions in the operation options menu
If you touch an item for about one second you will get the options menu:

The functions in the options menu refer to the functions with mostly the same name that are described in the keyboard programming. Most functions can also be called up via a programmed key in the keyboard area, depending on preference.
The number of entries depends on the current situation, the authorisations of the logged-in operator and the settings made for the context menu in POS Designer.
The Change Inserts and Change Menu options are not offered for items that have been posted to a different price level for the current price level. Price levels can be displayed in the transaction list and thus compared with the current price level (shown at the top of the POS). If necessary, change the current price level.
More details on Change item text and price.
You can also call up an item again with queries via Change Attachments. In this case, you can even repost a changed item:

When booking queries, C or the options menu can be used to cancel the selection at any time. If you cancel it, the previously selected item will not be posted. With Finished ... the selection is incompletely posted. If you edit an existing item with queries you get the possibility to book the item as a new item.
If you have called up an item that has already been posted with ChangeInserts call, you can also post a new item instead of the same item. If a following guest takes a similar item, "I take the same steak, but with wok vegetables", you only need to switch to wok vegetables, then with a long press open the program menu and select Book as new item.

Table details or operation details
The most important information is already displayed in the operation list (left). If you call up the table details (transaction details) with the transaction options menu, the bookings (on the right) are displayed with all details.
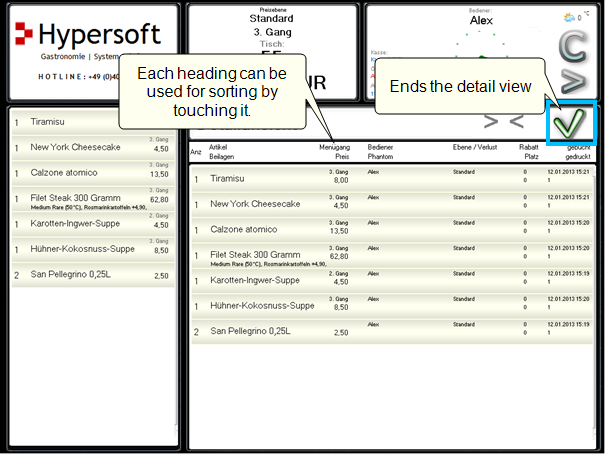
The time of the cancellation is displayed in the detailed view.
Server-independent master data and emergency operation
The cashier mode works with a local copy of the master data in order to be able to offer the emergency mode in case of technical problems (no server, no network). Each time you change master data (and exit the corresponding program), the cashier mode updates its data. To update fixed keys, however, you must exit the cashier mode and restart it.
In the settings of the designer you can choose between an analogue and a digital clock view, default is analogue.

A red opening day(date in red letters) indicates that the opening day does not mathematically match the current date, i.e. that a daily closing has possibly been forgotten.
If the clock is red, the cash register is offline (no interface to the server). A green clock means that the cash register is online (connected to the server) or it works exclusively on the local drive anyway. If the clock is brown, the cash register has been manually switched to offline operation.
If the cashier mode is in offline mode, the display changes:

By touching the clock, you get a menu with special functions for working in cashier mode. Whether they can use these functions depends on their individual interests and the use of the POS system. It is important that you know it and then decide whether you want to use it for yourself and your staff.
The number of entries depends partly on the functions and situations used, so your clock menu may have fewer entries.

| Element / Switch | Function / Description |
|---|---|
| Search items |
You will get access to Search item Function. |
| Search bookings | Helps you search for entries in open transactions. |
| Online payments | Here they can access the status of online payments. See NoCOO workflow at the POS. |
| Digital clock | Acts as a clock design toggle between analogue clock and digital clock. This can also be selected via a preset in the designer. |
| Output 0 document | This document output is exclusively intended for Austria within the framework of the cash register security regulation there. See there Create 0-document. |
| exchange rates | Takes you to the function Show exchange rates. |
| Change secret number | An option when using enhanced security of secret numbers, details are described in the section Request your own permanent secret number at the POS. |
| back | Back to cashier mode. |
With a touch on the transaction number, QUICKinfo displays the last bookings. Here you can quickly check whether you have already booked something (e.g. on a customer card that is not always at hand).

When you touch the Hypersoft logo, the status overview is displayed:

With the button MCP you can call up the login of the MCP from the cashier mode.
If you have problems with card readers or printers, press the devicesbutton , the CLOU will check the connections and reconnect the devices.
If the problems with the peripheral devices can be solved by pressing OK, this is an unwanted exception. If the incident should occur again, please contact our support.
Use the Printer button to test the printers. This dialog appears for this purpose:

All printers that are directly connected to this POS are listed. Select a printer and press Print to print a document as a test. If this QR code is missing on the printout, the printer is not compatible with Hypersoft in this respect.
You can lock access to the status overview by activating the self-service mode.
Self Service ModeFurther topics:
You can customise the layout of the checkout dialogue with the POS Designer: Hypersoft ePOS Designer
Further topics:
Data environment for emergency operation
Shift management and time recording
Post incoming and outgoing payments
Hypersoft POS Back to the overarching topic: