mPOS Freestyle UX Onboarding
An mPOS client connects to a module on the respective POS server and maps the complete mPOS handheld functionality: mPOS Client-Server in practice
Setting up the mPOS Client-Server System
The set-up is identical to the normal mPOS system as described in Setting Hypersoft mPOS. However, other mPOS licences are used for mPOS Freestyle UX.
The device on which the mPOS server runs should be the device with the good and free resources, or if you have many powerful devices, the one best suited for this. We have also run the system on "weak Celeron PCs", which work well but sometimes cause short waiting times.
Terminal Commander and communication ports
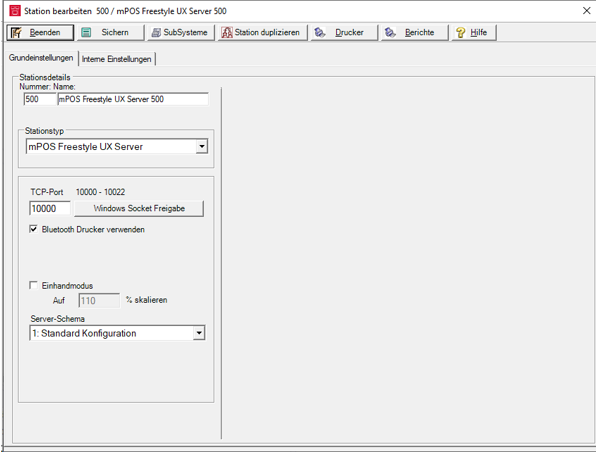
After retrieving the licence and restarting the TC on the server, a station mPOS Freestyle Server is automatically created:

This station is equivalent to an mPOS Client Server facility. Port sharing here refers to 23 ports to be released :
A communication port must be entered under TCP Port. A default is generated which you can change, the default is 9000 + station number as offset (station 25 is then port 9025).
The respective ports must be released as incoming TCP ports in the firewall.
On systems where the Terminal Commander is not running in administrator mode, the port must also be "unlocked" once. This can be achieved with the Windows Socket Release button. To do this, however, the MCP must already have been started in administrator mode, otherwise the necessary permissions for the programme are missing.
Furthermore, the one-hand mode is specified (Bluetooth printer is not supported here).
These settings always apply uniformly to all mPOS Freestyle UX clients and devices.
Trouble Shooting Port Release...
If this is not possible, the respective port release can also be entered manually by the respective IT administrator. IP & port and user of the example are to be adjusted accordingly:
netsh http add urlacl url=http://192.168.0.100:9001/ user=Windowsusername listen=yes
There will be a confirmation or error message, if applicable.
Single-handed portrait...
mPOS Client also supports one-hand mode, which can be set here to activate the one-hand portrait format.
Ward details for mPOS Client-Server...
The internal mPOS Freestyle UX Server
After the station has been configured (and, if necessary, the ports have been released), the mPOS Freestyle UX Server is started by the Terminal Commander (restart required):
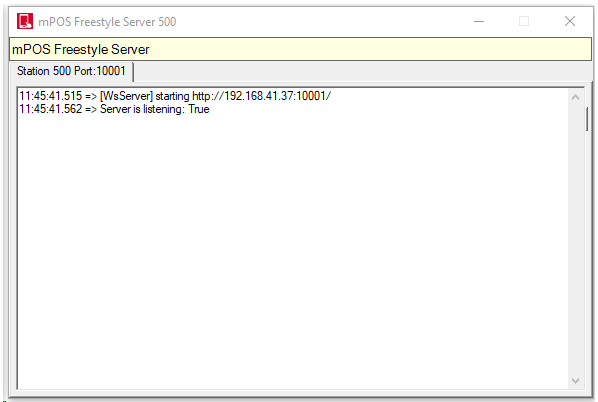
This is an "internal programme" and can only be brought forward via the icon in the system area. Status and connection information is displayed
mPOS Freestyle UX Workflow for activation
When the mPOS Freestyle UX system is activated, an additional entry appears in the clock menu of the checkout mode at the POS: "Log in mPOS Freestyle UX".

The operator who wishes to operate an mPOS Freestyle UX logs on to the POS using their PIN number (alternatively a waiter's key) and calls up the clock menu - mPOS Freestyle UX log on. The QR code displayed at the POS is scanned with the desired handheld device - the handheld device then establishes the connection to the POS system. As soon as the connection is established, the operator can log on to the handset using their PIN.
Once you have logged on to the handset, you no longer need to log on to the POS to operate the handset.
Logging off (ending the Freestyle UX) from the handset is done in the same way. The operator logs on to the POS and calls up the clock menu, the clock menu then shows the entry "Log off mPOS Freestyle UX".
By selecting "Log in to mPOS Freestyle UX", the operator is shown a login code or QR code. This code can also be printed out ( on the report printer stored in the settings ).
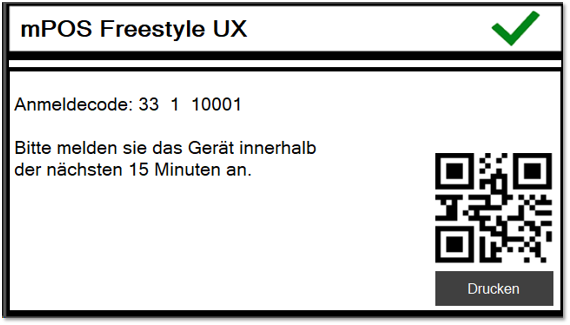
With this code, the operator can now log in to the mPOS Freestyle system on / his mobile device within 15 minutes. To do this, you can enter the code manually or scan it via the barcode. The installation of the client is described in the sectionInstall mPOS Freestyle UX Client.
Back to the overarching topic: mPOS Freestyle UX