Order type settings

The settings per order type allow you to satisfy very different expectations and needs with one database.
The webshop offers different order types. There are different settings for each order type, which you can access via the respective order type:

Global settings for all order types
-
Holiday message
-
Lead time and cycle
-
Item availability
-
Product recommendations
-
pledge
-
Voucher layout
-
Ticket layout
-
Order for following days
-
List of names as daily transaction number
Optional mail confirmation copy for customers

One or more e-mail addresses can be stored in the portal for each order type and for each location, to which a copy of the order confirmation is sent.
Settings for browsing
The browse function lets you present your product range without implementing a shopping cart or order function. All merchandise groups and items can be displayed, queries, allergens, nutritional values etc. can be selected, but without allowing a check-out. You can use this order type, for example, if you cannot yet process orders for delivery or pickup, but still want to present your offer in a modern way.
-
Designation and description
-
Visibility of the order type on the home screen in the location details
Settings for collection
The order type Pickup allows your customers to place an order, which has to be picked up in your restaurant according to your lead time. There is no restriction according to postal code, minimum order value or delivery charge.
-
Designation and description
-
Visibility of the order type on the home screen in the location details
-
Customer data and mandatory fields
-
Order confirmation
-
payment methods
-
gratuity
The Delivery order type lets your customers place an order that will be delivered by you to a desired address. For the order category Delivery, you can also enter the postal codes supplied per location, a minimum order value and a delivery charge. Likewise, different delivery addresses can be stored for the order type delivery. For deliveries you can use other programmes: eSolutions Delivery / Collection
-
Designation and description
-
Visibility of the order type on the home screen in the location details
-
Customer data and mandatory fields
-
Selection of payment methods
-
Delivery area (postcode), delivery charges, minimum order value, free shipping from
-
gratuity
Delivery: Free shipping from...
In the settings of the delivery area you can make the global setting from which amount the delivery charges should be waived.
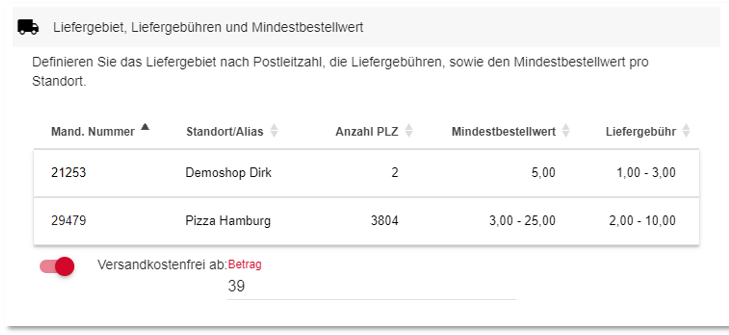
The minimum order value determines the minimum amount per postcode and location from which an order may be executed. The minimum order value is displayed below the shopping cart. If a customer chooses to order without reaching the minimum order value in the shopping cart, a note will be displayed to him/her to inform him/her how high the minimum order value for this postal code is. Additionally, product recommendations will be offered to him/her to reach the minimum order value.
Specify a delivery fee per postcode and location, which will be added to the total. Delivery charges are not discountable, nor are deposits.
As soon as you use delivery charges, the customer data "Postcode" and "City" automatically become mandatory fields.
Taxation of the delivery fee is based on the first (and highest) stored tax rate of the respective location, which is automatically transmitted from your POS system to the shop.
A value between 1 and 30 can be stored here, which corresponds to the number of days:

1 = No daily selection is offered in the shop, orders are only possible for the current day. (default)
2 - 30 = A daily selection is offered, which is offered depending on the opening hours in the shop for the order types delivery and collection. See the details on the workflow with follow-up days from the user's point of view.
In the order overview you can use the filter Future orders... to view orders for subsequent days.
Postcode and city...
After selecting the desired location, first create the postal codes supplied by this location. You can either create individual postal codes or use a from-to function in which the last two digits are generated automatically. If several locations are able to supply the same postcode, the customer has the possibility to choose one of the possible locations.

Postcodes can also be created several times per location to store an additional city name. This is mainly intended for rural areas where there are several small towns with only one postcode, but which have different delivery charges or a different minimum order value. For this purpose, enter the different city names after the identical postal codes to generate an additional query of the city in the web shop.
You can edit your entries directly in the table.

If you do not enter any postal codes, all cities (worldwide) can be supplied. As soon as you have entered at least one postcode, only the stored postcodes will be supplied. If you would like to enter postcodes alphanumerically, e.g. in the United Kingdom, please use the single entry only.
Different delivery addresses...
For the order type Delivery, customers can maintain one or more different delivery addresses and reuse these for future orders. Depending on the settings of your desired customer data, however, deviating delivery addresses can only consist of the following data:
- c/o
- Street/No
- add-on
- postcode
- Place
- country
All other fields are hidden for the entry of a different delivery address.
For customer data with a different delivery address, the selected delivery address is also used as the billing address at the checkout and printed.
As soon as you use delivery charges, the customer data postcode and city in the order type Delivery automatically becomes a mandatory field.
Guest orders can only be placed with one address, a different delivery address is not offered.
Use polygon map for delivery area definition

A polygon map for a webshop with a delivery area uses geographical zones defined by individual boundaries (polygons). It enables specific delivery areas to be precisely defined and visualised.
With the extended delivery area zones, you can define precise delivery areas independently of postcodes. These granular zones allow you to assign individual delivery charges to different delivery areas. You can also set delivery charges based on different shopping basket amounts.
For details, see the chapter: Polygon map for delivery areas
Settings for the polygon map in the Hypersoft Portal
In the portal under eSolution. Webshop, Settings, Order type Delivery, the polygon map can be activated. One KLM card can be stored per location. For redundancy, the delivery areas should always be stored with the postcode (even if you want to use the polygon map). This gives you security in case the Google service fails, the API key expires unnoticed, the Internet connection is disrupted or the address simply cannot be determined! because then the Hypersoft system automatically falls back on the postcode setting and can basically guarantee the function of the shop.

Define delivery charges in the delivery areas...
To use a KLM file, select New delivery area settings. You can upload these settings for each selected location. Once the file has been selected, you can enter the values for the various delivery areas:
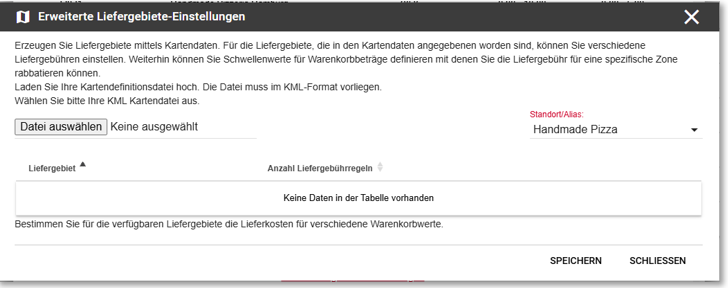
Up to three delivery charges per area can be stored in the delivery areas. The delivery charges are defined based on the shopping basket amounts.
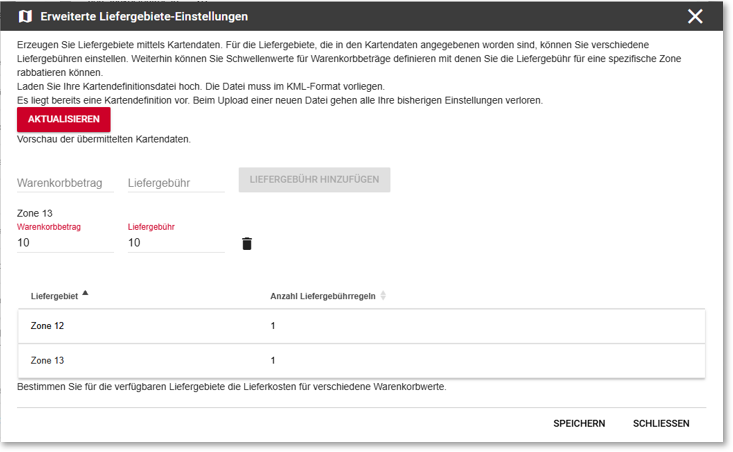
Definitions:
Shopping basket amount:
The minimum order value from which an order is possible and the threshold value for the respective delivery fee.
If the shopping basket amount is set to 0, there is no minimum order value for the area. Example: A shopping basket amount of 10 means that the shopping basket must reach at least €10 in order to be able to place an order.
Delivery charge:
The amount that will be charged for the delivery if the defined shopping basket amount is exceeded.
Examples:
Shopping basket amount 10, delivery charge 0:
Delivery is free, but the minimum order value is €10.
Shopping basket amount 0, delivery charge 5:
There is no minimum order value, but there is a delivery charge of €5.
Multi-stage graduation:
Shopping basket amount 10, delivery fee 7
Shopping basket amount 20, delivery charge 5
Shopping basket amount 30, delivery charge 0
Explanation:
Minimum order value is €10 with a delivery charge of €7.
From a shopping basket value of €20 to €29.99, the delivery fee is reduced to €5.
From a shopping basket value of €30, delivery is free of charge.
Shopping basket amount 0, delivery charge 0:
There is neither a minimum order value nor a delivery charge.
Add and edit delivery charges...
After entering a delivery fee, this must be assigned to the delivery area with Add delivery fee. It is recommended that the delivery fee is reduced as the shopping basket amount increases in order to incentivise larger orders. A delivery charge can be removed with the waste bin symbol. Delivery charges can only be edited by deleting and re-adding them.
Each delivery area requires at least one stored delivery charge rule. If you open an existing delivery area definition, you can overwrite the KLM file using the Update option to customise the areas.
Further topics: Known limitations and restrictions with the polygon map
YourAPP - Delivery areas based on the polygon map
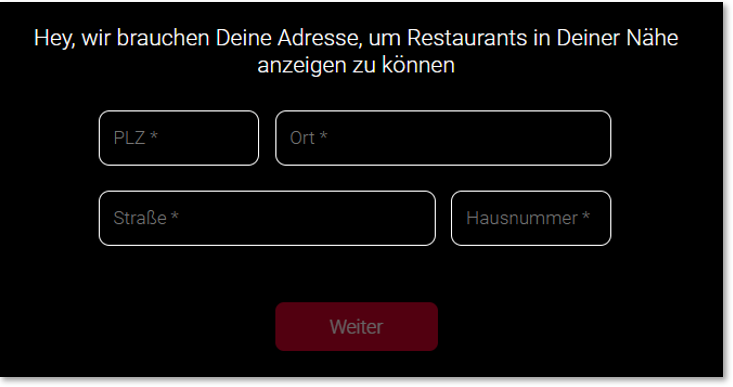
When selecting the delivery order type, the user is asked to enter their delivery address in the YourAPP.
Address check with polygon map
If the function is active, the address entered is converted into geo-coordinates using Google Geocoding.
Using these coordinates, the system automatically checks whether the address is located within a defined delivery area.
Hit: The matching location is suggested.
Unclear assignment: If the address is not clearly recognised by Google, a message is sent to the user - and the postcode check is used.
No valid location: If no match is found, the guest is informed that delivery to this address is currently not possible - with the option to try another address.
Dynamic display in the shopping basket
The following information is dynamically displayed in the shopping basket based on the recognised delivery area:
minimum order value
delivery charge
Write-protected address fields depending on the destination basis
Depending on how the delivery address was determined, individual fields may not be editable:
| Type of destination |
Read-only fields |
|---|---|
|
Postcode only |
postcode |
|
Postcode & city |
Postcode, city |
|
Polygon map (address incl. street) |
Postcode, city, street |
This regulation ensures that the delivery logic remains traceable and consistent.
When selecting delivery, the user is prompted to enter their destination address:
Delivery address for orders...
Upon delivery, the customer is asked to enter the address to which delivery is to be made.
The delivery address and polygon map are checked. If the polygon map is activated, the address entered is checked using the geo-coordinates.
Hits in a delivery area:
The corresponding location that supplies the address is suggested.
Unclear address:
If Google cannot find the address or the result is uncertain/inaccurate, the customer is informed that the address is unclear. In this case, an additional check is carried out based on the postcode (postcode).
Test without polygon map:
If no delivery areas are stored for a location, the address is checked solely on the basis of the postcode.
Not a suitable location:
If no delivery address can be assigned to a location, the customer is informed that there is no location that delivers to the address entered. The customer can then try a different delivery address.
Display in the shopping basket:
The minimum order value and the delivery charge are displayed in the shopping basket according to the settings of the delivery area.
Display of the delivery address when ordering:
Before the customer finalises the order, the delivery address is displayed for verification. The fields can be write-protected depending on the check:
Postcode-based check:
If the delivery is determined exclusively by the postcode, the postcode is read-only.
Postcode and town:
If both the postcode and the city are relevant, both fields are read-only.
Polygon map:
If the delivery is determined by the address with street, the fields for postcode, city and street are write-protected.
Further topics: Known limitations and restrictions with the polygon map
Settings for In the House
Via In House Order, your customers can order more products from your restaurant from a later point in time without having to wait for service. For this purpose, each table is provided with a code or QR code, which your customers take a picture of via smartphone and thus gain access to your product range.
-
Designation and description
-
Visibility of the order type on the home screen in the location details
-
Customer data and mandatory fields
-
payment methods
-
Table list and table codes
-
Payment method
-
gratuity
The trade (retail) shop is an ideal addition to your possibly already existing delivery or pick-up shop.
Regardless of your beverage and food assortment, you can offer your merchandise or trade goods here, which you can then send to your customers by parcel.
-
Designation and description
-
Visibility of the order type on the home screen in the location details
-
Customer data and mandatory fields
-
payment methods
-
Country, delivery charges, minimum order value, free shipping from
Trade: Country, Delivery fees, Minimum order value, Free shipping from
For the order type trade (retail) you can independently define which countries you would like to supply.
Use the Add Country button to define all settings per country.

The list of countries lets you select a country within Europe:


Set a minimum order value, shipping costs, and an optional threshold for eliminating shipping costs per country.
Customer data for trade (retail)...
Set the required customer data for a retail.
Please note that the required names and address fields must be defined as mandatory fields.
Example:

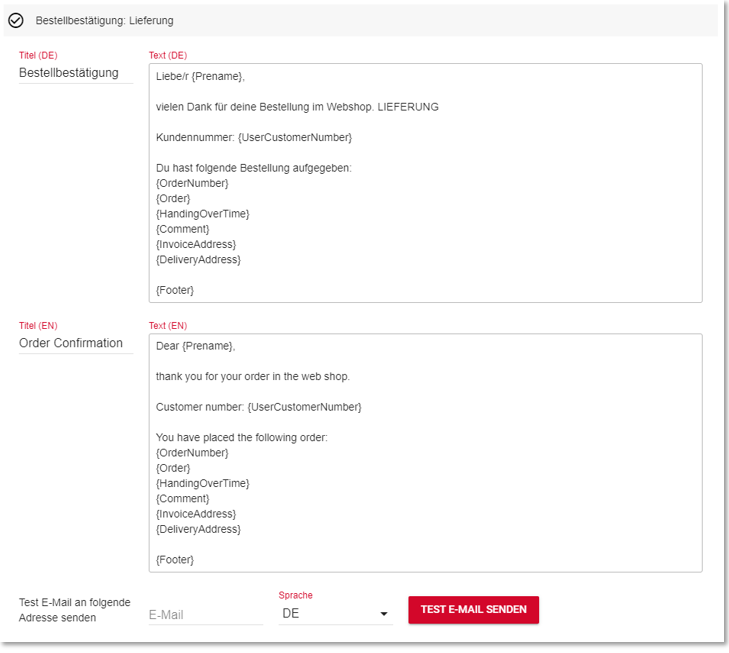
Trade Order Confirmation by eMail...
In the email settings, the order confirmation for retail orders can be customised as desired:
Further topics: Retail Shop from the user's point of view
-
Designation and description
-
Visibility of the order type on the home screen in the location details
-
Customer data and mandatory fields
-
payment methods
Settings Web Vouchers Shop

If you have activated the order type vouchers for one or more locations but this order type is not displayed in your shop/app, please check your web voucher settings in the MCP. If not all settings are complete here, the order type is hidden for security reasons.
-
Designation and description
-
Visibility of the order type on the home screen in the location details
-
Customer data and mandatory fields
-
payment methods
-
Recharge vouchers
The web voucher shop uses a central layout for print@home vouchers in the standard version (for several locations), which you have stored under your central customer number.

If, on the other hand, you would like to use a separate layout per location (e.g. for different "brands"), you can use the "Voucher layout per location" button to use the print@home layout stored in the respective location instead of the central layout.
You can adapt the designation and description of the order types as you wish. Please note, however, that the special features per order type cannot be changed (e.g. not renaming the order type "Delivery" to "Collection").

Please note that the length of the name and description may have an effect on the display of the order type label in the shop.

The tip settings can be activated and defined separately for the order types: Delivery, Pick-up and In-house.
You can activate the tip function in the webshop settings. If you would like to use this option, you have the possibility to enter a percentage value as standard, which will be added to the total amount in the shopping cart before it is filled in. You can set this default value from 0-50%. See the section Tip in the webshop.

Users can of course adjust this value with a slider, or enter their own tip. When using the slider, we round the tip amount to 0.10 EUR, CHF, GBP in each case.

Tips and minimum order value:
The tip entered by the customer in the shopping cart for the order type delivery is not counted towards the minimum order value, only the sum of the items in the shopping cart is counted here.
Visibility of the order type on the home screen and location details
Active order types are displayed by default on the start page of the desktop view, as well as in the order type selection in the mobile version. If you would like to hide one or more order types, but still use them for individual locations, you can use the following function.

This can be particularly important if, for example, you only use the Order to Table (In House) order type in some locations but do not want to suggest to your customers that you offer this function in all locations.
Order types View Desktop and Mobile...


However, all order types of the respective location are always available via the order page in the location details.

Further topics: Address logic in the ordering process
Back to the overarching topic: Shop in the portal