Order ticket types
Thermal printer and dot matrix printer
Use our recommended POS printers. On thermal printers, areas are printed inverted for highlighting. On dot matrix printers then with the second colour of the ribbon, which is usually red.


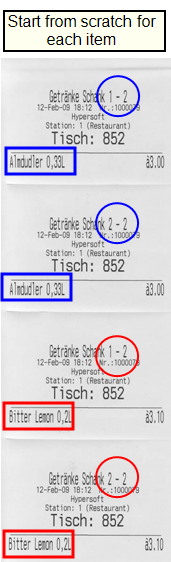
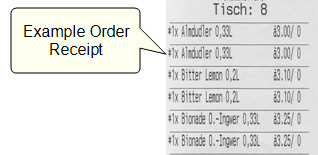
A single receipt is an option that can be activated in the item master per item. It causes a separate (small) receipt to be created for the item. These are usually intended to be placed on the plate, cup or tray with the items. In the order receipt settings there are further options, such as the creation of an additional main receipt for an overview of all individual receipts. In addition, it is possible to have individual receipts cumulate from a certain number of items, for example, if you have banquet orders, you could generally create a cumulated individual receipt with a threshold value of 10 orders with, for example, 25 x dessert.
Example for the single voucher: You book 3 x salad plates. Three sections 'a 1 x salad plate are printed.
The individual receipt is only created for the order receipt that was selected under Bonorder in the item master. If you use the Double Bonbon option, only one line will be added to the Double Bon, indicating that 3 x salad plates have already been ordered (for this example).
Numbering of the individual receipts...
The individual receipts can be numbered according to different criteria. This is done globally in the system settings.
At numbering of the single receipt select the option restart per itemto start with 1 per item and continue with 2,3 for the same items. Choose Restartfor each receipt order to restart the numbering for each order group. Select Startagain for each booking transaction to obtain a uniform numbering for all current order receipts of the transaction.


Best practice: Targeted use of double vouchers
The double voucher is not a convenience feature. It is a coordination tool between production stations. Used correctly, it improves:
-
Speed
-
Quality
-
Plate logic
-
Production clarity
-
and prevents unnecessary queries at the passport
Used incorrectly, it creates a flood of receipts, uncertainty and inefficient processes.
This best practice shows you how to use double receipts strategically and precisely - and when you should activate the "Only with item" option.
Basic principle of double receipt
Each item has:
An order group (e.g. "Kitchen main dishes")
Optional second order group for the double receipt
If a second order group is stored:
-
The item is printed at two stations.
-
It appears on the second station with an *.
The star indicates:
-
pure information
-
no additional production order
Example:
* Rib eye 300g
Salad plate
Carpaccio
The salad item recognises: The rib eye is produced on the grill - but the salad belongs to this plate.
The order group is selected in the upper area of the item master and the double receipt is selected in the checkout area of the item master.
Why double vouchers at all?
There are two basic applications:
-
Several production stations are involved (e.g. grill + side dishes). A double voucher makes permanent sense here.
-
Context information is only sometimes required (e.g. steak should only appear under side dishes if a side dish has also been ordered). This is where the Only with item option comes into play.
Best practice: Use "Only with item"
The Only with item option ensures that a duplicate receipt is only printed if there is a relevant article in the same context. The system checks this when the receipt is actually printed and, crucially, the valuation is based on the menu cycle.
Example: Steak & baked potato
Scenario 1 - same menu
-
Steak (main course, double bill → side dishes)
-
Baked Potatoe (side dish station)
-
Both in the same menu →
The steak is printed with * at the side dish station.
Result:
The potato is served correctly with the steak.
No queries. No rethinking. No reworking.
Scenario 2 - separate menu aisles
Potato as a starter
Steak as a main course
"Only with item" activated
Result:
No double receipt for the steak at the side dish station.
Why?
Because the potato has already been processed as a separate production block.
The system evaluates each production requirement separately for each menu aisle.
Important: Menu aisle release
Menu items can be: Printed together immediately or called up individually by the operator
The following also applies here: The "Only with item" check always refers to the time of printing.
This means that the system does not make a decision at the time of booking - but at the actual start of production.
Why this is important
An order receipt must not raise any questions.
Too much information pressure leads to employees:
-
Ignore hints
-
Throw away receipts
-
or develop wrong routines
This is not acceptable in a professional business.
-
A double receipt is a deliberate coordination signal.
-
No safety net for unclean processes.
-
Quality and speed advantage
Correctly configured:
-
A baked potato is not accidentally served on a separate large plate.
-
No unnecessary queries at the passport.
-
No steak is printed at the side dish station without context.
-
Each receipt remains unique.
-
And that saves time (not just at the barbecue - but throughout the entire process).
Strategic recommendation
Always activate "Only with item" if:
-
The second print only makes sense depending on the context.
-
You work with menu logic.
-
You want to avoid Bonflut.
-
You want clear production signals.
Do not use it if:
Two stations are always involved.
Both stations produce independently of each other.


Conclusion
Double receipt is not a print feature, it is production logic.
"Only with items" is not a detail, it is efficiency control.
A properly configured system produces just as much information as necessary - and no more lines.
Further topics: Directory: Best Practice
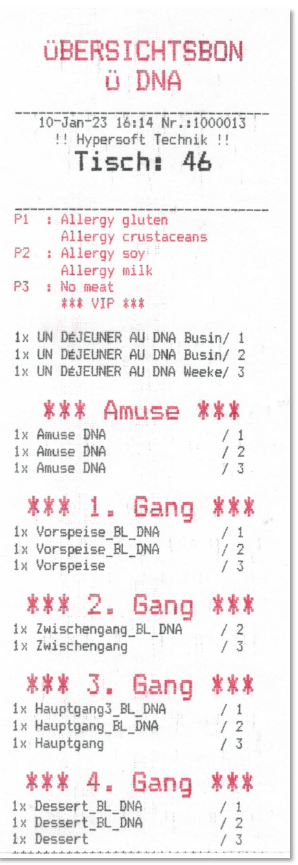
You can have a summary of all bookings printed at the end of an order voucher. All the same items that were posted within a menu are cumulated. (\number = seat number)
Example summary on main bon...
Warm Kitchen
1x Aperohappen Italy /1
1x French aperitif /2
1x French aperitif /3
1st course
1x fried soup /1
1x fried soup /2
1x fried soup /3
2nd course
1x ox liver /1
1x beef tenderloin /2
1x ox liver /3
***********************************
Summary of the
1x Aperohappen Italy
2x French aperitifs
1st course
3x fried soup
2nd course
2x ox liver
1x beef tenderloin
Example summary on main receipt without menu course...
In addition, for this summary we offer you the option switch without menu course, which discards the menu information in the summary.
Warm Kitchen
1x Aperohappen Italy /1
1x French aperitif /2
1x French aperitif /3
1st course
1x fried soup /1
1x fried soup /2
1x fried soup /3
2nd course
1x fried soup /4
1x beef tenderloin /2
1x ox liver /3
***********************************
Summary of the
1x Aperohappen Italy
2x French aperitifs
4x fried soup
1x ox liver
1x beef tenderloin
Or simply for non-cumulative individual bookings without a seat number:

The settings for this are in the topic Order Group Settings with the switches at Summary also on main receipt. See also general information on the topic Use menu courses.
Print each booking item individually...
On the receipt, the bookings appear exactly as they were entered at the POS. If a Cola is booked 3 times individually, 3 lines appear with 1 x Colaeach. This applies to both areas when grouped together on the main receipt. With an additional switch called Print each posting item individually you decide whether in the summary the entries are then printed individually (or also remain cumulated).
The overview receipt is a summary of all bookings created by the operator. It can combine several order groups and print them out at any point per POS terminal.
The overview receipt does not hold back time-delayed items, nor items which are held back by menu access release. It is therefore suitable for the overview of the operators or as an overview in the kitchen directly.
The overview receipt can be set up per order group, so it is possible to merge all groups in the overview or still make subdivisions according to order groups.
We recommend that you first set up an order group exclusively for the overview receipt in order to set up the overview receipt correctly, and to name this order group, for example, overview group! Then you set up the elements and the layout for the order group overview receipt as for an order receipt and you also define the assignment to the printer for each POS terminal at which an overview receipt is to be printed.

You can then define for each additional order group whether its postings are listed in the overview receipt.

You can also define different overview groups if you prefer certain splits for an overview receipt. If you use the same overview group for several order groups, the overview receipt simply summarizes the bookings of these different order groups. Display of the overview receipt with only 2 items as examples. Menu items and other information can also be displayed. Here are examples with several menu courses and a short overview coupon for tapping:

Example of a summary receipt on dot matrix printer with tags & features enabled and printed in the header and not in the aisle.
If you work with several cooks who would have to share the summary receipt, you can set up any copies on other printers.
If you work with single receipts, you may have to switch off their re-printing on the summary receipt by switching on Ignore single receipt setting for items.
The overview receipt only refers to the main order point, when using a double receipt it is not possible to output the item with it e.g. on another overview receipt.
Example...
The service books the table order with menu courses, this also includes the drinks, which are made at the bar. In the kitchen, the receipts are distributed to two kitchen posts. The 2nd item is informed via the double-bon function if it is to work together with the first item in this order. The operator at the cash register automatically receives a summary receipt of all kitchen orders from item 1 and item 2 (but without the drink order).
Example overview receipt for SOT configured...

In this example, order receipts were printed at the different production points and this summary receipt was printed at the packing station. The settings are only examples and can be individually configured by you.
Best practice for blanket information exchange between multiple items
This solution is aimed at businesses that work without Hypersoft Kitchen Monitor but still require structured, transparent communication between several production stations (stations are the individual production areas - such as grill, side dish, dessert or counter).

To activate this, the Info about related items attach to the receipt button is used in the order group. With this function, those items are also printed at the end of an order receipt as information:
-
were booked at the same time
-
but are assigned to a different order group
-
and would therefore not appear on this receipt in the standard.
Important:
These additional items are purely informational and not production orders.
The entire receipt continues to be sorted by menu aisle.
Typical application
In upmarket companies, it can be useful for a post to know what is being produced at other stations at the same time.
Example:
A chef wants to see which drinks have been ordered for a course - for example, to intuitively adjust cooking times, presentation or timing. The counter can also recognise which dishes are running in the same aisle in order to better coordinate expenditure.
Menu aisle filter: Precise or generalised information?
In addition, the Cut by menu option can be activated. This setting determines the information density.
With menu filter

Only the items in the same menu are displayed as information.
Example:
In the 2. A steak is produced on the grill in the second course.
The kitchen only receives the corresponding items from the 2nd course of other items in the info area - but not starters or desserts. This ensures maximum clarity.
Without menu filter

All simultaneously booked items from other order centres are attached as information - irrespective of the menu option.
This can be useful if:
-
a complete overview of the table is desired
-
complex coordination processes take place
-
several gears follow each other very closely
However, the amount of information increases here - and with it the risk of information being overlooked.
Best practice recommendation
Use this function consciously. Decide clearly in favour of one variant:
-
with menu aisle filter for structured aisle production
-
without filter for complete table information
An order receipt must not raise any questions. It should create clarity - not room for interpretation. If too much information is printed, employees get used to ignoring notices. This contradicts the principle of a precise production system.
When used correctly, this function ensures
-
better coordination between items
-
fewer queries
-
clean gear control
-
and higher service quality
Further topics: Directory: Best Practice
Special feature order receipt as label
It is possible to create (adhesive) labels via a special label printer. The print can contain a barcode in addition to the price and item information with queries. Using this barcode, the respective item can be booked at the POS terminal using a barcode scanner.
One possible application is to create barcode labels, which are later applied to the sales items. The barcode scanner then enables fast and secure booking at the checkout.
To print order receipts on labels, you must visit Setting up label and barcode printers.
Back to the overarching topic: Organize order groups