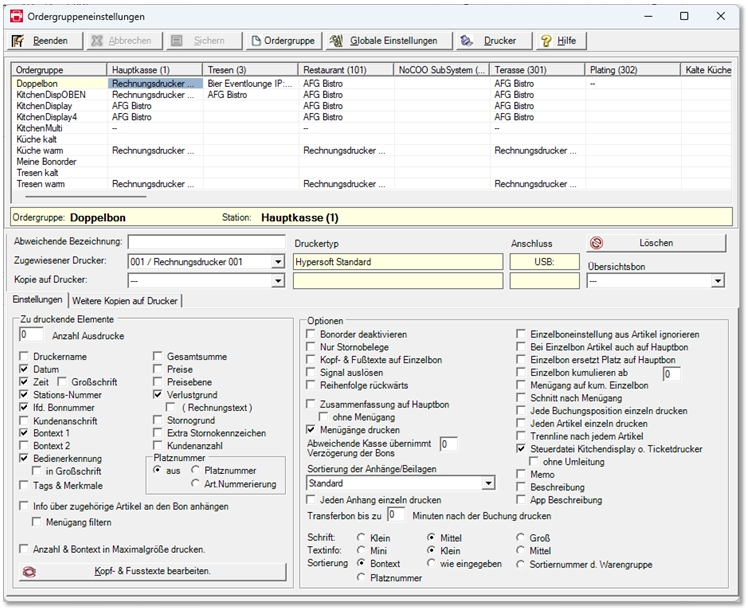
Order Group Settings
Internal order receipts are organized with order groups and their appearance is adjusted. In the order group settings you can define order groups, assign them to stations and design the appearance of the order slip.
Start the order group settings from the programme group Printers & Interfaces .
If an order group has not been set up for a ward, then no corresponding order voucher can be printed at this ward.
Tabular assignment of the order groups
Each order group has a row and each station a column. Thus each cell represents the setting of the corresponding order group per station.

If a setting is to apply to several stations or order groups, you can copy the setting to a cell with a right mouse click and paste it into other cells as often as you like.

Via the context menu, all order group settings can be copied with the command Copy Ward and transferred to another ward with Paste Ward:

| Element / Switch | Function / Description |
|---|---|
| order group |
Press the Order group button and select New in the dialog that appears to enter a new order group. |
| Changing the Order Group |
After you have selected a line, you can change the name of the corresponding order group. |
| Global settings for order receipts |
These settings apply to the entire system of all order receipts:
Further item bookings or information can be attached to items. These attachments are represented in the standard by a + . For example, type - - > to get the following result: 1 xItem text - - > withItem info Between the number of items and the item text there is an x as a multiplication sign in the standard, you can change this here. You can also customise a character for text message borders. Example for *: *************** * No salt * *************** |
| Printers | This will take you directly to the PrinterSettings program. |
| Other designation |
The name of the order group is used as the header of an order receipt. If you want to have a different heading (possibly per ward), you can enter it here - the designation of the order group remains unchanged. |
| Assigned printer | In this selection, select which printer is to be used for printing. The available printers are offered for selection. |
| Copy to printer | Creates an almost identical copy of the order receipt if another printer is selected here. Only the additional heading *** copy *** distinguishes it from the original. |
| Printer type and port | Provides more information about the printer. |
| Overview receipt |
Instructs the programme to also print the item bookings on the overview receipt. |
| Delete | Deletes an assignment or setting of an order group to a station. |

Functional settings of the order groups
| Element / Switch | Function / Description |
|---|---|
| Number of printouts | Set how often the receipt should be printed (default 1). If you want a copy to another printer, use the Copy to Printerfunction. |
| Printer name | Prints the name of the printer in large letters in the header area. If you are working with many copies, this is an additional orientation, especially in case of a fault with pressure diversion. |
| Date and time | Prints the current date or time of your ward in the header text. With the Uppercase option, the time is printed in large letters. |
| station number | Prints the station number and description. |
| Running. receipt number | Prints a sequential number that uniquely numbers each printout. The number ranges are counted per order group and station. |
| customer address |
Prints the customer address, or the room number or reservation number for a hotel room booking. |
| Bontext 1 and 2 | Select the receipt text line to be printed. You can, for example, use these lines for different languages on different receipts or output additional instructions. |
|
operator identification |
Prints the user name entered in the employee master in the header text of the document. Optionally, you can have this printed in uppercase. |
| Tags and features | Activates tags and features as described in Printouts of TAGs and features on the POS system and Environment . |
|
total and price |
Prints the number of items on the order so that employees can see at a glance whether the order is complete. If you have activated the Price option, the sum of the amounts is also displayed. If you select Price only, the price of the items will be printed on the order slip. This setting is used, for example, in kitchen remote printers to give the cook more information. Example: A waiter sells the lunch table a 6,- three times and a 7,50 once with free price entry (he always books the same item). On the order form you will see: 3 x lunch á 6,- 1 x lunch á 7,50 |
| price level | Activate this option to print the price level used for the postings. However, the system only prints if you have entered the required texts in the Text for receipt field for the corresponding price levels. |
|
reason for loss and invoice text |
Activate this setting to print loss reasons on the order receipts. These postings are grouped for each loss reason. With the thermal printer the output is done with a right-justified inverted heading, with the dot-matrix printer the color red is used. Optionally, you can use Invoice text to print the text from the Text on account of loss reasons field. If you do not use this option or if this information is not stored for a reason for loss, the name of the reason for loss is automatically printed if the reason for loss is activated here. |
| cancellation reason |
This activates the printing of the cancellation reason on the order receipt. Operators can be requested to select a cancellation reason from a list you have specified via the operator authorisations. |
| Extra cancellation indicator | Cancellations are displayed on order receipts depending on the printers used. The reversal indicator creates an extra line with the heading STORNO above the reversal posting(s) marked with a negative sign. |
| Number of clients | Prints the number of customers on the receipt. This can be useful, for example, in the kitchen to decide the order of preparation. Example: 2 salads and 3 steaks with the number of customers 4 can indicate that only one of the salads is needed as a starter. |
| seat number |
Prints the seat number on the order receipt. This will shorten the item text (on most printers) by three digits. The seat number is printed at the end of each item booking after a slash: Item description/01 = Place number 1 |
| Item numbering |
Activates the item number function on the order ticket. This will shorten the item text (on most printers) by three digits. A sequential number is printed per item within a transaction. If the process is not completed and further items are booked, the numbering is continued. Please see Best practice: Clear labelling for pick-ups and deliveries. |
|
Info about related items attach to the receipt and Filter menu channel |
Please see Best practice for blanket information exchange between multiple items. |
| Print number and receipt text in maximum size | Prints the maximum size. Look here: |
| Edit header and footer texts |
With this you can add the header and footer text as well as the graphic logo of the printer to the order receipt. To print this information on receipts, you must also activate the option switch. Time-controlled texts can also be inserted here. |
| Deactivate Bonorder |
Deactivates the output of this order receipt. If in certain situations this order group should not trigger printing in the selected area, you can deactivate the order receipt here. The fallback printer is not used when deactivating. In order to achieve print diversion, you must switch off the printer. |
| Reversal documents only | With this setting, the receipt order document is only printed if it is a cancellation. This is useful, for example, if no order receipts are required but cancellation receipts are required. |
| Header and footer texts on individual receipts |
Adds the header and footer texts to Individual receipts. |
| Trigger signal |
With this setting, a signal is output to an acoustic signal generator when a receipt is printed. The use is explained at Trigger signal on order. |
| Sequence backwards | With this function you can reverse the order as described in Reverse order or even print 180 rotated. |
|
Without menu |
These very practical summaries are described in the section Overview receipt. |
| Print menu bar | Causes menu courses to be printed on the receipt. |
| Different cash register takes over delay |
If you work with time-delayed order receipt control, you can determine here which cash register manages the delays for these receipt orders. Depending on the number of bookings, the monitoring of the printing delay and in particular the triggering of the order vouchers can lead to the loading of the station. Allows you to distribute this load to other devices. |
| Sorting the attachments / supplements |
Attachments of items can be sorted as desired. Standard sorted according to the queries (query 1, 2 etc.). The receipt text and product group are sorted alphabetically. Bontext highlighted groups items with this option enabled. |
| Ignore single receipt setting from item |
This setting is specially designed for the summary receipt so that it does not print optionally arranged individual receipts. |
| For single receipt items also on main receipt |
If you work with Individual receipts and want the booked item to appear not only on the individual receipts then created but also on the actual order receipt, select the option Individual receipt also on main receipt. This will give you an overview of the individual receipt items. |
| Single receipt replaces space on main receipt |
If you work with location numbers, the individual receipt items on the main receipt are normally not cumulated, otherwise the information on the location numbers in the overview would be lost. If a single receipt is created with the option For single receipt items also on main receipt, you can use this switch to determine that all items entered with place number are cumulated on the main receipt. A notice that a seat number is on the single receipt will be marked by EB behind the item. |
| Accumulate single receipt from |
With the function Cumulate single receipt from you can set up the printout of Single receipts in such a way that if the same bookings are made for the same items, they are cumulated on one single receipt. If you always want to cumulate, enter a 1 in the field. In special cases (for example, large companies), it can happen that individual receipts are only undesirable for a very large number of bookings, enter a number from which the same bookings are to be combined on an accumulated individual receipt. |
| Menu course on cumulated individual receipt |
With time-delayed order receipt control, not all items in a menu are always printed at the same time. This provides the recipient of the order receipt and the operator with the information as to which items within the individual receipt still belong to this menu item. Further topics: Single receipt (Talon) |
| Cut after menu course | If the user switches to another menu item within an order receipt, a cut is first made to separate the items and the header text is then printed again. |
|
|
This is an option in the complex context of the topic Summary on main receipt and is described at the end under Print each booking item individually... described. |
|
|
How to print each booking item individually and additionally for each number greater than 1 is divided into individual lines. If 5 x pasta is booked, 5 individual lines with 1 * pasta each are printed. If you group the pasta on the main receipt, the grouping remains cumulated ( 5 x pasta remains as posted). |
| After each item a dividing line is printed (for an improved overview). This applies to both areas when grouped together on the main receipt. | |
| Control file KITCHEN MONITOR or ticket printer |
Activate this option if you are working with the KITCHEN MONITOR and want each participating order group and station to send the information to the Kitchen Display. The option Without Redirection can exclude individual order groups from the alternative configuration. If this switch is activated, the alternative order receipt delay is deactivated. Further topics: Whole kitchen / Half kitchen |
| Print each attachment individually | Deactivates the standard cumulation of attachments. |
| writing | Here you can choose between small, medium and large font of the bookings. The middle setting has double the height, but due to the limited space, it retains the width and thus the number of letters. The uppercase also uses double the width and restricts the number of letters corresponding to your printer. |
| Print transfer vouchers |
The transfer voucher for operations. If a booking is transferred to another transaction number, you can use this to send a message to the order point. This is used in concepts where transfer is often used or for example in self-service restaurants where the customer only sits down after ordering and can be "located" again by entering the table number. You must enter a number of minutes for this. If there is a transfer of a booking that is not older than these minutes, you will automatically receive a printout. If "0" is entered, the function is inactive. |
| sorting |
Specify the sort sequence here. You have the possibility to sort either according to receipt text, order of entry, product group and place number. If you want to sort by merchandise category, the merchandise categories must have a sort number. Further topics: Sort number of the merchandise categories |
|
With the corresponding option, the data of the specified area (from the item master) is output on the receipt. Further topics: |
Further topics:
Things to note about order vouchers
Back to the overarching topic: Organize order groups