NoCOO Onboarding at the POS
The adjustments to the POS depend on the scope of the possibilities you want to use and affect different areas of the (existing) POS system. If you do not want to use all the options, make the adjustments only in the areas that interest you. For example, if you don't want to offer your guests online payments, then they don't have to set them up and can view the information on open payments, etc. skip
Please note the following interrelationships at the site:
-
The activation of the checkout form must be carried out for each location. This is for your safety, as you are changing the appearance of the former invoice, so make sure that all settings and training have been completed.
-
If you have multiple locations, you can create the layouts for the NoCOO short receipt and the PDF layouts in the head office and make them available to all selected locations. See for this Use central guidelines....
Activation in the ward management
The first step is to activate NoCOO in the portal ( Activate licence and configuration ), then the portal clearing of your location will receive this information the next time you connect. This schedules the NoCOO setup of the ward administration for the restart the following day after /TTA.
If you can wait for the /TTA, you do not need to do anything else to set it up.
However, you can then also trigger the immediate setup by manually restarting all programmes via the Remote Commander / Terminal Commander.
Hypersoft automatically creates a subsystem for NoCOO. It is important that the settings for printers, order groups, cash register forms, interfaces are made for this.
The internal station type "NoCOO Subsystem" ( 97 ) is used for NoCOO. This is required internally by the system for PDF / invoice generation.
The Terminal Commander creates a station with the name NoCOO Subsystem on the server and starts this automatically. This internal subsystem is a necessary POS subsystem for the operation of NoCOO. The Terminal Commander also starts the NoCOO PDF Printer on your "server" so that it can take care of the document creation. The cash register forms control the printout based on your settings.
An FTP manager transfers the data such as invoice + trader receipt + customer receipt to the Hypersoft server.
The PortalClearing checks the portal for changes such as online payments or new billing addresses and receives them; after processing such information, receipts are updated online again.
Please give the system "a few minutes" for complex changes. As soon as we have data on the utilisation of the services, we will be able to adjust them if necessary and define and communicate more precise timings.
Activate NoCOO online payments
If the payment type for NoCOO has been set in the portal so that online payments can take place, this payment type is offered for use at the POS as checkout function payment type online. If this is then used on the cash register keyboard in a closing macro so that the operator can initiate the expected online payment. By notification of the activation by the portal clearing, the multi-payment is automatically extended by the function Online payment. See also: Multi-payment with online payment....
Activate NoCOO in cash register forms
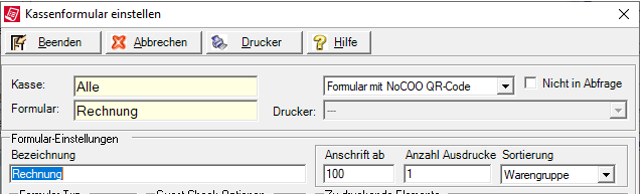
Form settings are mandatory for printing the NoCOO short voucher on the terminal. For invoice form 1, the NoCOO short voucher must be selected:
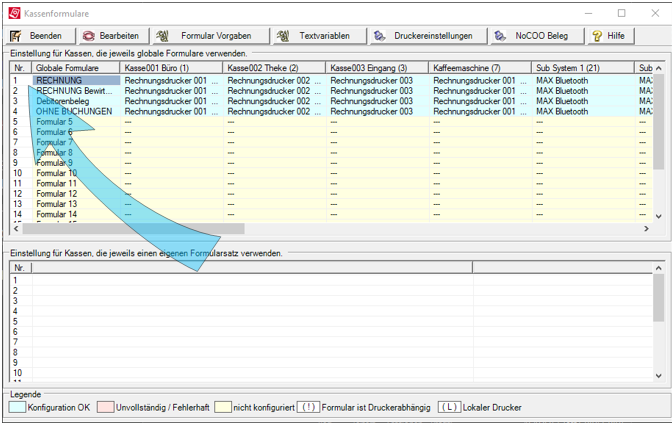
In the form settings there is a selection of the NoCOO document.
For details on checkout forms, please visit cash forms.
This receipt (with adaptations to your logo and texts) is handed over to the customer. The customer receives access to NoCOO and can use all the advantages of the system for himself there.

The short form, as well as the layout of the PDF that is uploaded, can be customised, see Form for NoCOO.
With this variant, a TSE-compliant invoice including a TSE QR code is printed and the customer also receives the URL and PIN for NoCOO access.
Another option is to deactivate the TSE QR code in the form settings, as this is available via NoCOO if required.
If you work with NoCOO and want to issue an invoice with TSE data and QR code directly (for example, on demand), the customer also receives access to NoCOO.

Form with NoCOO text info...
With this variant, a TSE-compliant invoice is printed with a TSE QR code and the customer also receives the URL and PIN for NoCOO access, but no NoCOO QR code.

Configure NoCOO Online Invoice Form
The NoCOO vouchers can be designed with a layouter.
In the cash register forms there is access to the receipt design with the NoCOO receipt button. See Form for NoCOOfor this. Here you can customise the short form and the DIN A4 form.
If you already use a graphic logo on your POS printers, this will also be applied to the short form. Please add a logo to the online PDF, because this is all you need to use NoCOO with an individualised layout.
local DIN A4 invoices of the POS system:
If you do not use special POS printers at the POS, but for example an A4 Windows printer, you can also extend your existing layouts for Windows prints at the POS with the variables for NoCOO use.
For DIN A4 invoices, special variables for NoCOO are included, please see the section NoCOO variables only: and the related information there for editing the layout.
Back to the overarching topic: NoCOO - Digital Billing