Live Report Settings
To use the Live Report, you must have at least Hypersoft Service Pack 1 (from 2017) installed on your POS system. In order for the POS system to provide the information in the Hypersoft portal, you must establish the Hypersoft Lounge interface once (if you have already used the Infoboard or the previous version of the Paparazzi, this interface will be used). You can then activate Live Report simply by confirming this on the Welcome page. However, if you wish to add further locations as part of an expansion, these must be activated once in each case.
Establish Hypersoft Lounge Connection
When starting from a Live Report that has not yet been activated, you will be directed to a Welcome screen. There you will find the activation instructions.

When the Live Report is activated, a password for the Hypersoft Lounge interface is automatically generated. With this password you can establish a Hypersoft Lounge interface in your MCP. Look at this: Activate Hypersoft Lounge
To call up the settings, go to the three-point menu at the top right. The settings are controlled by an authorization. If you do not have authorisation for the settings, you can still make settings for your user login only and within the framework of the defaults.
Settings Live Report Information selection
You can define the start view of the Live Report according to your specifications and activate or deactivate the individual information rows.

Depending on whether you log in as a site user or central user, the settings are saved for you.
The settings are applied the next time the program is started.
Edit groups
In Live Report you can group locations whose information you want to cumulate as you like and assign names to these groups.

Groups must have a unique designation.
If you want to create a group or change the selection of locations, a dialog for selecting the existing locations opens.

The locations shown in light grey are the ones you have hidden. These are included in the selection of the group, but are not displayed. If you want to show them again, you can show them again in Sort & Hide.
If Live Report is opened as a location (not headquarters), the group selection does not exist and the Edit Groups dialog does not exist.
If you try to create a group of locations with different currencies, you will get a warning that they are different currencies, because the locations in a group must have the same currencies to be displayed correctly.
Sort & Hide
You can hidelocations that are then no longer offered or evaluated in the Live Report. Each location can be hidden individually. By hiding, the location is no longer displayed in the retrieved or exported data. Even if the location is assigned to a group, it is not displayed.
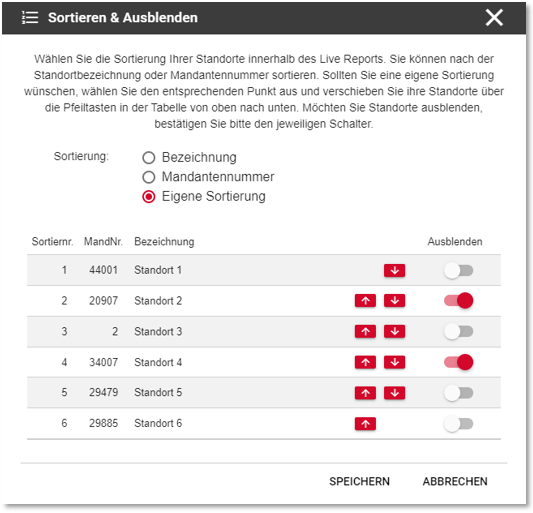
The standard sorting of locations is alphabetical by name. Alternatively, you can specify the sort using the client number or you can carry out your own sort. If you select My Sort, you can use the arrow keys to determine the order. New locations will then always appear at the end of the sorting process. The sortings apply to all groupings.
In the Location Alias Assign dialog you can assign aliases as descriptions for your locations. These apply to both the Live Reportand the Enterprise Report. With Save all entered aliases are accepted. If you want to reset an alias, delete the entered alias and press Save.
Please note that an alias designation of a location is then also applied in other areas. Although not as an address on invoice from us to you, but in the site selection to view these invoices.
permissions
The following authorizations exist for the Live Report program:
- Live Report: Call up and view the Live Report
- Settings: Enables you to enable Live Report to create and edit groups. As well as giving aliases for the locations. If you do not have this authorization, you can only make the settings for your logon.
- Export: Allows you to export the live report.

For general information on authorizations, see here: Users and Authorizations
Special feature Set hourly wage 1 and 2
For details on the two hourly wages, see Best Practice with Theoretical Hourly Wage 1 and 2
Depending on the setting in one of the employee time recording reports, hourly wage 1 or hourly wage 2 is transferred to the live report.
Report item in the Live Report
In the item master, select the option Report items to evaluate these items in the Live Report in particular:

Further topics: Features and options of the items
Back to the overarching topic: live report