POS printer settings

The Manage Printer Settings program refers to special printers that are to be used by the POS system.
Basically the type and the connection are determined. A printer that is connected via TCP/IP can be addressed directly from any cash register and must therefore be set up once for each cash register.
The connection of parallel and serial printers is determined only once and the printers can be used by all other cash registers of a client by the release directly available in settings.
Exceptions...
To set up ticket printers, please use the documentation in the ticket area:
Please note that there have been several new front office printing options recently. New features include QR codes and 180-degree rotation of the print. Since the firmware in some printers is not up to date, it is possible that these functions are not yet working correctly. For example, if you rotate 180 degrees, the QR code no longer appears or the formatting of the lines is wrong (not centered). In this case, please update the printer firmware and use Hypersoft POS Printer.
The Hypersoft Pay System can create printers independently if printing is to be done on internal printers of payment terminals. However, these printers are then only available for the print jobs described under Hypersoft Pay, such as invoices, and cannot be used by other devices.
Configure POS printer
From the programme group Printers & Interfaces , select the programme Printer Settings:

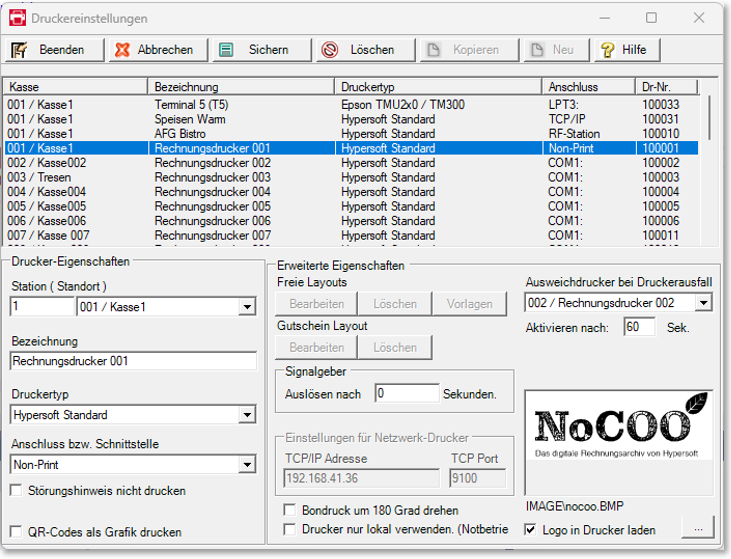
In the upper table, each line represents a configured printer. Missing printer settings are indicated in the lines by a red color marking.
| Element / Switch | Function / Description |
|---|---|
| Copying | Copies a selected printer, simplifying setup. |
| New |
Press Newto assign a new printer to a station. You make the settings in the lower area of the dialog. Please note that a serial or parallel printer only needs to be set up once here for the cash register network and can thus be made available to other cash registers. |
| Cash register (location) | Select the station for which you want to set up the printer by number or label. |
| designation |
In the Name field, for example, enter Terminal Printer 1. If you are working with many printers and stations, use a unique label for each printer that goes beyond the individual device, since this label can also be used at other stations through the release. |
| printer type |
For Printer type, select the exact name of your printer. If you choose Free Layout (New Format) as the printer type, the standard Windows printer is addressed and the setting for the free layout is released. We provide information on the design at Form as DIN A4 layout. If you have selected aUse Guest Check Printer as the printer type, the paper size setting is enabled. Special case ticket printer... If you choose Boca Ticket Printer, go to Set up ticket printer to learn how to set up a ticket system. Special case video interface... The printer type Video is used to connect a video surveillance as described in the section Video interface of the cashier mode. You must assume that models not listed here are not supported. Also, a compatibility mode of another printer with one of the devices listed here cannot conclusively ensure trouble-free operation. Therefore, only use front office printers recommended by Hypersoft. |
| Connection or interface |
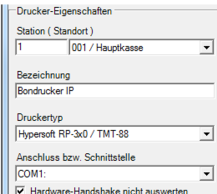
Select the physical port or interface used by the printer. The USB selection is only compatible with Hypersoft printers. The TCP/IP connection type allows you to connect printers using the network protocol. If you select this option, the Network Printer Settings area is activated.
Enter the address of the printer in the TCP/IP field. The TCP port address is normally 9100 and should only be changed in exceptional cases and with knowledge of this procedure. The front office printers or print servers that may be used have auxiliary programs that assign the corresponding IP addresses to the devices. Serial connections... Note that serial connections work about 30 meters (50 meters for very good cables). Parallel connection cables should no longer be used. The RF station is described here Orderman Wireless Printer Station. To set up the Bixolon mobile printer, see WLAN printer with POS/mPOS Select Non-Print if you do not want the print jobs to be printed. This may be necessary in conjunction with the Kitchen Display or the dispensing system. It is also a good solution in case you need printouts only in certain cases.
For example, as an alternate printer, you can use the Non-Print port to automatically remove print jobs when a printer is turned off. In your own interest, please ensure that you do not violate applicable laws, such as the receipt issue requirement in Germany, by using this function. To save paper, you can also use NoCOO - Digital Billing. Further topics: Order voucher only for online orders (non-print) |
| Do not evaluate hardware handshake |
The Do not evaluate hardware handshake switch is only to be used in an emergency, since it can no longer be used to check the function of the print function. The small SAM Hypersoft printer requires this, but only if it is closed in USB mode (virtual serial port) (not recommended). |
| Do not print fault message | If printers are not available and are printed on an alternative printer, a fault message appears as header text. Here you can deactivate this hint. Details of the Alternative printer in case of printer failure |
| Print QR codes as graphics |
Some printers can only create "small" QR codes and are overwhelmed with the QR code of the German TSE codes, for example. With this switch, QR codes longer than 230 characters are not created by the printer itself, but by the POS system and then transferred as a graphic to the printer for printing. Since this takes about a second extra, smaller QR codes (such as those used for NoCOO ) are further quickly generated by the printer. |
| Free layouts |
This area is only available for certain printers: |
| Voucher Layout |
This function is for the voucher management (not web vouchers): If you have assigned a printer as a voucher printer, you can optionally print to a Windows printer here. It is then used when selling vouchers the Windows printer. You can extensively customise the supplied standard layout called "Voucher" with the Designer. The layout function... Hypersoft Suite enables you to make extensive arbitrary adjustments to most lists and evaluations with the program List & Label Layouter . This is started with the Layout button next to the Print button. The layouter should only be used by experienced users or after training. You can also instruct us with adjustments at any time. Further information can be found at The List & Label Designer. |
| signal transmitter |
This is used to set up intelligent notification of signallers by setting the minimum interval in seconds for a new notification here. |
| Network Printer Settings | Only available with TCP/IP connection. |
| Rotate receipt printing 180 degrees |
See this: Printing rotated 180 degrees... |
| Use printer locally only |
If you work with a network, all print jobs are stored on the server drive and from there they are sent to the cash registers. The printer is then automatically released for all cash registers. If you use a printer only for the current till, you can enablethe Use printer only locally settings. The printer is therefore not available to other cash registers and the print jobs are processed particularly quickly on the local hard disk. |
| Alternative printer in case of printer failure |
Select an alternate printer in case the primary printer fails or if you intentionally want to redirect the print to another printer by turning off the primary printer (item not busy). You can also specify the number of seconds after which the backup printer is to be used. This prevents unintentional switching to other printers during normal interruptions to operation, such as those caused by changing paper rolls. When an alternate printer is activated, a message may appear at the Hypersoft POS to inform the operator. on mPOS and CLOU MOBILE, this message does not appear. If the printer control is done via a server, the message is probably not noticed there. Before each new print job, the system checks whether the original printer is available again. Before the alternate printer is activated, the system tries to reinitialize the printer port and send the print jobs to the selected printer. Details of the Alternative printer in case of printer failure Please make sure that this setting is only permitted for printers of the same type, as there may be display problems when redirecting. If you have different printers, test the effect on the print image before using this setting in practice. IMPORTANT: The printers also report interruptions (depending on the type) when they produce long printouts. Make sure that this does not result in unwanted print redirection and set the time for redirection at least longer than the time required for printing long print jobs. |
| Load logo into printer |
You can have all TMJ series thermal printers and printers supported print image files. The image is loaded into the printer's memory so that this can always be done reliably and quickly with Front Office printers. If a logo is available, the path of the file storage is described below it. This path always refers to the active Hypersoft directory (starts with [C:]Hypers-!...). Image format for stationary standard printers: The image must have the following format: Width: 472 Height 176 pixels. The color format when saving must be the monochrome bitmap. You can use the ORGLOGO.bmp in the directory (C):\Hypers-!\Image, the logo must be stored in this directory to be used. You can replace this with your logo, but you must keep the size and color format to avoid overloading the printer's memory for storage. Image format for mobile printers (Bixolon): The logo for invoice printing in the Clou Mobile or mPOS control has other dimensions than the stationary printers: correct is 384 x (176 - 254), the height is variable. |
Further topics:
Setting up label and barcode printers
Back to the overarching topic: Further settings

