eBookings in cashier mode
The integration of the reservation systems into the POS process represents a significant advantage for the practical work in the business. Especially due to the fact that most POS systems do not integrate the reservation systems, you need to train even experienced staff on these functions and workflows.
The following functions are available for both Hypersoft Basis Reservation 2.0 andHypersoft Reservation powered by aleno. Additions to the latter can be found in the section aleno Reservation at Hypersoft POS.
These more advanced functions are available on the Hypersoft POS, mPOS passes the operations for automatic check-ins, but this does not allow all the adjustments shown here to be made to the reservations.
Status display of the reservations at the POS
When the process is closed, a desktop widget is displayed at the checkout, which displays the reserved tables / number of persons for the next 60 / 240 minutes or today (after TTA).

Every reservation should be checked in when the guests arrive or before the first booking.
When a table is opened for which a walk-in has been made via aleno, information such as the table number, customer name, number of customers and reservation period is displayed at the POS:

Reservation Management at the POS
The reservation is started via the POS keyboard with the POS function Check-In function. The following dialog then appears in which all pending reservations (marked blue, within the next 60 minutes) are displayed.
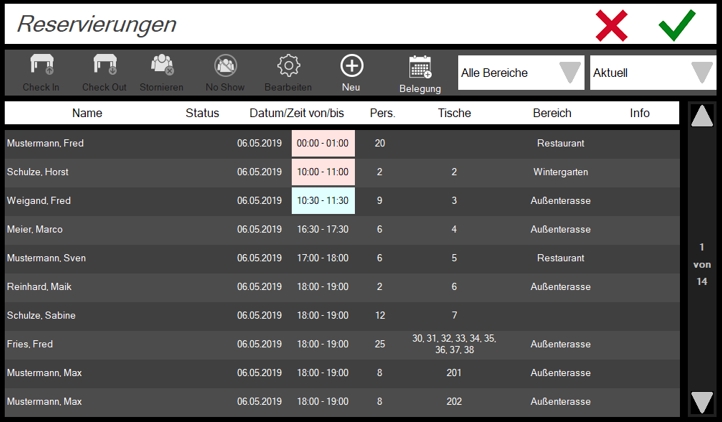
Entries marked in red have already exceeded the adjustable time for the status /No Show. These entries are displayed until the following day, unless they are confirmed/cancelled manually. In the right-hand area, you can scroll through the table page by page using the up/down arrows. The current page numbers and the maximum are displayed (here 1 of 14).
By selecting an entry at any position it is marked and the buttons which are possible in the respective situation are activated.
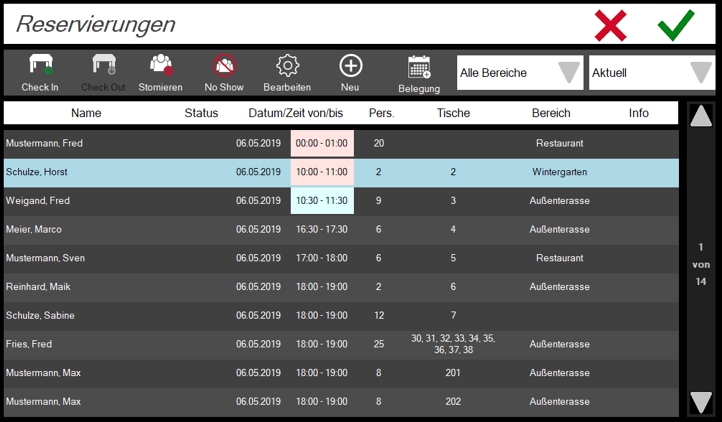
| Element / Switch | Function / Description |
|---|---|
| Check In |
When checking in, the respective entry is "checked in" and the dialog closes immediately. The number of reserved seats is not automatically taken over as the number of customers. Use the extensive possibilities to record the number of customers. |
| check out | The table is no longer reserved, it is released again. |
|
Cancel reset |
The Cancel button changes its text to Resetdepending on the status. If a reservation has not yet been checked in, the entry will be "cancelled". For all others, "cancelled, checked in, No Show", the status is reset again and it becomes a reservation again. |
| No Show | Sets the status. |
| edit | Enables editing, see: Processing a Reservation at the POS |
| NEW |
Starts the entry of a new reservation. This corresponds to the description Processing a Reservation at the POSwithout existing data. |
| occupancy | Occupancy shows the entire occupancy from the area / table view without the names. |
| domains |
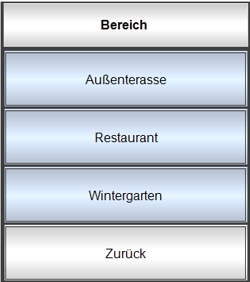
By pressing the range selection, the possible ranges are displayed.
In the ward management there is a setting to create areas as standard for each cash register. This setting is then applied each time the table is started for the respective cashier station. If areas are specified for a cash register, a further entry "Standard area" is displayed in the respective selection. |
| status selection |
By using the status selection you can filter the table according to the following statuses.
The status of each posting is also displayed in the Status column. A reservation that has not been checked in has an "empty status". Example Status All:
|
| column sorting |
The contents of the table can be sorted in ascending and descending order by selecting the headings. This is indicated by a small arrow behind the text, as in Windows. |
| info |
The Info column indicates entries in the fields ("Gastinfo" or "Internal Info" ). |
Processing a Reservation at the POS
By selecting Edit the Edit / Create dialogappears.
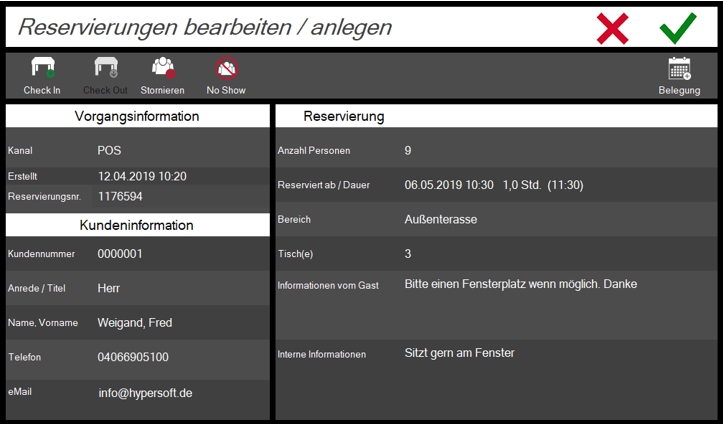
In the upper left corner you can see the process information, the channel (channel, where the reservation came from) and the creation date. Under Customer Information you will find the customer data and in the right field the data relevant for the reservation.
Selecting a field opens the corresponding editing of the area.

For customer information, the customer master function is initiated at the POS for each field. The customer data is then completely processed via this function.
Reservations without customer data are not possibleat the checkout. Each reservation must be associated with a customer. Alternatively, you can, for example, create a dummy customer "POS customer".
Enter the number of persons...

Input date / duration...

Input range...
Enter "Tables" if necessary with the option of calling up the occupancy table to check free tables...


occupancy table
If the occupancy view is called up via editing a reservation (change or create), only reservations that concern the desired area are displayed. All reservations are displayed with a red background. Once all relevant reservations have been determined, all remaining free tables are displayed (highlighted in blue).
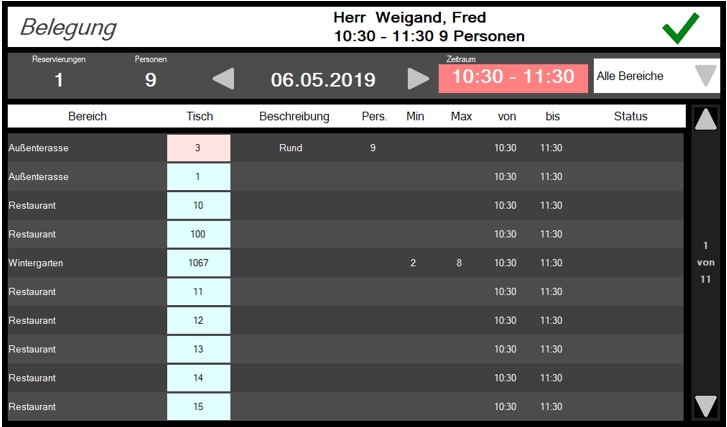
By selecting the period shown here (highlighted in red at the top), ALL reservations are displayed to get an overview. The red time domain field is then hidden.
The area can be filtered and the table sorted by clicking on the headings.
Display of combined reservations
Entries marked with asterisks *** are not independent reservations but originate from a reservation that occupies several tables (since the occupancy view is displayed table by table):
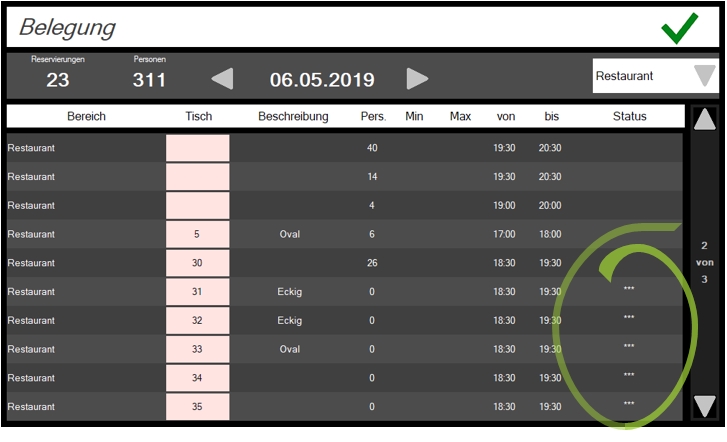
This function is not equally available on the mPOS.
If an attempt is made at the POS to open a process for which a reservation has not yet been checked in, the operator receives a message. He can now decide whether to select Check in now to check in the guests directly at this table, or rather Confirm, as it is now inappropriate to check in the table with these guests:

After a reservation is checked in and the Reserved Checked In operation is opened, the operator receives the reservation information:

If the process is completed, the reservation is released. (Check Out)
Checking and adjustment of walk-in reservations
See Best practice: Turn walk-ins into check-ins.
Graphic table overview
The Graphical table overview shows approaching reservations at the tables, if you activatethis function.
cash register functions
Further POS functions are available for setting up your POS keyboard in conjunction with the reservation: Reservation: all functions
Walk-ins and procedures...
If you open a table (which has not yet been booked), book an item and close with New Balance, a walk-in can be booked automatically depending on the setting.
If you open a table (which has not yet been booked), do not book an item and close with New Balance, the table is not used and no walk-in is booked.
Quickly book walk-ins manually...
On the Hypersoft POS, you can send the number of customers in one go using the comma key in combination with the Walk-In checkout function. This is particularly practical with walk-ins.
For quick entry book 5,3 Walk-In then table 5 with customer count 3 will be registered as Walk-In.
Further topics: Best practice: Turn walk-ins into check-ins
telephone interface
With the Hypersoft TAPI interface callers can be found in the customer database. Telephone reservations can also be recorded more quickly.
Further topics: eBooking Communicator
Back to the overarching topic: eBooking Reservations


