Set Kitchen System
The settings of the Kitchen Supervisor also include the settings of the Kitchen Displays.
The Kitchen Display automatically supports the 16:9 format. If this is not desired, this can be set to 4:3 with the parameter NOWIDE.
The interface between font size, number of simultaneous information and the possibilities that you provide to your guests and customers with inserts and other changes requires a corresponding monitor size that can also display this. Settings for sizes and colors are then sufficiently available.
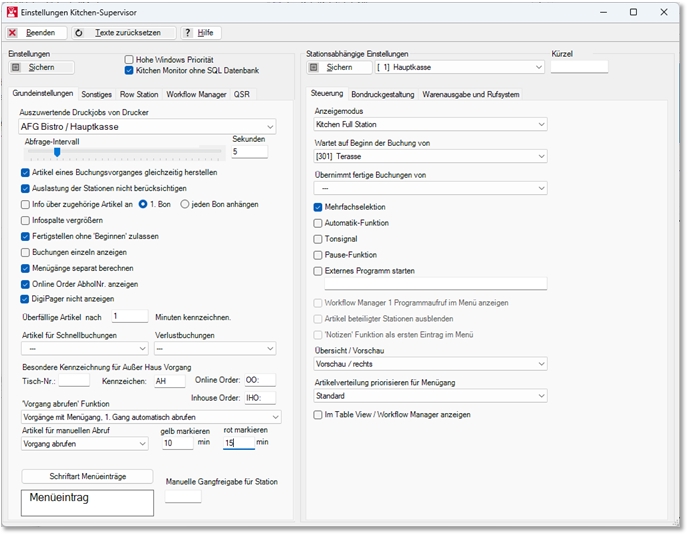
Start the Kitchen Supervisor icon from the checkout area. Then press the button Settings in the upper button bar:

Basic settings of the Kitchen Monitor
| Element / Switch | Function / Description |
|---|---|
| High Windows priority | Forces Windows to allocate more computing power to the program. |
| Kitchen Displays without SQL Database | The Kitchen Monitor system up to version 2025 can be used with or without an SQL database. |
| station | Select the station to be used as the Kitchen Display. |
| abbreviations | A short station name that is used in the info column. |
| Print jobs to be evaluated from printer |
Instead of a printer, the Kitchen Display is used to display the orders. In order to assign a display to order groups, a virtual front office printer is defined beforehand. This printer is the target device for the order groups and is assigned for this purpose. |
| query interval | The query interval determines how often the supervisor should search for new bookings in the POS system. The default is 5 seconds. |
|
If the switch is active, the preparation times are not added within a transaction (!), but the largest preparation time is used. Example: 1 steak 10 minutes + 1 fish 5 minutes. Fish is delayed by 5 minutes, steak is due immediately (if no other items are available). The utilization of the station is now only 10 minutes ( from the steak ). If the switch's off, the fish would be 10 minutes away. delayed, because the steak takes so long and the load would be 15 minutes ( sum of all items ). The switch has a positive effect if several meals can be produced at the same time on a Kitchen Display. However, the switch can have a negative effect if it is used at a station that cannot do this. Is such a solution for grilled or draught beer - in other words, long preparation times that do not occupy much of the employee's time. |
|
| Do not consider utilization of stations |
If the switch is active, the load of the other stations is not calculated when adding products. For example, it is assumed that a grill post can put on "unlimited" meat. Within the same transaction, however, times / distances are calculated ( Different from the switch Create items from a posting transaction at the same timeArtikel eines Buchungsvorgangs gleichzeitig herstellen). |
| Info about related items attach to 1 receipt or each receipt |
This allows you to create an infobon that will be created only on the first printout or on all print-outs.
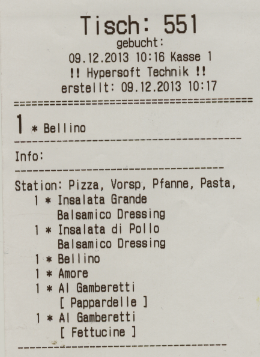
Thus all items involved are printed out on the receipt (if you work with menu item Release, only those of the released menu item). Items that have already been completed are shown in square brackets [ 1* item ] to give an overview of what is still missing. Only bookings entered at the same time are combined here. A new balance separates the bookings additionally. Also enter a text in the receipt print layout that will be printed as a hint for the last item in the order. |
| Enlarge info column | The info column displays information on the number of items and the stations involved. This increases the font size slightly. An enlarged info column provides better information about attachments and queries. |
| Allow finishing without "starting |
The normal workflow is to set an item to work with "Start" and finish the item with "Finish ...". If this switch is active, the button Print receipt and Done is always available in the Kitchen Display, so that an item does not have to be marked as "started" first. This allows individual stations or smaller systems to work much more conveniently and quickly. For larger systems and when the information about "start" is important, this abbreviation should not be used. |
| Calculate menu courses separately | If several menu courses are triggered at the same time, this switch will handle each menu course as self-contained, i.e. the times will only be calculated within the menu course. This setting is recommended. |
| Overdue items after 1 minute Marking | This is used to color items that are overdue on other Kitchen Displays in the info area pink. |
|
You can select an item from the item master that is used for quick postings (info item). All subsequent item bookings are classified as Due Immediately in the Kitchen Displays. This allows operators to prefer urgent items on the displays. |
|
| loss entry |
If you select a reason for loss here, the loss function is offered in the menu of the Kitchen Workflow Manager . Losses are then treated with this reason for loss. |
| Call up process Function | Settings for the Retrieve mode operation. Further topics: Kitchen Workflow Manager |
| Special marking for out-of-home operation |
Enables special labelling for Off-site operations such as shown here: Outside home functions at the Kitchen Full Station. |
| Online Order | Standard marking for online order processes. See also the topics on Text indicator for online order. |
| Do not display DigiPager | In order not to show DigiPager as "Pager" on the kitchen display (because it has no meaning). |
| in-house order | Here you can select a character to indicate In-House Order operations (default IHO:). |
| Font Menu entries | Font size of the menus in the Kitchen Workflow Manager. |
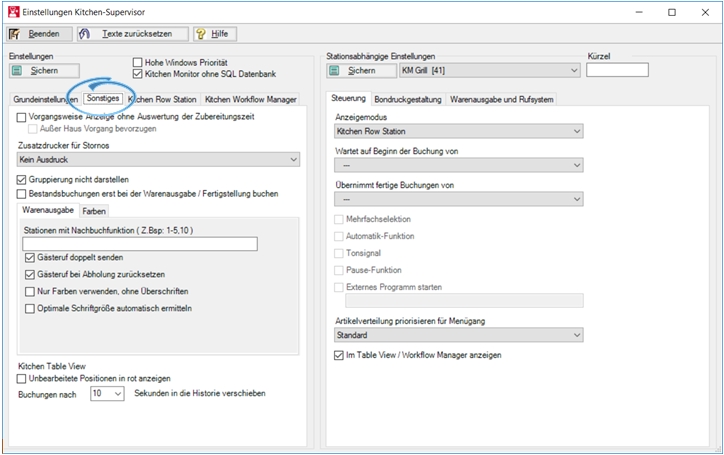
Miscellaneous of the Kitchen Monitor


| Element / Switch | Function / Description |
|---|---|
| Bump Bar Keys |
To assign the keys to the functions, select the field to the right of the function and press the corresponding key of the connected bump bar. The key code is accepted and displayed. So any keyboard can be used. |
| lines | Specify the maximum number of rows to be displayed. |
|
font background |
When you set the font, you will see a preview of the status below: 1st line: posted 2nd line: in transaction 3rd line: Finished |
| advance | Color setting of the progress bar. |
Settings of the Kitchen Workflow Manager (and Preview Manager)

The Kitchen Workflow Managers can be organized in four levels one after the other.
| Element / Switch | Function / Description |
|---|---|
| Kitchen Preview Manager |
You can adjust the colours, especially to distinguish items that have not yet been distributed to a display. The colour setting for preview function is only activated when the Kitchen Preview Manager display mode (right) has been assigned to a station. |
| Setup of up to 4 steps |
Enter a name that corresponds to the activity. In the area Displayed bookings you select which items are to be displayed on the station, as well as the color scheme. At the end of the production chain, for example, choose Served or Served and the entry Inactive.
A Kitchen Workflow Manager can see the postings in different levels:
+ own: the 4 stages of preparation and all that are on the respective Kitchen Workflow Manager.
Example: Plating would be set to [6] Booked [+own], then all bookings and all finished products that are on the Plating, but not the products that have already been handed over to the passport are displayed on the station. At the pass, for example, you set [1] and see the complete system of all bookings. |
|
Font Item Font Supplements |
The font can be used to display the main items of the inserts in different ways. The size of the insert field in the Workflow Manager is automatically adjusted based on the size of the item font. If you need more lines for inserts, it is advisable to reduce the font size of the item. |
| Returns up to xx minutes |
Finished items that have been moved to "Served" in the last Workflow Manager and that may need to be undone again burden the Kitchen Monitor System. So that the load does not become too large, please set a time span as short as possible which fits to items which can be reactivated. |
| Delivery (finished) of all positions |
The switch enables quick delivery of all positions, see Quick Fast delivery of all positions....... |
| Print overview receipt only | If a process is completely passed on to the next item, the items that have not yet been completed are automatically completed. A receipt may be generated for each item. This switch ensures that an overview receipt is generated for the bookings made instead of individual receipts. |
|
See the Special feature Manual release. |
|
| superstructure | Structure of the monitor layout using columns, rows and postings. |
| Sorting the operations |
sorting options:
|
| timeout |
If a planned completion is exceeded, it will be marked red after the time set here has elapsed. |
| Individual notes | An unlimited number of text templates can be stored here for the note function. |
|
Text for places Text for menu courses |
At the Kitchen Row Station, entries for menus and seats are automatically generated, and the design can be configured for the Kitchen Workflow Manager. %P and %M are the placeholders for the seats and menu courses. You can add texts before and after this if required. |
Ward-dependent control of the Kitchenmonitor

| Element / Switch | Function / Description |
|---|---|
| display mode |
The single mode determines the type of Kitchen Monitors:
Further topics: Variants and techniques of the Kitchen Monitor |
|
and Takes over completed postings from |
Special preparation division and synchronization: With Wait for start of booking it is set that involved bookings (a booking transaction, not a table) are only displayed when one of the items has been started on the corresponding kitchen display. With Accepts completed bookings from, affected bookings must first be completed on the Kitchen Display before they can be transferred to the 2nd screen. are displayed in the first place. |
| Receipt printing design |
You can adjust the receipts of the Kitchen Display. Further topics: Simple Front Office Layout |
| Note for last item | If the last item of an order is printed out as a receipt, you can print a note whose text you enter here for this purpose. |
| Multiple selection allowed | This allows several bookings to be selected simultaneously on the Kitchen Display. |
| automatic function |
With the Automatic switch, the Kitchen Display automatically selects the next due item and all others from the same preparation transaction and moves them to the In transaction area. |
| audio signal |
This will sound the Kitchen Monitor when new bookings are received. The device must have a sound card and speakers and the system sounds must be activated. The system sound "Note" (German OS) or "System Exclamation" (English OS) of Windows is used. This sound can be changed in the Windows settings. Alternatively, a Kitchencl.wav can be stored in C:\Hypers-!\Kasse-!\ which will be played. |
| pause function | If you activate this option, a pause button will appear on the Kitchen Display. This allows the operator to activate the Pause mode. |
| Start external program |
Allows you to select a programme that can be started on the Kitchen Full Station via the External button. This means that you can use the availability manager, stock control, time recording or 3rd party programmes on the Kitchen Display. |
| Workflow Manager 1 Display program call in menu |
Function to startthe Workflow Manager 1 at a Row Station. |
| Hide items from participating stations | Can hide items produced at other stations: Special feature Hide participating stations |
| Notes Function first in the menu | Places the Notes command on the first position of the Workflow Manager. |
| Display in overview monitor | A special view. Further topics: Kitchen Table View |
| Overview / Preview |
Setting via ward-dependent settings:
|
| Prioritize item distribution for menu navigation |
Selection of the entry from the menus for the special use of prioritized item distribution. Further topics: Prioritize item distribution |
| In Table View... | Only stations that have this check mark active feed information into the Kitchen Table View and Kitchen Workflow Manager. Thus, the system can be set up individually and, for example, pure beverage stations can be disregarded. |
Receipt printing design of the Kitchen Monitor
The receipt printout on the Kitchen Monitor prints a receipt (talon) for each finished item that can be assigned to the item. Below is a description of how you can also use the label printer for this purpose.

| Element / Switch | Function / Description |
|---|---|
| Printer for receipt printing | When the order is completed, a receipt should be printed on the Kitchen Display with the corresponding confirmation. Select the corresponding printer here (marked area B of the graphic). |
| Single receipt | This option is used to create individual receipts on the Kitchen Display. |
| Single receipt to... |
This allows you to select the number of individual receipts from which cumulated receipts are to be converted. For example, if an item is ordered 50 times, a cumulative receipt may be more practical than 50 individual receipts. |
| proof | Confirm proof to verify correct printer assignment. |
| Receipt printing design |
You can adjust the receipts of the Kitchen Display. Further topics: Simple Front Office Layout |
| Note for last item | If the last item of an order is printed out as a receipt, you can print a note whose text you enter here for this purpose. |
Label printer variant on the Kitchen Monitor...
The label printer can be set up instead of the standard receipt printer. The printer must be connected locally to the machine and set up in Windows as described in the standard. However, the programme described there is not used to set up the barcode, but the options for designing the bond print of the label that follow in this chapter. For basic printer setup, first see Setting up label and barcode printers and then continue here.
The supported format for the Kitchen Monitor is W/H: 56 x 50.8mm and the technology for setting it up is Simple Front Office Layout. You configure the design of the printout for the Kitchen Monitor based on the standard here:

Adjusting the Kitchen Monitor Goods Issue

| Element / Switch | Function / Description |
|---|---|
| This station books finished items in the goods issue area. | When you work with the Kitchen Displays, items are given the status Finished. Here you can select a station to be used as a goods issue. |
| Place item in goods issue immediately | With this setting, you can transfer items to a station that has been designated for goods issue without carrying out the Complete step. |
| This station works as a goods issue station. |
Activates the goods issue at this station. As standard the own station name is used here. Optionally a different station number can be selected. This setting is required if goods issue for the same items is to be possible at several points. With the second settings and as goods issue, you can cumulate another goods issue into the existing one. For example, guests can then decide from which of the two possible goods issues they want their item handed over to them. |
| Printer for dispensing goods |
A packing slip can be printed at the goods issue for which you specify the printer here. Further settings are described in the section on setting the goods issue. |
| Call text for the guest call | Each Kitchen Display can receive a call text for guestcall. The calling of the pagers is done by the Kitchen Supervisor at the completion of the last item of an order / menu. If it is a special pager with text display, this text can be transmitted. |
Further topics:
Back to the overarching topic: Kitchen Monitor System


