Configure cashless payment terminals
The configuration of the terminal integration for cashless payment transactions is initially based on the respective data centre. There are then differences within the data centres depending on the terminal used. The settings that are then available to you always refer to the terminal in connection with the respective data centre.
As an alternative to the method of selecting the data centres and terminals to apply default settings, you can select these manually. However, this is only intended for experts, as it allows you to select settings that may not be compatible with your data centre or terminal.
If you have not yet taken care of the activation of ports, you should do this first, as the payment area requires this.
To set up Adyen payment terminals, please also refer to Hypersoft Pay with Adyen Onboarding.
Set terminal integration correctly
The program is called up in the MCP under Interfaces with the Cashless Payment Transactions tile. By default, the dialogue is in station/terminal assignment mode. The left-hand list contains the station selection, the right-hand list contains the terminal selection, with other settings in between:

Further topics: Terminal Sharing with Hypersoft Pay
The first two very important cross-system settings concern the amount window and are explained to you in the chapterHypersoft Pay Amount Window, but also apply universally to other payment terminals.
Simplified workflow description...
We assume that the wards have previously been set up in the ward administration. With the switch Terminal the dialogue changes to the Terminal setup mode. The first step is to set up the payment terminals that are to be connected to the POS system.

Then press Station (right next to Terminal) and switch back to Station-Terminal Assignment Mode to establish a relationship between the wards and the terminals. To do this, select a station (left) and one or more terminals from the list on the right. Then complete the information so that the ward knows how to handle the terminals.
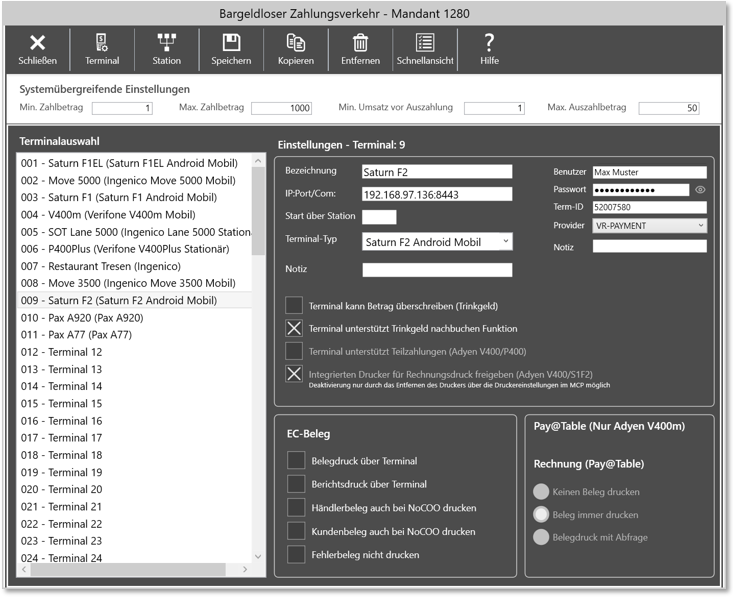
In the terminal settings, you can choose between the provider or free input via the selection list Provider (free input is only intended for experts and does not protect against configuration errors).
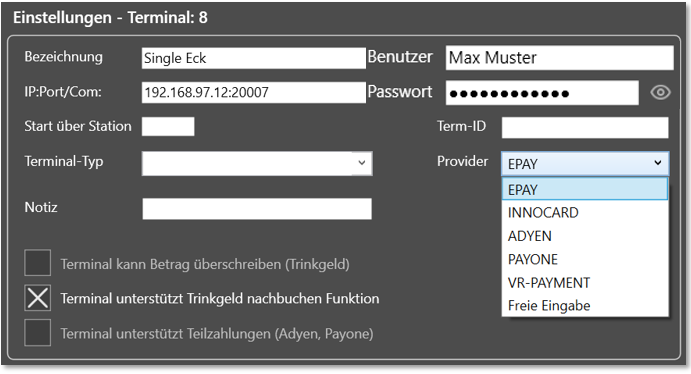

The providers Adyen for Hypersoft Pay powered by Adyen, epay are pre-configured for you in the Hypersoft Pay Standard. Innocard can unfortunately no longer be reconfigured (company, partnership no longer exists) and vr-Payment is only supported as part of the project business. With the Free input selection, further terminals can be set up (remember that the latter also does not prevent incorrect settings).
Terminal Selection of supported providers...
The Hypersoft Pay powered by Adyen terminals are described in more detail in the section Hypersoft Pay Adyen Terminals. When selecting a provider, the pre-configured terminals are available for your convenience in the Terminal Type list. Example epay:
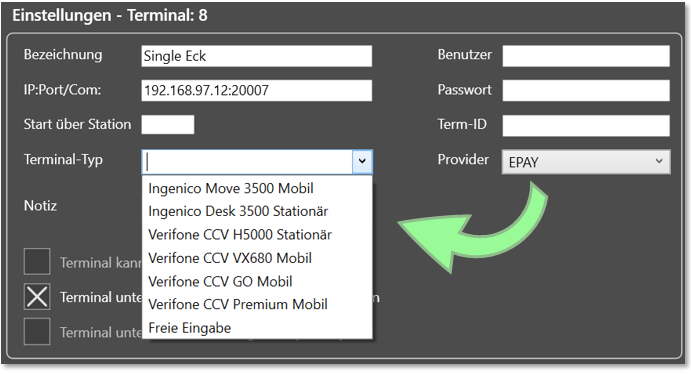
After selecting the predefined terminals (here for epay), you will later be offered only the matching counters in the station terminal assignment mode. In addition, however, further settings of the terminal are required beforehand:
| Element / Switch | Function / Description |
|---|---|
| designation |
Unique designation of the terminal. If you work with several mobile devices per POS or mPOS, you should designate these payment terminals intelligently. Later in the operation, your operators can also assign the payment terminals to a POS system simply by scancode. |
| IP:Port/Com |
The local IP address and the port on which the receiver module (BZVReceiver) is running must also be set. The default IP address is "127.0.0.1", which only needs to be changed under special circumstances (the port is freely selectable, but must be identical to the selected port of the provider ). Important: The selected port must be released as an incoming and outgoing rule of the firewall on the PC on which the "BZVReceiver" is running. |
| Start via station |
Normally, the main cash register(server) starts all payment terminals that have been set up. Here you can specify that a different cashier station should start the terminal. See the section Protection of the payment terminals in the event of a cash register failure. |
| Terminal type | The possible terminals regarding the chosen provider. |
| memo | Free note field for you. |
| User | Only to be entered for Adyen: The user stored in the Adyen portal for the terminals. |
| password |
For Adyen: The password stored in the Adyen portal for the terminals. For the others: If you have not selected Adyen as your provider, the ZVT merchant password must be entered here. The eye symbol can be used to make the password visible if you are logged in as an MCP user. |
| Terminal ID | For Adyen only, the ID must be entered using the ID stored in the Adyen portal or also to be read from the terminal. For all other cases, the IDs are automatically entered here if possible / necessary. |
| Terminal can overwrite amount |
Only for Adyen Pay@Table: See Hypersoft Pay@Table Settings. This setting is only for Hypersoft Pay@Table, for PayPOS this setting is not needed. |
| Terminal supports tip rebooking function |
Activate this if you want to post a tip at the terminal. This setting is only for Hypersoft Pay@Table, for PayPOS this setting is not needed. |
| Terminal supports partial payments |
In order for cash payments or partial payments to be possible at all at the terminal, the switch Terminal supports partial paymentmust be activated in the terminal settings. This setting is only for terminals that support Hypersoft Pay@Table, but Pay@Table does not have to be turned on. this setting is not required for PayPOS. Without this activation, only payment by credit card is possible at the terminal with Pay@Table. |
| Enable integrated printer for invoice printing |
Please see the chapter Configure integrated printers. |
Copy terminal settings...
Terminal settings can be copied, see here...
Further terminal settings...
In the standard, the printouts are made in sequence depending on the activation or deactivation:
-
Dealer receipt
-
Customer receipt
-
bill
| Element / Switch | Function / Description |
|---|---|
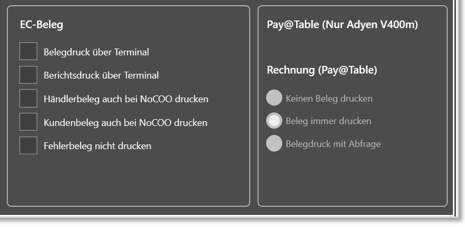
| Receipt printing via terminal |
Allows you to specify whether the merchant receipt and customer receipt are to be printed on the payment terminal with integrated printer. If you switch this off, the receipt is printed at the Hypersoft POS. If you use Hypersoft Pay@Table please note Printout via payment terminal. We generally recommend the use of NoCOO - Digital Billing, so that the document printout can be saved thanks to the digitised invoice receipt. |
| Report printing via terminal |
Allows you to specify the daily closing report to be printed on the payment terminal with integrated printer. If you switch this off, the printout is made at the Hypersoft POS. For example, you can print the merchant and customer receipt at the EC terminal and the daily closing at the POS. Applies to provider epay: Please note that with epay only both hooks may be set to the same value. If you specify them differently here, the settings in the epay terminal are automatically set to the same value. So either turn them both on, or turn them both off. |
| Print dealer receipt or customer receipt also with NoCOO |
In the terminal settings, the printing of trader and customer receipts can be switched on separately, even if NoCOO is active. As it is controlled via the terminal settings, a customer receipt can be printed on the mPOS client, for example, but not at the checkout. Printing at payment terminals with Hypersoft Pay Further topics: |
| Do not print error document | The switch Do not print error receipt prevents an error text from being printed from the payment transaction (e.g. if the payment transaction is cancelled at the terminal). By means of this setting per device, the error receipt can be suppressed at the SOT, for example, but it is printed as desired at a POS system. |
| Invoice Pay@Table | You see Hypersoft Pay@Table Settings. |
Warning of pressure cut-offs in the payment terminal...
In the standard system, Hypersoft controls the printout in connection with the payment terminals. Depending on the payment terminal or firmware, the printouts can be switched on and off by settings in the payment terminal. You must not use these settings there to switch off the receipts when the payment terminals are connected to the Hypersoft system. The printing of the retailer receipt and the customer receipt must remain activated in the terminal.
Automatic BZV emergency pressure control
If no BZV receipt printer is assigned in the system for the active ward, the system attempts to print on the printer assigned to form 0(zero) of the ward. If no printer is assigned for this station, the first printer assigned for this station is searched for and used. If no printer is assigned to the station, it is printed internally on the fictitious printer 999999.
The Station Terminal Assignment Mode
After the previous settings have been made, you can now conveniently assign the payment terminals to the corresponding stations. Each terminal must be assigned to exactly one ward and set up here in such a way that the cashier's station can start the terminal (other wards can then use the terminal as well, provided the ward number has been entered at Start via ward ).

| Element / Switch | Function / Description |
|---|---|
| Data directory |
A file storage directory is used for communication between the station and the payment terminal. From the point of view of the cashier station, this list should be available under all circumstances. The POS system checks the write and read authorisations and reports any errors to the cashier. You may not have permission to use this drive resource...:
|
| Interface type | For Hypersoft Pay powered at Adyen, the type Adyen is selected. Currently, a Hypersoft system can only support one type for all payment terminals. This selection corresponds or is related to the provider selection. |
| Terminal number |
The terminal number or numbers can be taken over by selecting or Multiple selection in the list on the right. The terminals selected here are then available to the selected cashier station. For quick complex settings, you can enter the terminal numbers directly into the field, separated by commas. |
| Timeout settings... |
Pay special attention to these time-out settings in the Hypersoft programme, as they must be about one minute longer than the time-out in the terminals. The effects of a time-out are also described in the section Best practice: Avoiding the time-out trap in full service. |
| Wait after login |
The BZV connection regularly sends login data to payment terminals to ensure that the subsequent data is accepted by the terminal. Some devices need some time to process this command. For PayTec terminals, set the value to 500 milliseconds. (With new Concardis firmware, it may also be necessary to set the waiting time to 500 milliseconds for certain devices). |
| Printer for... | Select the printers for receipt or report from the point of view of the cashier station in case these printouts are not made at the payment terminal (this is selected with priority in the terminal configuration). |
| Cashless payment transactions activated |
Cashless payment activated must be switched on if payment terminals are to be connected to this station. The respective control utility (BZVExtTerm, BZVAdyen) is then automatically started by Terminal Commander. |
| Quick-Service payment in the background |
Activate the payment in the background, while the cashier mode is already released for further bookings. Quick Service operations are bookings without a table number or similar. Do not wait in Quick-Service and Do not wait in Full-Service is only released if the ward is set up accordingly and the feature is supported. |
| Full-service payment in the background |
Full-service operations are operations on tables, customers and the like. In the full service, payment in the background is the standard, so waiting is switched off here. However, this gives you the choice of whether the cashier station should wait for the payment terminal to respond before continuing work. The Full-Service Paymentswitch in the background must beswitched on when using a belt printer, otherwise the EC vouchers will not be printed. Quick-Service payment in the background and Full-Service payment in the background are only released if the station is set up accordingly and supported for the corresponding configuration. |
| Allow payments with manual card data (Adyen only) | Enables manual Manual card entry at the terminal card data as described in the chapter . |
| Only use assigned terminals for payment cancellations | This option is used to check whether the relevant payment terminal that executed the original payment is also assigned to the current station that wants to execute the cancellation. If this is not the case, the cancellation will be rejected by Hypersoft. Using this setting can avoid misunderstandings and simplify billing. It also contributes to increased safety. |
| Do not print dealer receipt |
The first receipt sent from the EC terminal (merchant receipt if this has not been deactivated in the EC terminal) is not printed with this setting. Use the digital archive NoCOO Module Card Receipts (Merchant)instead. |
| Do not cut dealer receipt |
Use this setting if you do not want to separate the first transmitted receipt of the EC terminal (merchant receipt if this has not been deactivated in the terminal) from the payment receipt (as in the standard). The cut is thus suppressed. It is better to use NoCOO - Digital Billingto save on printouts altogether. |
| Do not cut customer receipt |
Use this setting if you want to print the second receipt transmitted from the EC terminal (customer receipt if the merchant receipt has not been deactivated in the EC terminal) but do not want it to be separated from the payment receipt by a cut. This may be desired in the Quick Service and in particular at the eSolutions Self-Order Kiosk (SOT). |
| Merchant and API key |
The entry of this information was only necessary with an older programme version. You can disregard these fields. |
| Pay@Table activated | See Hypersoft Pay@Table Settings. |
| gratuity | See the Pay@Table section Tip (CASH)... |
| Terminal settings | See the documentation Set Hypersoft POS for Hypersoft Pay@Table. for Pay@Table, and further down here Lower terminal area. |

Copy ward settings...
Ward settings can be copied, see here...
Removing a Payment Terminal Configuration
If you want to remove a configuration, you can use the button Remove for a selected entry. The ward settings are reset and the terminal settings are removed. This is used, for example, to release a licence and otherwise reconfigure it (a licence message is issued if too many terminals are entered).
Application of the licences...
The Hypersoft payment terminal connection is a strong performer. A licence is automatically applied for each payment terminal set up. If more payment terminals are set up than licensed, you will receive licence messages.
If you have enough licences, but overruns are still reported, check by selecting whether other terminals (that you do not use) have been set up and remove this set-up data there. Each entry in the fields - even partial entries - counts as one entry.
Removing a ward configuration...

Removing a terminal configuration...

Copying ward settings and terminal settings...
In the Wards and Terminals sections, you can use the upper button to copy the settings.

The currently loaded settings of the dialogue can thus be copied to one or more terminals and cashier stations, as multiple selection (multicopy) is also possible.
All terminal settings are used for the copy except IP:Port/com, Start via station and Term-ID. The terminal designation can be optionally adopted by means of a button above the list and in this case also receives the consecutive terminal number in the name.
Select the Quick View button to get a representation of the units in table format. The legend of the abbreviations can be found at the top of the dialogue:

Use epay license (epay-DLL)
When using the optional epay license (epay-DLL) additional setting fields become visible. This can then also be used to configure cash payments. To enable cash payments and QR code payments, a separate licence is required for each card terminal, which is stored in the settings for the card terminal. The key for QR code payments is unique per terminal

Further topics: Hypersoft procedure for payment terminals
Back to the overarching topic: Other payment terminals