Portal settings

You can access the webshop settings via the context menu (three dots) in the top right-hand corner of the title bar of the order overview.
eMail settings for eSolutions
The mail settings are explained in a separate chapter, go to: eMail settings for eSolutions
URL of your webshop
After you have provided us with the information required from the onboarding, you will see the URL at which your web shop can be accessed on the Internet.

If you want to use the webshop exclusively in YourAPP, you do not need to advertise a public URL. Otherwise, we recommend using your own URL as described at Best practice: Use your own shop URL.
General Settings
Under the general settings we have linked all contents, which you have to make under the menu item configuration. The procedure we recommend is explained in detail under the item Setup.

Further topics: Global eSolution configuration
Age verification in the webshop
With the age check, you can optionally ask your users for release-relevant items after they have reached a certain age. This could be, for example, alcoholic beverages, tobacco or other items harmful to minors. You enter the age requirement for each item in the item master in the Age check field.

If the age check is activated in the shop, a dialogue is displayed when the user is first asked to confirm his or her age:

If the age stated has not been reached, the corresponding item will not be added to the shopping basket. Further information can be found in the topic Age verification.
Age tests are held only once per age. For example, if there are 16+ and 18+ items, the 16+ will not be asked if there has been a previous successful 18+ check.
Activate coupons in the webshop
Activating the redemption of coupons causes the following adjustments:
-
Display of the redeem coupon button in the webshop
-
Option to redeem coupons directly in the Coupons module in YourAPP

Further topics:
Holiday notification for webshop
Leave a holiday notice to prevent entering and using the shop. You can also use these functions, for example, for renovations or other events to display a message to your customers when they enter the shop. Activated holiday messages completely prevent the display and use of the shop.
If, on the other hand, you only want to not allow orders for a certain period of time, but still want to allow the display of your products, you can also use the Browse function of the order types, which you can activate in the order types. You should deactivate all other order types in this case.
Turning on the holiday message prevents the entire shop from being used for all locations. If, on the other hand, you would like to restrict only individual locations, please deactivate the desired order types or adjust the opening hours of the respective locations. (Holiday notifications for individual locations are being planned).

In the delivery state, holiday notification is activated to prevent unintentional entry into the /User for your benefit.
You can use this function, for example, if you have not yet implemented your own delivery service, but still want to be able to access it via your Web shop and also want to offer other order types in addition to delivery to an external link.

The delivery to an external link lets you call up a possibly already existing delivery service. Please enter the appropriate URL per location to enable this redirection. Delivery to an external link overrides your webshop and directs the customer directly to the linked page.
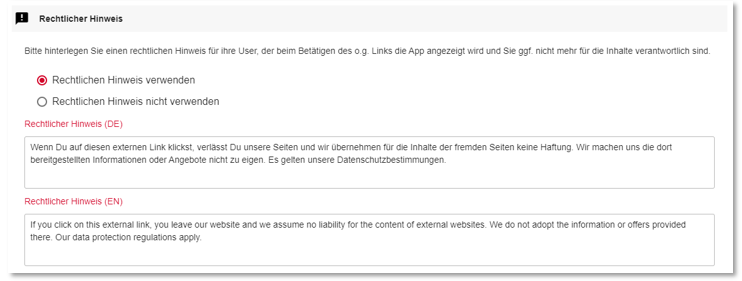
External Link - Note...
If you use the external link for the order type Delivery, you have the option of making it clear to your users that they are leaving the current page / app by displaying a corresponding note. You can activate this hint via the button Show hint text when leaving the shop.

Via the red link External link for delivery you can edit the corresponding note text:
Customer data specifications for webshop
In the webshop settings, define which customer data you want to enter for each order type for a purchase order. For example, you can enter less customer data here for an order for pickup than for an order with delivery. All customer data can be defined both optionally and as mandatory fields. All customer data already recorded is stored in the respective user profile of your customers.
Compulsory additions to customer data...
If you would like to enter further customer data at a later date, these additional fields will be displayed for the customer to fill in the next time they place an order. Using the sort function, you can arrange the input of customer data in any order.

The customer data email and name are each defined as mandatory fields and cannot be deactivated, as these are already requested during registration.
Customer base in the webshop
In the customer master 2.0 you can view all the information stored by the customer. In addition, you can define a customer discount or a customer price level here. See also: Hypersoft customer base.
The addresses additionally entered by the user as delivery addresses can be viewed and managed in the customer master 2.0 at Further addresses:

Order limit per time slot (dynamically adjust lead time to current orders)

For webshop orders for delivery and collection, a limit per time slot can be stored as an option.

Limitations can be placed on orders, items and totals:

The value determines the maximum number, sum per set time slot:
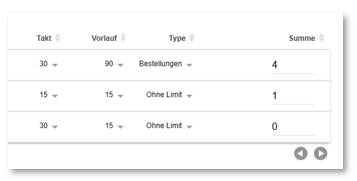
With the settings in this example, 4 orders can be placed every 30 minutes. Further orders are dynamically given an extended lead time.
Further topics:
Best practice for online order lead time at the location
Special feature Query completion time (lead time)
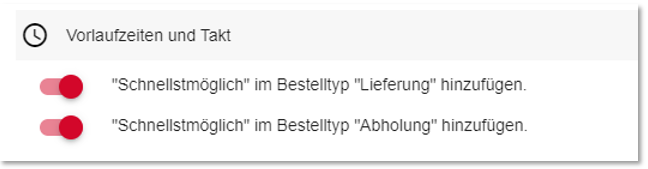
Webshop orders for the order types Delivery and Collection contain the option As soon as possiblefor the current day.
Example: Switched off (default)
The "Fastest possible" refers to the first possible time, according to your settings for lead time and clock.
The presentation in the shop is as follows:
-
07:00 (As soon as possible)
-
07:30
-
08:00
-
08:30
Example: Switched on
The "Fastest possible" is displayed before the first possible time in order to pick up orders "immediately" or have them delivered. This is particularly interesting for restaurants that do not want to wait for the first possible delivery or collection time.
The presentation in the shop is as follows:
-
As soon as possible
-
07:00
-
07:30
-
08:00
-
08:30
Tact...
The cycle can be set between 15, 30 and 60 minutes per order type. In conjunction with the lead time, this results in the earliest possible pickup or delivery time, as well as the choice should a customer place an order "for later".
Lead time...
The lead time per order type and location defines the minimum time between an order and a collection/delivery. The lead time can also be adjusted directly at the POS system of the location in order to be able to react quickly to peak times.
Please take into account that the lead time of the order type "delivery" is indicated including the expected delivery time.
Example...
You set the cycle time to 30 minutes and define the lead time for a pick-up to 40 minutes. If a customer orders at 12:14 p.m., the earliest possible pick-up time is 13:00 p.m. If the customer would order with the same settings at 12:22, the earliest possible pick-up time would be 13:30.
In the settings of the webshop, you can define for all order types (globally) whether users are allowed to enter comments on items or not. By default, this function is activated.

By deactivating this option, you can prevent fraud if necessary, e.g. if users can no longer write "Please with double salami" in the comments for a pizza.


By activating item availability, you can offer items with limited quantities in the webshop so that they are only offered as long as they are in stock. Afterwards, the items are displayed in such a waythat one remains informed about the general offer, but the item can no longer be placed in the shopping basket. To control availability, you can use the item blocking list and the availability manager on the POS system. This switch refers to both the item blocking list and the availability manager. If you would like to use one or both of these functions in the shop, please activate the button Use item availability.

Item blacklist:
Using the item blocking list on the POS system of the site, you can block items immediately. This information is transmitted to the web shop every 30-60 seconds, so that from then on blocked items can no longer be ordered.
Availability Manager...
Using the availability manager on the POS system, you can set how many "portions" of an item are in stock. This value is transmitted to the webshop every 30-60 seconds. In the settings of the webshop you can define a threshold value above which your products may no longer be ordered in the webshop. We provide the threshold function so that you can take into account the time offset caused by the timers when transporting the information and the natural usage behaviour. An item in the webshop's shopping cart could already be sold out at the location by the time you check out. You should therefore not set the threshold value for the web shop too low, if you want to avoid disappointment for the user in the web shop.
To learn more about controlling limited availability at the POS in general, see the section Targeted control of items- clever instead of always available.
Restrictions of the extended time control...
Use the extended time control in the article master to make items available only on certain days of the week, public holidays and/or at desired times. Further details can be found under Timed items and Advanced timing.
-
Please note: Time control and extended time control do not apply to item components.
-
If you use time control or extended time control, these settings always take priority. Example: If an item is not available according to the extended time control and the setting in the portal has been selected so that the item is hidden, the article remains invisible. This also applies if the item is also on the item blacklist or its availability falls below the threshold value.
-
Time control and extended time control are immediately active in the shop and on the SOT as soon as they have been set up in the item master and the item data has been synchronised.
-
The "Use item availability and blacklist" switch does not affect the time control.
Time-controlled item display:
-
You can specify when certain items are visible in the webshop. An example would be a lunch menu that is only displayed during lunchtime.
Customer orders for other times:
-
Customers can place orders for future dates. This means that you can order items that should not be displayed at the desired delivery or collection time. For example, a customer could pre-order a lunch menu for the evening. In such cases, you should make it clear in the item text that it may not be possible to fulfil orders outside the scheduled times.
Special case - different opening hours:
-
If you as a webshop operator activate items for lunchtime, but your shop only opens in the evening on certain days, the items remain visible even if they are not available at this time. The system checks the availability of items at the time of ordering, not at the time of collection or delivery.
-
Therefore, make sure that the item display and availability in the webshop match the actual opening hours and the desired sales period. It is your responsibility to configure the items correctly, as the system does not automatically adjust to the opening hours.
Further topics: Opening hours and public holidays
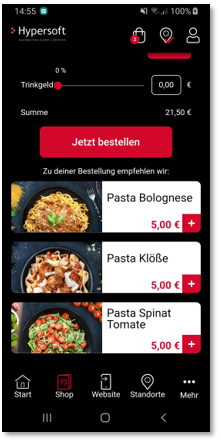
The configuration of product recommendations is crucial for their successful upselling. Please refer to the section Recommendations and up selling.
The webshop can automatically add a deposit for the out-of-house order types collection and delivery. You can use the convenient deposit system of the item master and set the deposit for the respective price level. In the settings of the webshop, you can specify whether the deposit amount is already added to the item price in the item list, or whether it should only be added to the shopping basket when an item is added.

The shop does not process any additional deposit, such as automatic booking of crate deposits for a certain number of bottle deposits.
If you select the setting Deposit only in the shopping cart add to the selling price, then all items with deposit will be displayed with the note "plus deposit" at the selling price. In the shopping cart, for example, a Cola 0.33l with a sales price of 1.50 Euro, with 1.75 Euro "incl. 0.25 Euro deposit" is indicated. Deposit is displayed in the shopping cart as a single item.
Example...
You use a price level for the order category Delivery that takes the out-of-home deposit into account and have chosen the setting that the deposit is already displayed in the item list. Your item apple spritzer 0,33l with a selling price of 2,50 Euro would therefore be displayed in the item list with 2,75 Euro (plus 0,25 Euro deposit). Alternatively, the 0.25 euros would first be added to the sales price in the shopping basket.
If the customer receives a special discount based on his customer status or a web voucher, the deposit in the check-out is not eligible for discount.
Webshop name list instead of daily transaction numbers
Just like the name list (superhero function) at the POS, you can also use the name list for webshop orders instead of a daily transaction number for orders.
The name list at the POS and the name list in the portal (described here) are two separate lists that can be applied in the respective system. Of course, you can enter the entries the same or differently. If your overall configuration actually has both lists in use or if there are other reasons for differentiation, the names of the respective lists should definitely be different in order to avoid confusion. If, on the other hand, you would like to use identical names, you can also give the webshop list an individual prefix, such as Shop_Silversurfer.
If an operation has a superhero name from both the POS and the portal and only one can be displayed, the name from the portal takes precedence.
To do this, please select the desired location from the list for which you would like to define a webshop name list. The list view shows you at a glance how many names you have maintained for which location and whether the name list has been activated for that location.

After selecting the desired location, the following dialogue opens. For control purposes, the name as well as the customer number of your location is displayed above:

You can create your name list by entering a name and clicking on the button Add name. The button Use name list for this location activates (immediately) the use of the name list, instead of the daily transaction number.
Before activating the list of names, please take into account that this list must at least correspond to the total number of your maximum open operations, otherwise the names may be repeated for the number of ready-to-pick-up persons present.
Copy list of names for locations...
If you want to use identical names in your locations, you can copy them from another location. To do this, please select the desired location from which you would like to copy the list of names and then click on the Copy button:

You can remove individual entries from the list using the delete symbol behind each entry.
Your users will receive corresponding presentations and information as shown below.
Further topics: eMail settings for eSolutions
Back to the overarching topic: Shop in the portal