In-House Order Onboarding

Check-list
You must follow these steps to accept "In House" orders.
- Licensed webshop or YourAPP.
- Completely set up webshop, incl. payment
- Activation of the order type In house.
- Changeover to multi-object operations
- Definition of the required client data.
- Activation and settings of the CloudBOX Live Connector Settings
- Printing of table displays etc.
Provisioning time...
Once you have given us the information from the check-list and we have received your written order, we can provide you with the programme within 48 hours. It is best to use the time on your site to maintain your item data and shop configuration (if not yet completed).
Settings on the CloudBOX Live Connector
Please use the information for the In-House Ordering settings as described in the CloudBOX Live Connector Settings and CloudBOX Live Connector sections.
Settings of the Online Order Connector
The Online Order Connector transmits the data between CloudBOX and the CloudEngine of your location. By default, the Online Order Connector is set to automatically route in-house orders to the POS system:

Receipt order delay in seconds...
The important option Receipt order delay in seconds allows you to wait for self-service orders from several machines so that they can be processed together if possible. See this: Important waiting time for joint orders
Control receipt order and invoice printing with Smart Swap...
In addition, there is now another option for controlling receipt orders or invoice printouts and profit centre assignments via the so-called Smart Swap. This can be set individually for each sub-channel and ensures that the desired subsystem is addressed when table numbers are used via the eSolutions. See Use Smart Swap with Online Order.
Transaction closure for In-House Order...
For transactions that are completed without the intervention of an operator, anoperator must be entered under Operator for Inhouse Order. These trades are then posted and closed under this operator. In this case, the tip is booked according to the item deposited under service costs. See also Technical basis for tip configuration.
Calling up the settings in the portal

Open the Webshop 2.0 in the area eSolutions.

The order overview shows all orders of your webshop and lets you filter them according to the order type In house so that you can view these orders separately.

Settings for In-House Ordering

To configure the order type In House, please open the settings in the submenu (top right).
Order type...

Activate the order type In house for all locations where you want to use this order type.
Landing page for in-house ordering
A related topic, elsewhere is: In-House Ordering Landing Page
If you as a brand owner also use our Android or iOS YourAPP, your users will be shown the availability of the app on the landing page when they scan the code:

You can optionally display a welcome image and activate a heading:

Button names for in-house ordering
You can name the Order, Payment and Service Call buttons individually.

The service call button is only displayed to your users if you have activated at least one service call. This means that you can also dispense with the service call as an option.
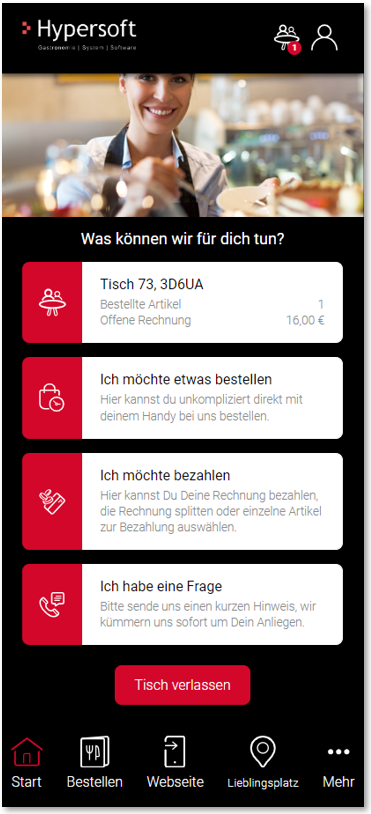
Example of a landing page with all options activated...

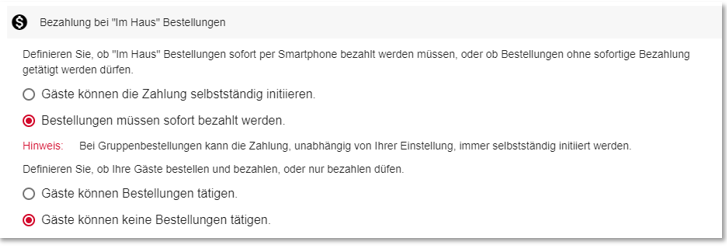
Payment options for in-house ordering
In-house ordering can be used in two different ways:
|
Guests can initiate the payment independently |
Users can order, reorder and independently trigger payment or partial payment. This variant is selected in the standard. |
|
In order to be able to send an order, it must be paid digitally by the user immediately (not possible with activated group orders). |
|
| Guests cannot pay |
If you want to use In-House Ordering only for orders and not for payments, please deactivate all payment methods. The label "I would like to pay" is hereby hidden. |
In-House Ordering without self-service payment:

No in-house ordering, only self-service payment:
If you only want a check-out payment, you can activate the option Guests cannot place an order, which deactivates ordering and reordering.
This option cannot be used in conjunction with the group order.
Optional in-house order payment at the POS
You can optionally activate the payment at checkout function. This option is intended for guests who do not want to pay digitally on their smartphone, but rather in the traditional way with a service employee at the checkout.

This option is not available for orders with mandatory payment(PayNow Zone).
Workflow for the user...
If the switch is activated, the workflow for the user is extended accordingly. If the user presses the I want to pay button on the In-House Order landing page, a dialogue appears asking whether they want to pay digitally on their mobile phone or at the checkout with an operator.

If the Payment at checkout option is selected, a Service call in in-house ordering is made in background (this must be set up accordingly):

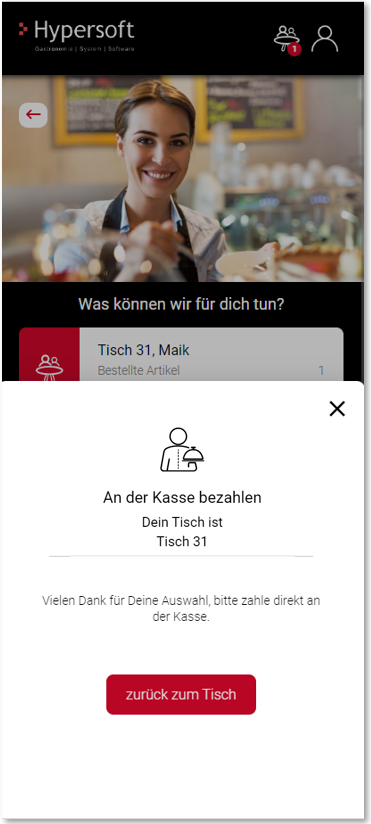
At the POS, the service employee is informed of the intended payment at the checkout by the service call:
Further topics: Enable SOT payment at POS system
Position check for in-house ordering
In-house orders are typically only used within a restaurant. However, in rare cases, fraud can occur if guests memorise a table code or share it via social networks.
To prevent orders from outside your restaurant, you can activate the position check and set the desired radius in metres around your restaurant in which orders by users are allowed. Only users or their end devices who are within this radius can then use in-house ordering. The radius can be set to 100 metres, 250 metres, and 500 metres radius. The centre point is your location position in the portal settings.

For locations without stored geodata, no position check is carried out and users can also place orders outside the defined radius.
Please note that for this function, the geodata of your locations must be stored in the location settings and you must have activated this Google Maps option.
Please note that geodata can also be manipulated by users (with technical skills to do so).
If a user has not activated the location determination of his terminal device, or if he is outside the permissible radius, this will be indicated by a corresponding message after scanning a table code:


The position check also acts as a Position check for group orders....
Service call in in-house ordering
Via the service call, your users can independently trigger a message at your cash register and select from predefined topics.
You have up to six possible service call options:
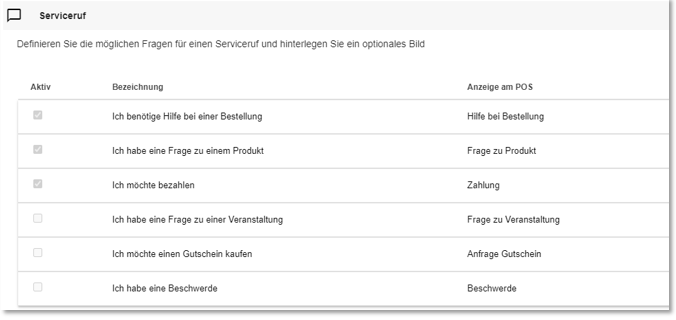
By selecting a line, you can define the details of the service call. The pre-filled designations are only a possible use and can be adapted at any time.

| Element / Switch | Function / Description |
|---|---|
| Use service call | Activates or deactivates this service call for your users. |
| Designation | Displayed name of the service call in the user overview |
| Description | The description is displayed if no picture has been stored for a service call. |
| Image | Illustrate the respective service call with a meaningful picture. |
| Display at POS | This text is displayed at your cash register after a service call has been triggered and is not visible to users. |
| URL |
Instead of triggering a service call at the checkout, you can also open an optional URL, which opens in a browser window. |
Possible uses: In addition to the classic enquiries, you can also use the service call to advertise certain articles(your merchandise shop), promotions(your ticket shop) or vouchers(your web voucher shop): when making the relevant selection, the user can, for example, be directed directly to your web voucher shop.


Ensure that communication (prints and controlling device) has also been set up in the CloudBOX Live Connectors for their service call to start.
Further topics: I have a question via service call....
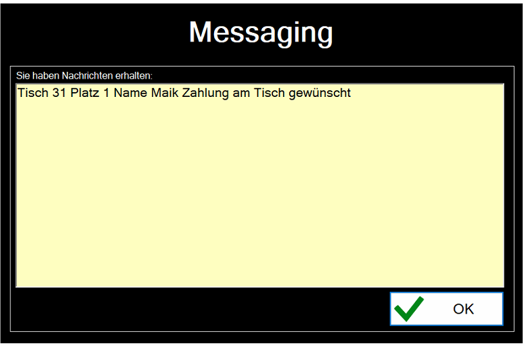
The service call at the POS...
The service call is made via the Hypersoft messaging system. Example of a message:

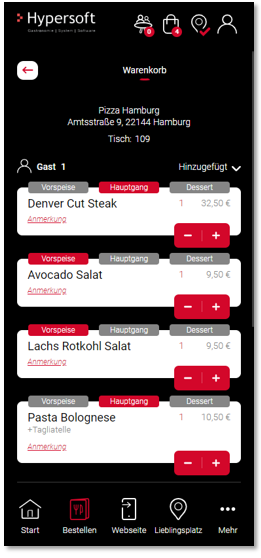
In-House Ordering Menu Courses
With the menu option for in-house ordering, your guests can independently specify which items are desired for which menu course when ordering. For example, your users can select the small salad plate, which is typically intended as a starter, as the main course.
So that your guests can benefit from automatic assignment and only have to adjust menu courses when necessary, use the Menu course default option. Otherwise, you cannot use this key feature for in-house ordering).
In the item master, you first define a standard menu for your articles, which can be adjusted by the user in the shop at any time when ordering.

Items that do not have a menu option in the item master (e.g. drinks) are displayed in the shopping basket without a menu option.
You can also choose menu names for your users in In-House Ordering that differ from your internal names at the checkout:

The Hypersoft system works with more than three menu courses. For in-house ordering and the fact that it is a self-service system, we have also limited the menu courses to three. You can, of course, use fewer than three (or do without them altogether).
Procedure for activating and setting up menu courses in the shop...
-
If you are working with a central unit, set central menu items.
-
Activation of the menu courses in the MCP.
-
Definition of sorting numbers 1-3 (menu courses in the MCP with sorting number 4-20 are not used by the shop).
-
Assignment of the menu course default in the item master (central)
-
Portal alignment via synchronisation (or automatically to the TTA)
-
Activation of the menu paths in the portal
-
Optional: Adaptation of the menu course designations for the shop
Customer data for in-house order
You can define which customer data you want to request from your users for in-house orders. With this order type, it is also possible to dispense with entering customer data altogether in order to speed up the ordering and payment process and possibly reduce hurdles when using your system. In the standard system, the recording of all customer data is deactivated for in-house ordering; if you want to record customer data, you can define it as you wish:

The customer data will only be requested within the payment process. Users are free to register, log in or place an order as a guest with the required customer data.
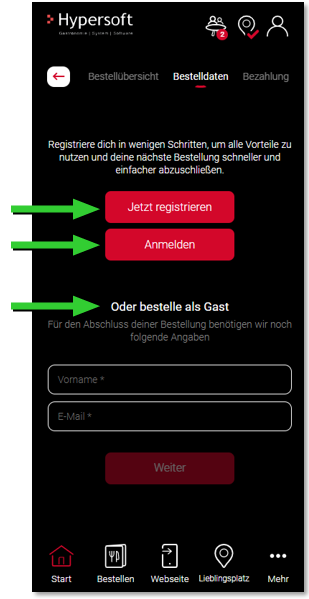
With YourAPP, users can remain permanently logged in.
Table list and QR codes for in-house ordering
Table list...
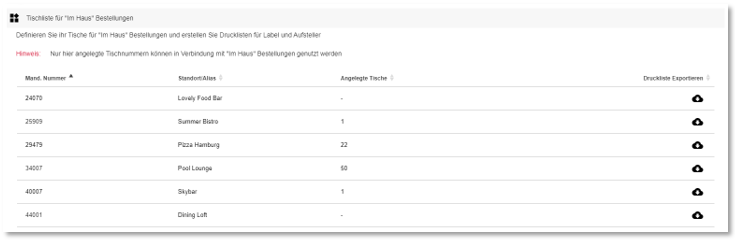
To accept In House orders, you must first create a table list at which you would like to offer this order type.
Only tables previously created in the portal can use the In house order function and forward orders to the POS system.

The table shows you your locations with the total number of tables set up in each case.
Using the download icon, you can export the table list and prepare it for printing table displays. (See Export table list)
Create tables...

After selecting a location, you will get a view of all the tables created for that location, as well as their QR and table codes.

You can create new tables individually or with a from-to function. To do this, enter the first and last digit in each case; all tables in between will be created automatically.
If desired, assign an optional prefix, which can serve to provide a better overview.

Example: Your table 20 is in the area Wintergarten, so you could give table number 20 a prefix W or Wintergarten. The table name would subsequently be W20 or Wintergarten20. The POS only processes table number 20.
Note: Table numbers can only be created once per location.

When table numbers are created, the QR codes and table codes are generated automatically.
If you have already created table numbers in Reservation 2.0, they will be displayed automatically and are already completed with a QR and table code.
Delete table numbers...

You can remove table numbers that have already been created by clicking on the delete symbol.
Please note that the QR and table codes of deleted tables are also no longer valid and existing stands must therefore be removed.
Export the table list per location to create table displays for QR and/or table codes. The table list can also be exported after selecting a location:
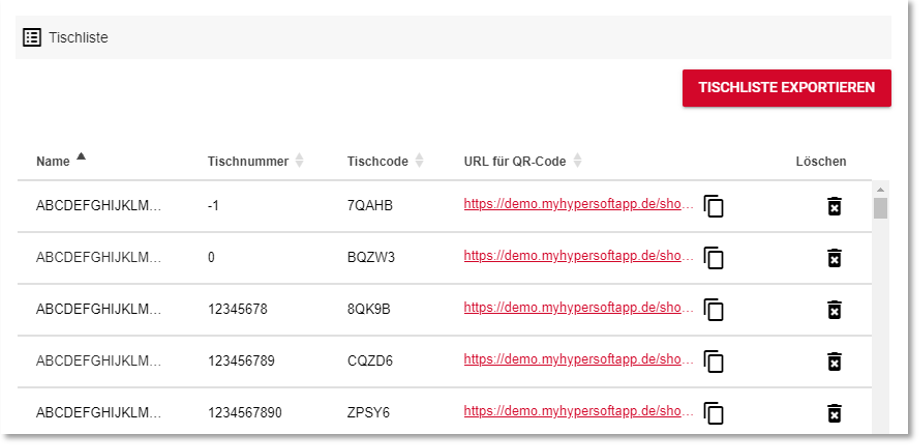
Individual table URLs can be copied to the clipboard using the copy symbol.
You must expect that guests (users) may not be able to scan the QR codes. Therefore, you should also print out the 5-digit table codes on the stand-up displays so that these short codes can be entered manually as a substitute.
The export creates an *.xlsx file, which you can open with Excel or comparable applications.

The exported table gives all the information of the tables created.
We recommend the following information for a print:
- Table number (to identify the correct setter)
- URL as QR code
- Table code (should scanning of the QR code not be possible)
From the URLs contained in the exported table list, you can generate the QR codes with any tool, which you can print on your table displays. Likewise, you can tell printers the URLs so that they are converted into QR codes.
In the following example, you can see a URL that can also be read as a QR code and thus leads directly to the URL.
URL: https://demo.myhypersoftapp.de/shop?type=QRcodescanner&QRcode=QSPRZ
QR code:

Payment for in-house ordering
You configure the payment for in-house ordering within the framework of the other payment standards of the webshop.
Configuration of the Online Order for In-House Ordering
In-House orders are received via the Online Order Programme. Select the channel Hypersoft and the sub-channel Webshop 2.0. An In-House transaction is automatically handled so that VAT is applied per item based on the In-House settings (more details...).

By default, select the trigger options In-House: trigger immediately, otherwise you will have to confirm each order manually before it is processed further by the POS system. An immediate release causes the receipt order and invoice printing to be triggered immediately after receipt of the order.
Back to the overarching topic: eSolutions In-House Order